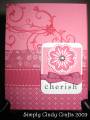
I found This Card to case and it was perfect for both.
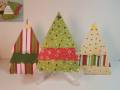
The directions for the back two trees are,
top layer is 3 1/2 square. I added the dp to cover area.I marked 1 3/4 inch on the top and cut angle. Then used border punch
second layer is 4 x 4 1/2, I added 1 1/2 inch strip dp to bottom marked the top at 2 inches and cut angle and then used border punch
bottom layer is 4 1/4 x 5 1/2, I added 1 1/2 inch strip dp on the bottom, marked the top at 2 1/8 inches and cut angle and then used border punch.
I layered together punched hole in top and added brad.
The front one is designer cardstock. I cut the pieces, marked the center tops , cut the angles and punched the bottoms of all layers. I then added the sentiments on white cs .
I hope this is clear.
Thanks for looking
Date: Tuesday, October 27, 2009 GMT Views: 804
Favorited:11
Registered: March 17, 2006 Location: Heaven - Buried under a mountain of paper scraps and stamps! Posts: 2069
Tue, Oct 27, 2009 @ 7:56 AM
Love this idea!! TFS
------------------------------ "Promise me you'll always remember: You're braver than you believe, stronger than you seem, & smarter than you think."-- Winnie the Pooh MY BLOG in progress
Registered: April 18, 2009 Location: Boston suburbs, MA Posts: 14060
Tue, Oct 27, 2009 @ 8:37 AM
These are ADORABLE!!! What a lovely grove of Christmas trees you've made. *Great* star brads and eyelets as tree toppers. These are totally fun. Super job with these!!!!
------------------------------ ~ Emily ~ My BLOG
My kids are on SCS: ponyluvingirl (age 14) and Legoboy (age 10)
I'm a Punchkateer! ~ I design for DeNami Design Rubber Stamps