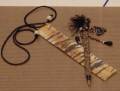
A plain Bic pen covered with O'So Sticky Tape, rolled in a mixture of brown, black and gold micro beads and embellished. Case made of fabric coated with tape and clear micro beads
Date: Saturday, June 26, 2004 GMT Views: 2335
Favorited:14
Registered: October 22, 2003 Location: South Central Texas Posts: 30074
Sun, Jun 27, 2004 @ 7:43 AM
GORGEOUS! We're so happy to have you here, Queenpennywise. You already have quite the SCS following! LOVE your beads, and send all my customers to you!
------------------------------ Jenn Balcer My Blog
Registered: June 26, 2004 Location: North Bend, WA Posts: 205
Fri, Oct 15, 2004 @ 7:30 AM
Yep! Here ya go!! This was a project that was done at an African themed Retreat last Spring - my dear friend Marjie Brandeen gets the credit for the directions and the outcome of this project!!
THE PEN
Toss the lid!
1. Design the sticker paper however you wish with stamps and inks of choice. If you are going straight for the beads (no stamped sticker), you can skip to step #4.
2. Peel back just ONE INCH of the liner from the sticker paper and position at the top of the pen where the black topper meets the white of the pen. Position as straight as you can, along edge aligning with length of the pen, letting the top 1" liner-peeled area grab onto the pen, then peel away the remaining liner. Once the sticker paper edge is positioned along the length of the pen, slowly roll the pen on a flat surface to adhere the full piece of sticker paper to the pen.
3. Look for the seam and work the tape toward the seam with your fingers to be sure you have total coverage of tape and any pockets of air are worked out.
4. Open the container of clear beads if using sticker paper, colored if just beading and have it ready for dipping into!
5. Peel back just ONE INCH of the liner from the O'So Sticky 4-7/8" strip and position at the top of the pen just as you did in step 1, leaving the red liner in place as you position onto the pen. Once in place, remove the red liner but DO NOT TOUCH THE STICKY with your hands; instead, use the liner to hold the pen.
6. Dip one end of the pen into the beads, roll it, then pull it out and smooth the beads down using the LINER, not your fingers. Once smoothed into place, you can now touch the beaded area.
7. Hold the pen along the smoothed, beaded area and dip the remainber of the sticky pen into the beads, following the process in step 4.
8. Mount a large bead to the top of the pen with a strong-holding jewelry glue or E-6000. Allow to set up.
PEN EMBELLISHMENTS
The sky is the limit on what you can create to embellish your pen! Get crazy with wire and beads or try this neat "arrow" shaped embellishment using wire, O'So Sticky Tape, beads and embossing powder!
To make the arrow:
1. Cut a small arrow shape out of card stock
2. Create an angular coil at the end of the wire, small enough to begin at the center of your arrow. Using the arrow as your pattern, constantly checking the size, create the wire design and do not let the wire extend beyond the outer rim of the arrow at any given point, until you come to the end.
3. At the end, the wire will extend upward and off the top of the arrow. Cut a 7" tail now.
THE CASE
This case requires a strip of O'So Sticky Tape that is 17" in length. If you have a MEGA Roll, you can make LOTS of pens and pen cases ~ A WONDERFUL project to get started on for Christmas gifts next year! Don't forget the beads!
If you DON'T have the mega roll - you can still make a pen case by piecing together tape sheets that are cut to 1-1/4" width.
Step 1) First you cut the O'So Sticky tape 17 inches long by 1 1/4 inches wide.
Step 2) Peel away the paper liner 2 inches at a time and position to the right side of the fabric. You place, peel down liner, place, peel down liner.... until the tape is in place.
Step 3) Rub the tape with your fingers to release any air bubbles and to achieve good contact with the fabric. You may use a brayer, if you like. Cut away excess fabric to EXACT size of tape. Cut away wispies.
Step 4) Have the clear micro-beads container open and ready.
Step 5) Peel away the red liner only two inches, bead the exposed tape. Lift slightly and let the liner fall back into place so you can finger press the beads into place, seating them well onto the tape. You can cut the red liner with it gets long and in the way.
Step 6) Peel the red liner down another three inches and repeat Step 5.
Step 7) Repeat Step 6 until the strip is completely covered with beads.
Step Use one piece of red liner like a puppet mouth and smooth it along the strip of beaded fabric a few times.
Teachers Note: If you need further instruction on puppet mouthing, ask Marjie!! This is her way of telling you to press the beads into the tape without actually touching the beads with your naked fingers! LOL
Step 9) Lay the strip of fabric wrong side up(beads down). Measure 4 inches from one end and fold over, creasing with your fingers. Open the fabric and make a line with your fancy new pen where the fold is(if your pen is going to be a gift to someone else, don't worry, they'll never know!)
Step 10) Place 1/8 inch wide O'So Sticky tape along the fold line mark. Place 1/8th inch tape along the remaining 4 inch length on both sides of the fabric strip. No need for tape on the end. (You are just making a pocket for the pen.)
Step 11) Remove red liners from 1/8 inch tape strips and fold 4 inch fabric strip section to meet perfectly with the rest of the strip. Press into place with fingers.
Note from Marjie: The length of the pen cases I made is 7 1/2 inches. I allowed for the feathers to have some protection. You may not have used feathers and may decide this length is too long for your pen. You can trim the excess BUT READ STEP 12 FIRST! Trim with scissors, cutting slowly to dodge the microbeads. (You can clean your scissors with rubbing alcohol later.)
Step 12) The other end of the strip is now either folded over 1/4 inch OR fold it at a 45 degree angle. Make the fold and finger press a crease. Open it up and mark the fold line with a pen. Place 1/8th inch tape along this fold line.
Step 13) Remove the red liner from tape strip and fold over this hem. Trim off the excess 'angle' of the 45 degree type hem.
Step 14) Fold the bottom half of the pen case up creating the fold line by pressing a crease with your fingers.
Step 15) Open the strip and mark the fold line with your pen. Place 1/8 inch tape along the fold line and along the sides of the flap that will fold up. Do not put the tape on the side it will meet. You have no way to gauge where to stop. Do not remove liners yet.
Step 16) Place O'So Sticky tape from a 1" roll or from scrap, if you have it, on one side of the 1 inch square card stock piece. Fold this piece in half. Now remove the liner.
Step 17) Place the folded sticky cardstock piece in the center of the pen case strip, just above the 1/8th inch tape you have placed in the fold. This cardstock is to reinforce the bottom of the pocket so the pen does not poke through the fabric over time.
Step 1 Peel away the red lines from fold line and two sides. Fold over by first positioning the fold area, catching the folded cardstock piece, the having the sides come down to meet the edges of the pen case.
Step 19) Press all tape areas once more to secure the hold.
Step 20) Insert your pen into your pen case!
Notes:
The pen case is complete at this point, or you may want to embellish it with more goodies.
The sample was made into a necklace for the fancy pen holder. If you decide to do this, you must be sure that the rat-tail cording (or whatever you used) is going to slip over the head with ease. (30 inches is good) You could also purchase jewelry findings to make a clasp for a necklace.
Jump rings can be inserted into the beaded fabric strip by first creating a hole. A Japanese screw punch works very well but so does an awl- Just be very careful not to make the hold too large ( nor a hole in your body!) You only need a teeny, tiny hold for the jump ring, even the big 3/8 inch diameter jump rings.
Slip the rat-tail cord through the jump ring first, add a bead, then make a knot on each side.
Registered: June 26, 2004 Location: North Bend, WA Posts: 205
Fri, Oct 15, 2004 @ 7:35 AM
Oh! And when your pen runs out of ink -- here is how to replace the ink cartridge!! (It's actually a polymer clay tutorial - but she shows you how to remove the ink and put it back!)


 Use one piece of red liner like a puppet mouth and smooth it along the strip of beaded fabric a few times.