Hmmm, I know what you are thinking...what am I doing making Christmas cards when Easter is this weekend. It's ok to get a jump start on them, right?
The Ways to Use it Challenge for today was to create something with "labels". I really didn't want to dig around in my dh's tool box for the label maker. Believe me, it's not as neat as my stamp room. Anyways, so I decided to use "mailing labels" for my card.
Here is my story:
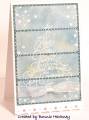
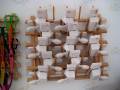
I think I learned a lesson when making this card. The base of the card is actually 5 1/2 x 7. I will explain towards the end of the story. Most label sheets that you get from the office supply stores have 4 labels each on a sheet. First step: I started out with 4 labels on the sheet, tore apart. I sponged with faded jeans distress ink from Tim Holz with a sponge all over the labels (do this while the label is still on the sheet it came on). I added a touch of light yellow to the sponged areas as well. Once, the areas were sponged, I took the versamark ink and stamped the Christmas tree onto the labels as is. I also randomly stamped little snowflakes around with versamark ink too. (hmm, now that I look at it, they look more like tiny flowers, I guess that's ok) Must of been that interruption this morning. Anyhow. I heat embossed the images using white emboss powder. Heat set. Second step: I carefully took each label off the sheet that they came on and transferred them onto not quite navy c/s and making sure they were evenly layed out. I added the famous white dots by Faith (Markie's Mom) to the open areas of the card. Added ribbon. The next step is where I had the problem with finding the c/s in this length card, because once I added the backing to it for the base, no c/s is long enough...I tried all ways to figure this out. I had to make my own base. I used the MS embossing star border punch across the page on white c/s. Adhered the label front onto the white c/s just a tab higher than the border punch. I left 1/4 inch on the top and used the score pal. I added a strip of tacky tape and to add another piece of white c/s leveling at the top. I will add a piece of dp along the top part inside the card to cover the seams . This was really a fun and unique way to create using labels. Try it! Thanks for fun challenge Julia. Have a great day and thanks for viewing my card.
What do you think?
Bonnie
Date: Thursday, April 9, 2009 GMT Views: 3548
Favorited:9
Registered: August 21, 2007 Location: Wayland MA Posts: 105272
Thu, Apr 09, 2009 @ 11:10 AM
I really like it! I think a jump start on ANY holiday is a good idea!
------------------------------ Anne HarmonFS154, QFTD58, PROUD FAN CLUB MEMBER (photo of our Great Granddaughter Elise, just 6 months old) and me, even older.
Splitcoast Dirty Dozen Alumni SCS Gallery Moderator Splitcoast Challenge Hostess Teapot Tuesday TEAm
Registered: July 27, 2007 Location: Dublin, Ireland Posts: 132004
Thu, Apr 09, 2009 @ 11:35 AM
I can identify with your problems with the size of the card base - when I used address labels recently, I ended up trimming some of them to fit the card...And you got yours lined up way more neatly than I did, too.