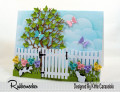
Also, today, I'm sharing a single stamp called "Fence" by Clear Dollar Stamps, that will be released on April 1st. When I saw this, I just had to have it! I mean the countless uses for this fence is just plain mind-boggling! For this sample card, I wanted to use the owl in the Clear Dollar Stamps "What a Hoot" stamp set and create a little scene. What a joy to draw, color, sketch, stamp and create with this little fence stamp! I know that it will get much mileage out of my stamp room!
INSTRUCTIONS:
A 5"x 10" card base was cut from Paper Trey White Cardstock and set aside. A square card front was cut to 4-5/8" wide x 4-5/8" high out of Daisy D's "Brighten My Day" Pink Designer Paper and set aside.
The main stamped image was created in these steps; Using the Nestabilities Labels One largest die and a pencil, I traced around the outer edge of the die onto Paper Trey White Cardstock -- this showed me the area that I had to work with for the stamped scene that I was creating. I first stamped the white picket fence in place using Memento Tuxedo Black Ink. I added some dimension and shadow to the pickets using some Copic Sketch Cool Gray Markers. Then using Primsacolor Pencils first, I hand sketched the tree to the right of the fence, penciling in the branches and some of the tree wood grain. I added texture and a little depth to the tree branches and trunk using a variation of Prismacolor Pencils & Copic Sketch Marker blending. Using Stampin' Up! Pretty in Pink and Regal Rose Inks I stamped the flowers in the trees, using the small flowers in the "What a Hoot" stamp set, randomly around the sketched tree branches. I then added the stamped leaves, using Stampin' Up! Sage Shadow Ink. Using Memento Tuxedo Black Ink, I stamped the little owl twice -- once onto the tree branch, and then again on a separate piece of Paper Trey White Cardstock. I colored both owls identically using Copic Sketch Markers and blending. I cut out the other owl on the separate piece of paper to use for popping up later. Using Stampin' Up! Real Red and Regal Rose Inks, I stamped a rose vine down the side of the white picket fence, and added a hand-drawn vine with tendrils using a Prismacolor Pencil. I added leaves the vine using Stampin' Up! Sage Shadow Ink. The grass was colored using various shades of Copic Sketch Markers in greens. I added the little brown bird on the left side of the picket fence, using Memento Rich Cocoa Ink and the little bird from the "Designer Garden" stamp set. The sentiment was stamped overtop the sky, flowers and leaves, using Memento Tuxedo Black Ink.
To add more detail to the scene, I sponged "clouds" above the picket fence using Stampin' Up! Bashful Blue Ink and a Tsukineko Sponge Dauber with a homemade Cloud Template. Using Copic Sketch Markers in browns, I added more detail to the tree trunk and limbs. The cut out little owl was then popped up overtop the other owl on the tree branch using All Night Media Mini Pop Dots.
Since I used the largest Nestabilities Labels One Die, I wanted a mat for the stampes scene in the same shape. So, taking the largest die, I traced around it's outer edge onto another piece of Paper Trey White Cardstock, and cut it out by hand. I glued the stamped scene to the white matching shaped mat, and then glued those to the pink card front square. Using my Janome Hello Kitty Sewing Machine, I machine stitched first with a larger stitch around the 4 sides of the pink card front mat, and then around the stamped die cut mat.
To embellish, I added a strip of Paper Trey Satin Polka Dotted Ribbon to the lower right diagonal corner of the card, securing to the back of the card. I tied a matching bow knot to the center of the ribbon strip, and topped it off with a Jolee's By You Button Flower, securing it to the bow knot with pink thread. The card front was then glued to the 5" wide x 10" high card base, and then, using the Stampin' Up! Mat Pack and a Paper Piercing Tool, I paper pierced around the 4 sides of the white card front edge.
Date: Tuesday, March 31, 2009 GMT Views: 698
Favorited:9
Registered: March 5, 2008 Location: Rhode Island Posts: 8635
Tue, Mar 31, 2009 @ 7:48 AM
What an awesome card, what an awesome design, I just love this card it is gorgeous, must put this one in my fav . and try this out. Thanks for sharing so much detail.
------------------------------ Daughter of a King My Blog
Rebekka
Registered: March 11, 2008 Location: Sacramento, California Posts: 39766
Tue, Mar 31, 2009 @ 7:53 AM
Wowzers, what a very pretty scene here. I love that fence. So many possibilities with it. You did so much here and it is all mighty fine! Love your sneak peek card! Can't wait till April 1st! TFS :0)
------------------------------ Cathy B aka: Mutnik ....or is it Nutmeg?! I get so confused!
Smile.......people will wonder what you are up to! :0) Proud Fan Club Member 2010 DT forRubbernecker Stamps My Gallery


 . and try this out. Thanks for sharing so much detail.


