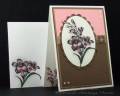
Here‘s the card from Julie’s gallery that I used for my inspiration. I kept her pink, brown and white colors, also used a flower but not the same image, kept the use of Nestabilites, kept the ribbon but used a buckle instead of a knot and changed the embellishments. I did stamp on the brown panel but it just faded away, I guess basic brown would have been a better choice on my part!
-The out of the box image using Nestabilites is done using a technique similar (I omitted a step or two) to JulieÂ’s which you can find here if you need photos and IÂ’ll explain how I achieved the technique for those that donÂ’t wish to leave SCS for directions:
I lie the Nestabilities die cut side up over the image and mark with a pencil on each side of the image that will be out of the box (youÂ’re marking on the inside of the die cut) and also make a couple small marks on the top or bottom for easy die cut line up. I cut the image slightly further than the mark to allow for the thickness of the metal. Flip the die over and slide it under the portion which was just cut and secure with repositional tape if needed (I use the blue painters tape). Run through the machine to cut then emboss and remove the die cut, erase the pencil marks and itÂ’s ready to color. I color after cutting just in case I make a mistake.
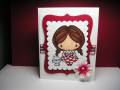
-For my partial images on the inside and envelope I inked up the rubber with a Marvy marker, the baby oil will not smear the marker ink.
-Prismacolor pencils, baby oil and paper stumps were used for coloring using the Gamsol technique found in the resources forum of SCS.