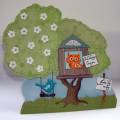
This lil' tree was created to house the Birdy & Owl from the brand new Little Paper Shop set Flyin' By. Well, I guess the trees not so little; it measures about 6.5x7 inches closed.
I wanted to give this adorable Birdy (& his Owl buddy) a worthy home and I had a blast playing about with the punny sentiments too...
The sign says "Flyin' by to say..." and with a little waxy thread, I turned the birdy's branch into a swing.
Inside it says "Owl always love you"
Birdy & his Owl Buddy...
(or is Owl his Paramour...given the sentiment..."Owl always love you"? heeheehee!) Well, I guess that'll remain their little secret! Regardless, both cute critters are stamped with craft inks: Owl: SU Apricot Appeal & Only Orange. Birdy: Tempting Turquoise & Chocolate chip for his branch swing.
Copics over Embossing:
The critters are embossed with clear embossing powder & the white details are done with an Inkssentials pigment pen. Then I added colours over the embossing with Copic markers to shade. (Fun to do! I can't wait to try variations of Copics over embossing & share 'em with ya.)
It swings open to reveal a tree house where owl lives.
Here's the details of how I made the tree, the cloud, & the grass (For those who prefer not to look at blogs):
TREE SHAPE:
Step 1) Print the tree template.
Step 2) Cut the tree tops
(& shade with a marker if you like)
Step 3) Colour & cut the tree trunk
(I've used a combo of CTMH, SU, & Copic markers)
You may want to extend the branches depending on how you wanna use your tree.
TREE EMBELLISHMENT:
The Stitching: I layered the SU Bali Breeze Designer Series Paper onto certain celery cardstock & pierced along the edges so that it would take the stitching with embroidery thread nicely.
The Flowers... are punched with SU's Three for You flower punch, shaped & embellished wiht heart-shaped gems in the center. One of them hides the large brad that the Tree top cover swings on.
CLOUD-SHAPED CARD BASE:
Step 1) Print & Cut out the cloud template
Step 2) Trace the template
(Fold a standard sheet of cardstock in half. Lay the cloud template onto it with the straight edge of the template on the folded edge of the cardstock. Trace the template in pencil.)
Step 3) Cut along the fluffy cloud edges
(leaving the fold intact)
Step 4) Sponge the cloud
(I used white craft ink (SU) and a makeup sponge)
THE GRASS:
Step 1) Tear some strips of paper/cardstock
(It's a good idea to make them wider than the cloud card base)
Step 2) Cut a fringe into the grass strips
(No need to worry about being even; it's wild grass.) ;o)
Step 3) Attach the grass & trim it.
(Layer the two pieces on the front of the card & trim from the back of it)
Paper: SU Bali Breeze Designer Series Paper (both sides), Baja Breeze, Naturals white
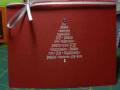
Ink: tempting turquoise (birdy) only orange & appricot appeal (owl), Not Quite Navy for sentiments
Accessories: Clear embossing powder, green embroidery thread, needle & paper piercer, Three for You punch, gems, For swing card mechanism: long brad, 2 mall circles of dp, & 2 dimensionals. Stick for sign (shaved with a potato peeler to make it flat. Crystal L
Techniques: embossing, Copics over embossing, embroidery,
Difficulty (1-Easy 5-Advanced): 3 (a little finicky but fun) :O)