Splitcoaststampers.com - the world's #1 papercrafting community
You're currently viewing Splitcoaststampers as a GUEST. We pride ourselves on being great hosts, but guests have limited access to some of our incredible artwork, our lively forums and other super cool features of the site! You can join our incredible papercrafting community at NO COST. So what are you waiting for?
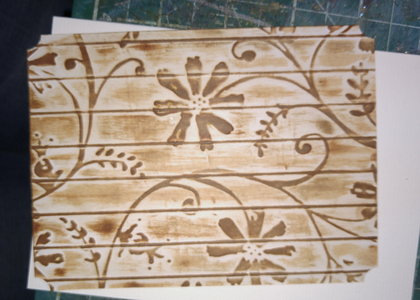
I have been saving up another Live tutorial with Gina K Designs for you guys that I think you are going to L-O-V-E!! It features a technique she calls CARVED WOOD BACKGROUND.
In the video below, she makes a couple of cards. It is fun to watch the whole thing but it is long. You can watch the first part where she does the technique and skip the card making if you don't have a lot of time to watch.
For her technique, she uses a stencil, but I used an embossing folder and it worked great too. Other than a stencil or embossing folder, you will need white cardstock,a "wood color" ink pad and possibly a blender brush. That is all! Let me warn you though, this may be highly addictive. I have been pouring through my stencils and embossing folders to see what I could use for more backgrounds haha!
I hope you have fun! I can't wait to see what you create!
I was only thinking recently about this....so happy to see it as a challenge. On my list. Thank you. Happy day
__________________ The Difference Between Try and Triumph Is Just A Little Ump Wednesday: Alpha Challenge
Thursday: Ways To Use It Challenge
Monthly: MMJ Challenge….get inky and have fun
Thanks for introducing me to this background technique, Lyn. Really is a great one. Had fun with it. Most challenging part was finding something to put on it! : )
Grinning, I have a couple of pieces ready to make up because I had been contemplating this for a TLC. The first video I found was an older one where GinaK used only embossing folders. Then I realised that Melody had described something different in her upload, so I found the one you linked. Work and housework today, but I'll get one of them made up into a card this evening or tomorrow. Thanks, Lyn.
Thanks for introducing me to this background technique, Lyn. Really is a great one. Had fun with it. Most challenging part was finding something to put on it! : )
what an awesome technique Lyn!! I made two - positive and negative - and I just love how they came out - I'll be making more with other stencils for sure!! here's my tso carved wood sunflower cards! TLC808 Start Each Day by artystamper - at Splitcoaststampers
__________________ Julia Aston Proud member of SCS Fan Club and Dirty Dozen Alumni, former DT member on Color Challenge My Blog
Here is my card...TLC808 Thinking of you by JD from PAUSA - at Splitcoaststampers
It's been quite a while since I have done a TLC challnege, so glad I looked at this one today. Thank you, Lyn for posting this one. I really enjoyed making my card using this technique.. I know I will make many more cards using it. Thank you
__________________ Jill
My gallery
My blog
QFTD165
I loved this, but had to revert to and EF, because no matter what I could not get an impression from a stencil! Someone tell me what sandwich for a Big Shot? please.
Here is mine: Snow Much Fun
I still ilked the result!
Thank you Lyn!
And, because I was experimenting when I made the background piece, I sponged both sides to see which I preferred. I remembered to take a photo of the other side before I stuck it onto the card front.
I had time to create, and made this fun card using the colors for the color challenge this week. I will be doing this again using different colors! Cool effect!
__________________ The Difference Between Try and Triumph Is Just A Little Ump Wednesday: Alpha Challenge
Thursday: Ways To Use It Challenge
Monthly: MMJ Challenge….get inky and have fun
I'm late to the game but that's not unusual for me (sigh). However, I just couldn't pass up the opportunity to try this challenge out! Oh my... it is a good one! Here's my take on it: