Splitcoaststampers.com - the world's #1 papercrafting community
You're currently viewing Splitcoaststampers as a GUEST. We pride ourselves on being great hosts, but guests have limited access to some of our incredible artwork, our lively forums and other super cool features of the site! You can join our incredible papercrafting community at NO COST. So what are you waiting for?
February already! Where does the time go!
Back in December, Linda (bubblestx4) posted this card (THIS CARD) for the WTUI challenge, and it really caught my eye. Because of my comment, she sent me photos of a couple more cards she had made using the technique. She's provided a lovely sample for today too - thanks twice over, Linda.
I thought we could try it out today.
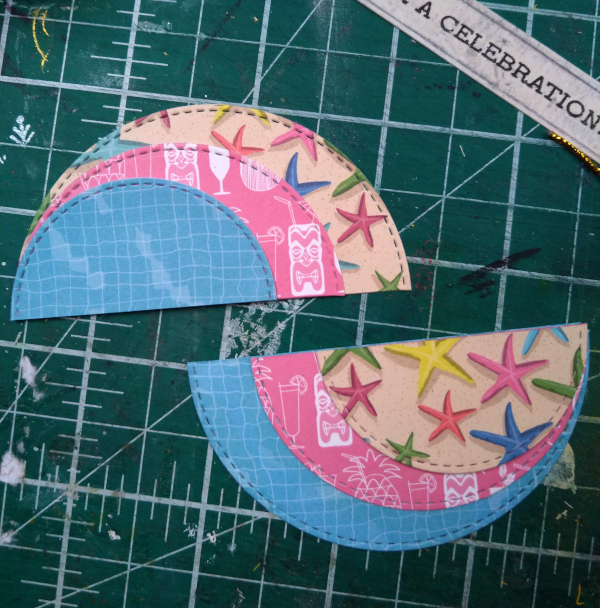
I will attach a video I found, but to be honest, I just totally winged it, by cutting three circles from DP in graduating sizes.
In fact, you will need TWO of each circle, so you will get two cards for the price of one - bonus.
My circles were 2", 2 1/2" and 3" diameter - and for the flamingo card, I used another white layer for matting.
You need two sets of circles because on one split section, A will be the smallest circle, C the largest - and on the other split section, A will the the largest and C the smallest.
Cut the circles in half, and then start by layering the semi-circles as shown. Note that one set lines up to the left, the other to the right.
Again, note that in one section, the blue grid is the smallest layer and the starfish the largest; in the other section, the starfish is the smallest and the blue grid the largest. This is why you need two sets, and end up with a two-fer.
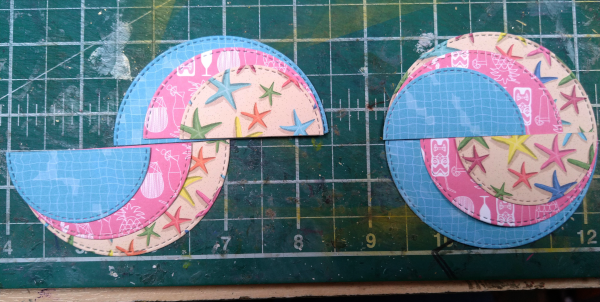
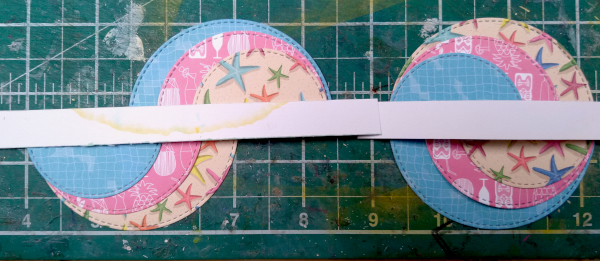
Next you can choose how you wish to line them up - in a circle (and in that case, I added another matting layer), or staggered. It doesn't look very finished - don't worry, you'll be adding a sentiment strip or other decorative strip which will cover the seamline
As shown here:
A couple of the examples Linda sent me had four circles rather than three - feel free to play around.
I found that they needed backgrounds that weren't too busy, as there is so much going on in them. Embossed backgrounds look great. Again, play around.
Remember to use the keyword TLC885 when you are uploading. It's helpful if you come back and leave a link on this thread, especially in case you made a typo and people may not find your card.
If you're not sure how to link your card on the thread here, here's how: 1. Open 2 windows or tabs: one window for your card and one for this thread. 2. In this thread, click on reply and type anything you want to show before the link. 3. Go to your card window. Highlight the address for your card. (It says www. splitcoaststampers.com/gallery/showphoto..... and so on) 4. Click EDIT. Click COPY 5. Go back to this thread. Click PASTE.
Apologies for the lack of details in my sample upload. There is a current issue in the gallery affecting some people and editing and moving uploads is a nightmare for me. After 20 minutes of repeated browser crashes I went for uploading from scratch instead of moving from the hostess staging area, which is supposed to make it easy for us. I'll fill them in when I'm on a computer. Papers were mostly Carta Bella, and the flamingo was Top Dog Dies.
I really enjoyed making some samples for today's split circles challenge as i find them so much fun to incorporate into lots of designs for both movement and a pop of color.
I’m about to turn in for the night and am sorely tempted to run to my craft room and try this…I’ve seen this design floating around various sites but had no idea how to do it, so thanks for this challenge! I’m going to make myself go to sleep now so I can get up and have a go at this before I have to move on to my “real” work.
If I remember well, Melody had a challenge with this technique for a VSN challenge, I'll need to check this, but I've already cut my circles and I'm ready to play
Sabrina- thanks for the cool technique! I went with a non-traditional Valentine's Day card- and since there are lizards sunning themselves on the sidewalk here- I used a chameleon. Added a watercolored sky and sun, and some fabric "grass". Finished with a floral fabric border. Here's you're one in a chameleon
__________________ "You can't use up creativity. The more you use the more you have." -- Maya Angelou
Sabrina, Thanks for this fun technique. I've never made the two circles together like this.
Here's my card.
__________________ My Blog- Trusting in the Lord for Everything Proverbs 3:5-6 Trust in the Lord with all your heart and lean not on your own understanding. In all your ways acknowledge Him and He will make your path straight. My Stampin' Up WebsiteMy Gallery, BRAK New Member Mentor. New Grandmother to Mia Lou. 1st Grandchild.
Here's my second card with this technique. I really liked learning the whole circle way, and liked revisiting this swirl version. Here's my card.
__________________ My Blog- Trusting in the Lord for Everything Proverbs 3:5-6 Trust in the Lord with all your heart and lean not on your own understanding. In all your ways acknowledge Him and He will make your path straight. My Stampin' Up WebsiteMy Gallery, BRAK New Member Mentor. New Grandmother to Mia Lou. 1st Grandchild.
I love this technique, however, I have to try again.....I need to "junk" it up this one turned out to plain. Split Circles
Hope you like it tho.
Hugs & Prayers
__________________ Lisa Featured Stamper #671 Love sending BRAK cards. Dirty Dozen Alumni.CC927 Favorite Virtual Stamp Night April 19 - 20 Come Join in the Fun Here
I saw this technique mentioned on Lydia's blog and had to come over for a look at how it all goes together. I can't wait to give it a try! What a fun design.
Karen