Splitcoaststampers.com - the world's #1 papercrafting community
You're currently viewing Splitcoaststampers as a GUEST. We pride ourselves on being great hosts, but guests have limited access to some of our incredible artwork, our lively forums and other super cool features of the site! You can join our incredible papercrafting community at NO COST. So what are you waiting for?
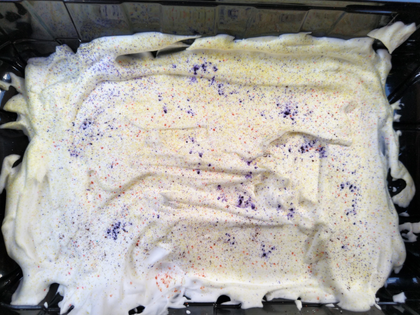
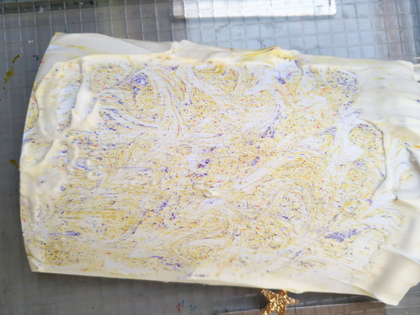
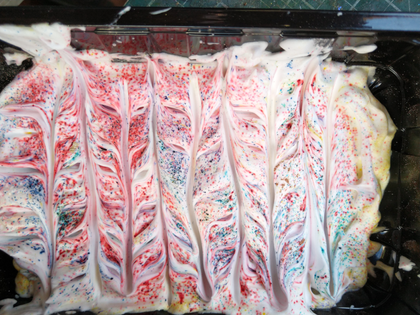
I was going to feature this last month, but went for a fold as we'd had a couple of "messier", more supply-intensive challenges. Since this time we have just had a couple of folds, I thought I would feature this. Today we will be trying Shaving Foam with Brushos (or of course any other watercolour powder you have, like Bisters, Colorburst, Pixie Powders etc). Yep, I know Anita just listed shaving foam as a requirement - but I reckoned that you couldn't play at all if you didn't have shaving foam. At least if you have that, even if you don't have any powders, feel free to use re-inkers, food colouring or whatever, but if you have powders I hope you'll give it a try. It's a lovely effect. You just need to allow a couple of minutes for the colours to activate on the shaving foam before swirling them. And I found that I had to scrape the excess foam off carefully in case there were still granules of undissolved colour.
The traditional shaving foam tutorial is found HERE
Follow the directions, except sprinkle some watercolour powders and allow to activate for a few minutes before swirling.
The background created from my first two photos was used in the Portrait Pals card sample. The last photo shows two of the completed prints from the other step-out photos.
Here are my cards - although if I can't bear the thought of trying to edit this post again due to ongoing site issues, they will be in the next one. This is highly likely, as I've already lost all my images once.
Remember to use the keyword TLC797 when you are uploading. It's helpful if you come back and leave a link on this thread, especially in case you made a typo and people may not find your card.
If you're not sure how to link your card on the thread here, here's how:
1. Open 2 windows or tabs: one window for your card and one for this thread. 2. In this thread, click on reply and type anything you want to show before the link. 3. Go to your card window. Highlight the address for your card. (It says www. splitcoaststampers.com/gallery/showphoto..... and so on) 4. Click EDIT. Click COPY 5. Go back to this thread. Click PASTE.
I couldn't, indeed, bear the thought of having to spend time sorting out the first post if things went AWOL on editing. It's a holiday weekend here, I have a busy week ahead and I just thought hang it. Sorry. It already took time sorting out bogey posts in the Favourites thread - that's enough time spent. So, here are my two cards.
Your challenge made me try different ways to use it, I wasn't convinced in the beginning and didn't like it so much but because I'm a lucky team mate who had time to try it before I had the more and more fun to use this technique so I've made 3
Sabrina, this technique leaves a VERY FESTIVE touch to your cards! AND I can't believe you used a Brittany Knitting Needle to do this with! ACK!!!! (I treat my needles as gold! LOL) By the way, your shaving cream looks SCRUMPTIOUS!!! Like a decorated CAKE!!! Now, you've made me hungry! LOL
Sabrina- wonderful challenge, thanks! I went with a "blue sky"- using shaving foam and blue food coloring- applied also to my craft background. Stamped daisy petals twice, propping up the daisy head with foam dimensionals. Fussy cut my stems, and added a sentiment block. Finished with 3 washi tape borders, and used a fancy corner rounder. Here's thoughtful daisy
__________________ "You can't use up creativity. The more you use the more you have." -- Maya Angelou
I would say this technique was more challenging than the usual shaving cream, mainly because I was afraid of smearing. But they certainly are vibrant backgrounds.
I did two separate smears of shaving creme and colors on a tray got quite a few BG's that I'm happy with. Thanks, Sabrina. Gallery at Splitcoaststampers
I made quite a few of these backgrounds from one squirt of shaving cream and running sheets through them and dabbing it back in- on an occasion or two, adding more color. Very fun and a great challenge! Thanks
Just now getting to look at the challenges for this week. This looks fun and it will be interesting to see what brushos do with the foam. The thumbnails of your results look great! I'll be back.
__________________ Proud Fan Club Member
Dirty Dozen Alumni
"Art washes away from the soul the dust of everyday life."
__________________ The Difference Between Try and Triumph Is Just A Little Ump Wednesday: Alpha Challenge
Thursday: Ways To Use It Challenge
Monthly: MMJ Challenge….get inky and have fun
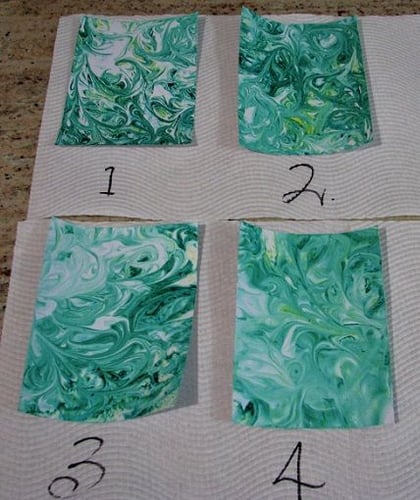
Good morning or evening (as the case may be) I just wanted to share this photo with you, I'm tickled pink with the way this turned out.
I'm the first up in our house, a left over from having to rise at five am every day during the week while working. It's the perfect time to indulge in some crafting and today I decided to have a go at the "Shaving Foam with Brushos"
I don't have brushos but I do have Ken Oliver Colour Burst powder watercolour paint.
I have done this technique before but used re-inkers. This has turned out even better, what do you think?
1. was my first layer then I re-swirled and pressed down more firmly for the second, third and fourth. The fourth one is less defined and much softer but lushes in it's own right.
I used green and a touch of yellow. I will be making a card for DH's birthday later this afternoon but I was so excited with the results I just had to share.
Thanks Sabrina for coming up with this, it's amazing and I only have two green fingers. :lolo::lolo:
They look beautiful, Marg. I see underwater scene potential. They also remind of the jade vine, I think it's called, which grows in the tropical house in the Botanic Gardens here. I look forward to seeing what you do with them.
You may see cards appearing from me for months using this technique. Love it. I pulled a couple of panels out of my stash this weekend and made this. Happy day
__________________ The Difference Between Try and Triumph Is Just A Little Ump Wednesday: Alpha Challenge
Thursday: Ways To Use It Challenge
Monthly: MMJ Challenge….get inky and have fun
__________________ The Difference Between Try and Triumph Is Just A Little Ump Wednesday: Alpha Challenge
Thursday: Ways To Use It Challenge
Monthly: MMJ Challenge….get inky and have fun