Splitcoaststampers.com - the world's #1 papercrafting community
You're currently viewing Splitcoaststampers as a GUEST. We pride ourselves on being great hosts, but guests have limited access to some of our incredible artwork, our lively forums and other super cool features of the site! You can join our incredible papercrafting community at NO COST. So what are you waiting for?
Good Easter Monday morning to you all. I hope that everyone with a sweet tooth got visited by the Easter Bunny - or a friend.
I know that folds aren't everyone's cup of tea, so I try to mix my challenges up a bit. But I noticed that I wasn't the only one whose eye was caught by THIS CUTE CARD that Anne posted a few weeks ago.
So I did a little research, and since there are several different corner pop-up cards, I thought that I'd offer you a choice of three different options. Apologies in advance that that makes for a picture-heavy post. I'll also add two videos for those who prefer that option. In fact, although it looks the hardest, the one Anne made is in fact the easiest, so I'm just posting two step-out pictures for that - and you can make your own easel to pop into it. Just be sure to make the easel small enough to fit on that 4" square panel!
There is a pdf tutorial with extra photos attached below - and it's also available online as a Google document if you click HERE.
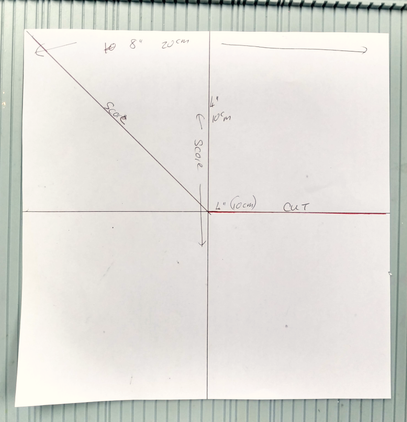
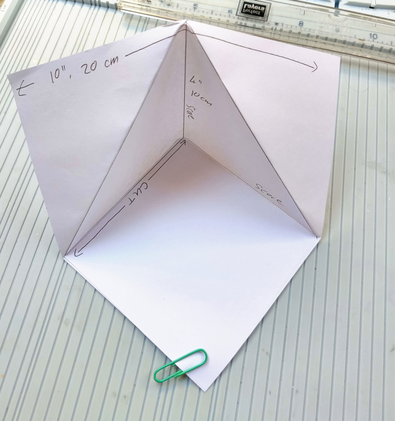
All these cards start with an 8" (20cm) square scored in half each way.
Obviously you can use a bigger square if you prefer.
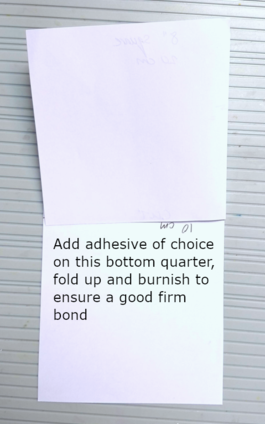
For those who don't like measuring - there's very little involved. If you start with an 8" square, then your scores will be at 4" on each side, and your DP for matting will be 3 3/4" or 3 7/8" square according to your preference. For any diagonal panels, you simply cut that matting square in half. For option one, I found it easiest to use diagonals on my inside base, to ensure that it folded closed easily.
For a larger square, you just score in half down and across, and cut your matting panels accordingly.
I know it looks intimidating - but believe me, they're not hard and the octopus one truly is much easier than it looks. I hope you'll give at least one of the three options a try some time.
For any of these three options, start with a square scored in half both ways.
For option one (the first video) a pop- up corner, you then follow the diagrams as shown below.
I'll leave option two entirely for the video (or see the pdf tutorial) as it's the most complicated and would require adding too many picture.
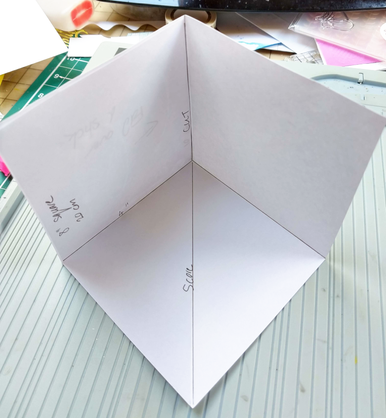
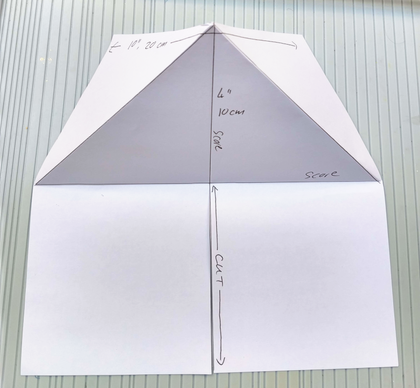
For option three - score, cut and fold as shown below after starting with the same scored square as the others.
Apologies again for the image-heavy post.
Since there are already so many links and pictures, instead of adding links here I'm just saying that my three samples (one for each option) can all be found in the galley for this challenge which is here:
Upload your own corner pop-up, whichever of the three options you choose to make, using the keyword TLC739. The hostesses do really appreciate it when you come back and share a link to your creation here.
If you're not sure how to link your card on the thread here, here's how:
1. Open 2 windows or tabs: one window for your card and one for this thread.
2. In this thread, click on reply and type anything you want to show before the link.
3. Go to your card window. Highlight the address for your card. (It says www. splitcoaststampers.com/gallery/showphoto..... and so on)
4. Click EDIT. Click COPY
5. Go back to this thread. Click PASTE.
I'll give this a go later. I think I made one for a challenge a long time ago. I'm thinking it was maybe for a challenge in DTGD for Lydia, but not sure. I'd have to go look. Be back later.
__________________ My Blog- Trusting in the Lord for Everything Proverbs 3:5-6 Trust in the Lord with all your heart and lean not on your own understanding. In all your ways acknowledge Him and He will make your path straight. My Stampin' Up WebsiteMy Gallery, BRAK New Member Mentor. New Grandmother to Mia Lou. 1st Grandchild.
I used the second tutorial and it was pretty easy. I'll take a little more care lining up pieces before I close the card and let that tab adhere to the back of the panel. This was a fun fold. Thanks for making us stretch a little today!