Splitcoaststampers.com - the world's #1 papercrafting community
You're currently viewing Splitcoaststampers as a GUEST. We pride ourselves on being great hosts, but guests have limited access to some of our incredible artwork, our lively forums and other super cool features of the site! You can join our incredible papercrafting community at NO COST. So what are you waiting for?
ooh, my dd is just learning to sew...maybe I can get her to make one of those bags for me!
I cannot bring myself to spend so much money on furniture and organization tools! Even $6-12 for one paper holder adds up (I would need at least 10 of them!)...that's a lot more paper, embellishments, etc. that I could be buying!
__________________ Lynn
"Sir, my concern is not whether God is on our side; my greatest concern is to be on God's side, for God is always right�--Lincoln
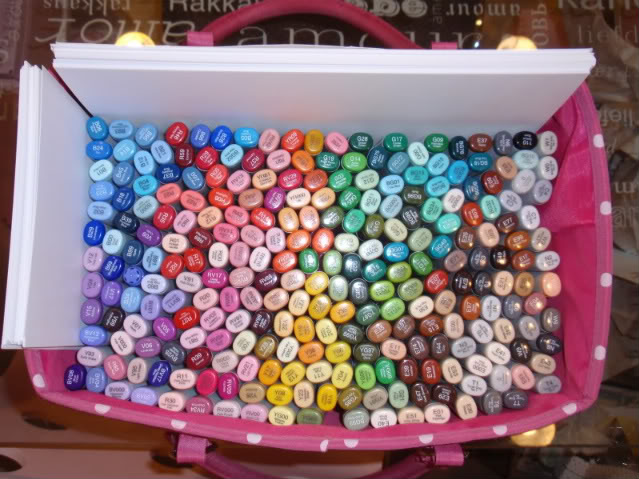
I have looked high and low for the perfect copic storage solution. I own 240 markers and some extras, give or take. I've had them stored all kinds of ways as the collection has grown and never felt pleased. I like the AMuse enamel buckets, but it took two and I wanted them all in one place. I also need to be able to transport them back and forth to teach as well as use them at home. So... I made this tote.
Now, I'm NO seamstress, but I can sew a straight line. I got some quilted fabric, a zipper and straps to make handles, drew out a rough pattern and sewed this last Friday night. The bottom and sides are reinforced with plastic I re-purposed from a Cropper Hopper paper holder. It took three hours. Not too bad, I think. Sewed the zipper backwards, but it works just fine. On the inside, I used some re-purposed Cropper Hopper photo holders, cut the sides off and made stand up marker cases. Everything fits in there perfectly and there is room to grow. There is about three inches left on the top and I have a clear tray that fits in there nicely to store more goodies before closing it all up.
I hope this will inspire you to make your own storage that totally suits you. Often I find myself retro-fitting some other product to suit me. Not this time. I'm thrilled. Happy Coloring.
I was very much inspired by the Creative Memories tote Sally shared. Total supply cost for this project was $15 using a Joann's coupon.
For someone who says they are not a seamstress, I am seriously impressed by your work. Your Copic holder is amazing - I keep looking at the photo thinking it's just what I need but I could never make that!
I've never heard of Cropper Hopper cases here in the UK, although to be fair it's not something I've ever searched for, but I'm sure we would have something similar.
Could you have found yourself another business idea?
Ha! Nope. Not me. This sewing girl could never keep up. The pattern is simple. I'm going to put directions together (other than the envelope I scrawled it out on) and post it back here for anyone who wants to give it a go. Simple really. A real seamstress would find all my flaws. Tee hee.
__________________ Lisa Hetrick, Indigojade Art Website + Blog
Illustrator Gina K Designs
Ha! Nope. Not me. This sewing girl could never keep up. The pattern is simple. I'm going to put directions together (other than the envelope I scrawled it out on) and post it back here for anyone who wants to give it a go. Simple really. A real seamstress would find all my flaws. Tee hee.
Oh wow Lisa!!!! I can't wait to see the pattern and attempt it!!! LOL You seriously are awesome!!!
Ok ladies.... I translated my scrawled out idea from the envelope and put it into a .pdf file. There are two pages to the .pdf file. Here is the measurements/pattern I came up with. Please remember... I am not a seamstress. Not even close. I tried to use the correct terminology and I provided pictures.
Enjoy the process. Have fun with it. The idea for me was to create storage that suits your need exactly, instead of trying to retrofit something.
I also re-attached the pic to this thread. ENJOY!
Happy Sewing! :mrgreen:
__________________ Lisa Hetrick, Indigojade Art Website + Blog
Illustrator Gina K Designs
My Copic storage system is not as eye catching as some that have been shown, but it works for me. I bought some Snapware containers at Target and separate my markers by color. I have both Copic and Prismacolor markers, so the shapes are not uniform. This method does not require similar shapes. And to answer NancyK's question, I leave the Flourishes sets in their packaging and just put them into the container.
Hi everyone,
I came up with a one of a kind solution. Each color has it's own clear plastic box and then all the boxes fit into the big white box. Don't ask me how I got this idea - probably all that wandering around The Container Store! I like reading about what everyone else does. Thanks!
Hi everyone,
I came up with a one of a kind solution. Each color has it's own clear plastic box and then all the boxes fit into the big white box. Don't ask me how I got this idea - probably all that wandering around The Container Store! I like reading about what everyone else does. Thanks!
Yep!!! TWO things now in my disaster of a craft room that are actually organized!!!! LOL My inkpads and now my Copics..........of course the rest of my room is a major MESS!! LOL
YAY- these look awesome! please keep sharing as you go- super inspiring! Thanks for the link- i'm off to order too!
Yep!!! TWO things now in my disaster of a craft room that are actually organized!!!! LOL My inkpads and now my Copics..........of course the rest of my room is a major MESS!! LOL
Well look at this! I use the same method, Lee! I currently house my Copics in 2 of these .. So easy to put Copics away after a project!
Love, love, love your idea for your Copics. Now, what did you use for the inside of the bag? I noticed you have plastic containers of some sort.
Thanks for the instructions and I'll hand it off to my MIL to make. LOL
Sheila
Hi,
I re-purposed Cropper Hopper photo cases. I cut the sides off and separated the markers by color. I fit 240 markers in that tote with room to grow. Hope this helps.
__________________ Lisa Hetrick, Indigojade Art Website + Blog
Illustrator Gina K Designs
Lisa you are a generous person to share the instructions. I immediately saved it and sent it to mom as she is the one who sews with an email stating a trip to J's is in order. Thank you so much for sharing your amazing ingenuity. I am currently using the snapware cases but its a little difficult to dig in all the time to look for the colors or numbers I want to use, I like the reach in part of the CM tote and now yours. Love that the color chart can be inside too. Wonderful !!!
A few questions though if you don't mind:
Where did you get the tiny stickers on the ends of your ciaos?
And you said room to grow on adding markers but would it hold all 356 they have made so far do you think? Also with multiliners throw in also? The spicas could be thrown on top right?
What was the heavy plastic you used on the bottom for form?
What type of tray do you have on top of the markers in your bag?
Thank you for creating this, sharing and answering the above.
Ok ladies.... I translated my scrawled out idea from the envelope and put it into a .pdf file. There are two pages to the .pdf file. Here is the measurements/pattern I came up with. Please remember... I am not a seamstress. Not even close. I tried to use the correct terminology and I provided pictures.
Enjoy the process. Have fun with it. The idea for me was to create storage that suits your need exactly, instead of trying to retrofit something.
I also re-attached the pic to this thread. ENJOY!
Happy Sewing! :mrgreen:
Lisa,
Great Idea! Thanks so much for the instructions. I think I'll give this a try to make my markers easily portable.
Lisa you are a generous person to share the instructions. I immediately saved it and sent it to mom as she is the one who sews with an email stating a trip to J's is in order. Thank you so much for sharing your amazing ingenuity. I am currently using the snapware cases but its a little difficult to dig in all the time to look for the colors or numbers I want to use, I like the reach in part of the CM tote and now yours. Love that the color chart can be inside too. Wonderful !!!
A few questions though if you don't mind:
Where did you get the tiny stickers on the ends of your ciaos? I used my DYMO label maker and a small circle punch.
And you said room to grow on adding markers but would it hold all 356 they have made so far do you think? Also with multiliners throw in also? The spicas could be thrown on top right? There is room for about 50 more markers in the case and room to lay four of the photo cases on top. So, I would venture a guess that you could get them all in there.
What was the heavy plastic you used on the bottom for form? I cut up an old Cropper Hopper Paper Storage thingy. The sewing guru at Joann's said that some people use plastic canvas to make it sturdy.
What type of tray do you have on top of the markers in your bag? I re-purposed the lid of a clear rectangular box I had laying around.
Thank you for creating this, sharing and answering the above.
Enjoy!
__________________ Lisa Hetrick, Indigojade Art Website + Blog
Illustrator Gina K Designs
Thank you so much Lisa I so appreciate all the explanations. Now to find my dymo and small circle punch and make a trip to J's. I'm so excited. Thank you again.
Aww, Bummer! I went to buy this and used the RACK coupon code, but they didn't recognize it.. and now it's over $100. Guess I'll be keeping my eyes open for something similar!
This is my uber organzied way of storing my Copics.....NOT! But given that I'm over 300 now (this pic is a bit old), I haven't found a way to hold them all and still be portable as I go to crops a lot. I have 6 of the Magpie storage units (I scored them for $3 at Big Lots) but they are not transportable. :(
I keep mine in an open top Mackinac Moon tote bag I got at a Scrapbooking Expo. They fit well and are completely portable. I take them with me all around the house.
Don't feel bad-the lower priced ones sold out within minutes of being posted.
I wish I'd heard about that sale in time to get one. I won't pay $124. for a storage container. Ack! It does look like a perfect way to store them, but I could get a lot more markers for $124...
I wish I'd heard about that sale in time to get one. I won't pay $124. for a storage container. Ack! It does look like a perfect way to store them, but I could get a lot more markers for $124...
CindyB
Hahaha.. exactly!
Right now I'm keeping them in little containers I get for about $5. Here's the link to the ones I use: My Copic Storage I think I got the ones I'm using from Hobby Lobby.
They work great, except I like to keep my markers all in numeric order, so when I buy a new one, I have to take all the ones in front the new one out and replace them one by one. It's a pain.
Ok ladies.... I translated my scrawled out idea from the envelope and put it into a .pdf file. There are two pages to the .pdf file. Here is the measurements/pattern I came up with. Please remember... I am not a seamstress. Not even close. I tried to use the correct terminology and I provided pictures.
Enjoy the process. Have fun with it. The idea for me was to create storage that suits your need exactly, instead of trying to retrofit something.
I also re-attached the pic to this thread. ENJOY!
Happy Sewing! :mrgreen:
I tried to open your PDF file, but it says the file has been damaged and will not open.
__________________ Wife of Greg & Mom of 5 GREAT kids!!! Being a mother is like taking your heart out of your chest and watching it walk around. MY BLOG
It looks very tempting, but I have about 95 markers now. It's just a little too small for my collection. Waaah. And if I bought two, I'd feel obligated to fill up both! ;)
I used to have a wallet a lot like that for regular markers. I hated it. I hated having to slide each marker back into the little slots every time. Maybe I'm just lazy but I need something where I can put the stuff away quickly. I sold it and I think it took like 10 minutes to sell so I know someone likes that type.
Same here, I had one of those and sold it.. I like just having space to keep them in their color families but not individual spots.
I am going to try to make one of those totes using the directions provided by Lisa
Well, ladies -- I finally found the perfect Copic storage solution (for me)! They were designed by a crafter who knew exactly what she wanted in storage for her Copics and I LOVE them!
They are called Color Cubbies and you can purchase individual "towers" as your collection grows and configure them exactly how you want! In the photo below are two units ... I've ordered two more!!
The shelves are slanted a little, so the markers don't fall out when you grab one from the bottom or middle of the cubbie. The slant also makes it easier to see the color codes on the ends of the Sketch markers. You can read more about the Color Cubbie here. Let me know if you have any questions!