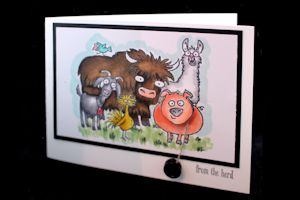
Yo-Yo Spinner Card

by Deb Valder

Pull a string to make an element on this card spin.

Supplies

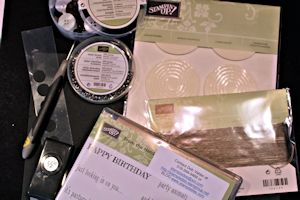
  • Stamps or a die cut image (Stampin’ Up! From the Herd set used here)
  • Cardstock (Whisper White and Basic Black used here)
  • Heavy acetate
  • Adhesive foam circle (Stampin’ Up! Shaker Frame used here)
  • Mini brad
  • Narrow ribbon or twine, about 7" (linen thread used here)
  • Piercing tool and mat
  • Glue dots
  • 2 buttons
  • Other supplies as needed to complete the project (Blendabilities markers, Memento Tuxedo Black ink)

Step-by-Step

  1. Step 1

    Stamp and color a focal image on a white cardstock panel (this panel is 3 1/4" x 4 3/4", sized for layering on a card front).

    Choose the element that will spin, and stamp it 2 more times on scraps of white cardstock. Color one of the images that will spin and leave one uncolored. Cut out the two spinner images.
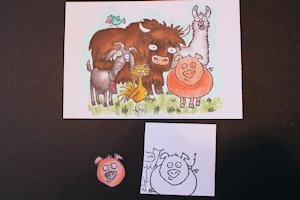
  2. Step 2

    Punch two 1/2" circles from the acetate.

    TIP:
    Layer a piece of scrap paper behind the acetate when punching for a clean cut.
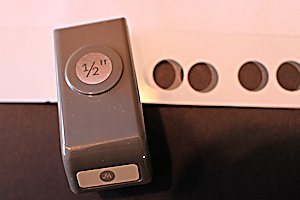
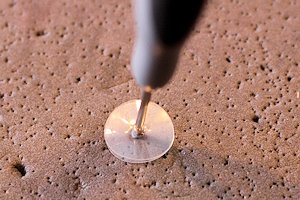
  3. Step 3

    Using a piercing tool, punch a hole in the center of the two acetate circles, and the center of an adhesive foam circle (the center piece of the shaker frames is used here).

  4. Line up the uncolored spinner image onto the complete image, and pierce a hole in the center of both pieces.

  5. Step 4

    Starting from the front to the back, insert a mini brad into the uncolored spinner image.

    Next, adhere the foam circle to the back of the uncolored spinner image, tucking the end of the ribbon or twine in between.

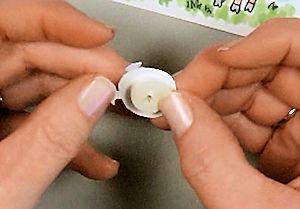
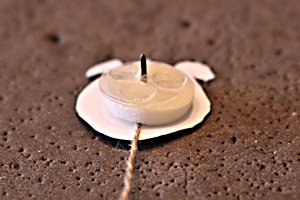
  6. Take off the backing from the foam circle, and layer one of the acetate circles on it. Add the other acetate circle. Put a few glue dots on the outside of the last acetate circle (be sure the glue dots are up – do not glue the two acetate circles together).

  7. Step 5

    Take the pieces that are attached by the brad, and insert the brad end into the hole pierced in the full image. Open up the brad so the layers are now secure.

  8. Step 6

    Glue the colored spinner image over the uncolored one to cover the brad.

    Put a glue dot on each of the buttons and sandwich them onto the end of the pull string. Wrap the pull string around the spinner piece, and you are ready to pull!
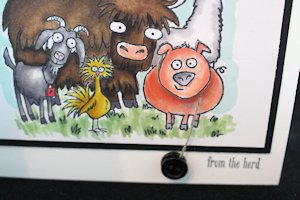
  9. Step 7

    Assemble and complete the card.

Video!

Variations

  1. Instead of a stamped image, use a die cut or dimensional embellishment as the spinner.

Your Turn

You've seen the tutorial, now you try it! We've got a section of the gallery set aside for Yo-Yo Spinner Card. Try this technique, then upload your artwork to the gallery. Show us your creations!

***Please note - Internet Explorer/Edge is not a supported browser, and will not allow you to see the videos. Please use Chrome, Firefox or Safari to view our tutorial videos.

Questions and Comments

We'd love to get your feedback or questions. Leave your comment below.

Oh My Goodness!!! AWESOME!! Can we say AWESOME!!!!
Oh YES!!
It's me Faith  |  Wed Feb 11, 2015 at 3:53 AM
Deb, If you made the thread longer and folded it in half and wound each end in the other direction... would it act like a pulley, so if you pulled one end, would the other wind back up? I'm not sure... might have to have something else in the middle... just Thinking out loud... Love Your Card...
It's me Faith  |  Wed Feb 11, 2015 at 4:21 AM
Deb....love, love, love this card! Great job girl!
Rose  |  Wed Feb 11, 2015 at 5:48 AM
What a fun card... thanks for doing the video!
Bette  |  Wed Feb 11, 2015 at 6:17 AM
Thank you SOOOOOO much Faith for your lovely comment! Hope you makes LOTS of these!
Deb Valder  |  Wed Feb 11, 2015 at 8:22 AM
thank you Rose! I'm so glad you liked it. If you have any questions, let me know.
Deb Valder  |  Wed Feb 11, 2015 at 8:23 AM
Thank you so much Bette! I love doing these tutorials for Splitcoast! :0) I'm so glad you liked it.
Deb Valder  |  Wed Feb 11, 2015 at 8:24 AM
LOL!!!! HOW FUNNY!!! LOVE IT!!! I like the Mustache one ALOT!!!!! They're ALL GREAT!!! LOL PERFECT for giving a laugh!!! THANK YOU Deb!!!!!! wink
Becky Green  |  Wed Feb 11, 2015 at 10:06 AM
What a fabulously fun project. Thanks so much for sharing it in your videos here on SCS and on your blog. I am curious how you assembled the flowers. It looks like you punched a bunch of hearts and then folded them in half. Did you need to place a circle of cardstock underneath as a foundation or did you just overlap the points?
Kab  |  Wed Feb 11, 2015 at 10:21 AM
Such an innovative project! I look forward to trying to put together a couple of these!
jan julien  |  Wed Feb 11, 2015 at 10:40 AM
this is great! I love the mustache!
Your video is captioned perfectly too! YES!
Shannon  |  Wed Feb 11, 2015 at 12:19 PM
I love this idea but am a little unclear about one of the steps. Do you peel the backing off the foam circle on both sides and put the clear circles on each side? Do you glue the clear circles also or is the foam circle the only one with glue on it? I've spent the morning on it but am still unclear.
Kay Oxford  |  Wed Feb 11, 2015 at 2:05 PM
Kay, did you watch the video tutorial? I think your questions may be answered there.
dina  |  Wed Feb 11, 2015 at 2:40 PM
This card idea is adorable. I love it and can't wait to try the pull idea myself. Question: when you added the string did you put it inbetween the two plastic pieces? It sounded like you put it under the sticky bottom piece but then why have the two plastic pieces if the string didn't go inbetween? Im confused. Would you be so kind as to clarify where the string goes? Thanks oodles!
Dottie  |  Sun Feb 15, 2015 at 6:17 AM
I think I just figured out what I didn't see in the video...the string pulled the front piece to move while the back is glued down. okay! Slow but got it! Thanks for the tutorial!
dottie  |  Sun Feb 15, 2015 at 6:20 AM
I watched the video, repeating the steps I was uncertain about, took notes, and tried it again, placing the string in between the plastic pieces. It still doesn't pull right. Help!
kaycstamper  |  Sun Feb 15, 2015 at 8:29 AM
Awesome idea! Thanks for sharing
Jackie Topa  |  Sun Feb 15, 2015 at 10:22 AM
@kaycstamper - the 2 acetate circles need to be free to spin against each other - their smoothness is what gives a good spin. The string needs to wrap around the foam piece.
dina  |  Sun Feb 15, 2015 at 1:42 PM
Then wouldn't the two plastic pieces need to surround the foam? don't know, I did just like she said, but it doesn't spin. I guess I'll give up on this idea, spent a lot of hours trying it!
kaycstamper  |  Sun Feb 15, 2015 at 3:30 PM
The 2 plastic pieces need to be against each other though, one adhered to the card base, and the other adhered to the foam. I had trouble with my string getting caught either on the edge of the plastic or wrapped behind it around the brad.

The order of pieces on the brad is like this, from top to bottom: Stamped image, string, adhesive, foam circle, adhesive, acetate circle, acetate circle, adhesive, card base.

Hope that helps!
dina  |  Sun Feb 15, 2015 at 3:47 PM

Page 1 of 2 pages  1 2 >

You need to be logged in to comment

GET OUR NEWSLETTER


Splitcoaststampers's privacy policy