Woven Basket with Die Cuts
by Mary Jo Albright
Create a woven basket using die cuts.
Supplies

- Big Shot Die-Cut Machine
- Stampin' Up! Baskets & Blooms bigz XL die
- 12" x 12" patterned paper
- 8-1/2" x 11" cardstock
- Ruler
- Pencil
- Adhesive
- Sticky Strip™ or other strong adhesive
Step-by-Step
-
Step 1
Creating Template Step 1:
Cut cardstock in half to give two 5-1/2" x 8-1/2" pieces.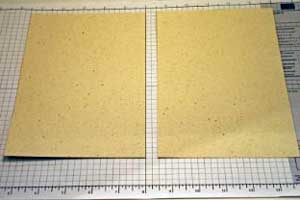
-
Step 1
Creating Template Step 1:
Cut cardstock in half to give two 5-1/2" x 8-1/2" pieces.
-
Step 2
Creating Template Step 2:
Die cut basket to the two cardstock pieces to give you 4 basket pieces.
-
Step 3
Creating Template Step 3:
Adhere two basket pieces together on perforated tab; cut away a section of the other two basket pieces as shown.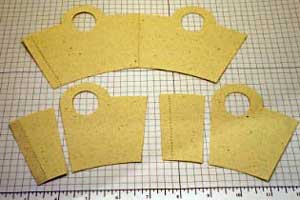
-
Step 4
Creating Template Step 4:
Adhere the two cut away pieces to the full basket pieces to the handle openings.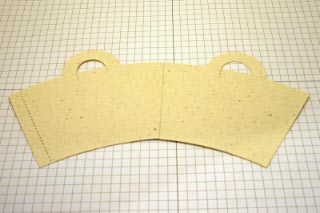
-
Step 5
Create Template Step 5:
Closeup for paper placement. You want to follow the curve of the baskets upper rim.
-
Step 6
Create Template Step 6:
Cut away the handles. Your template is finished.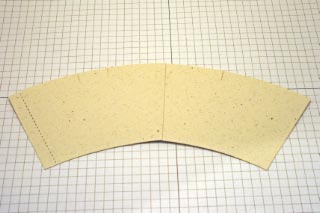
-
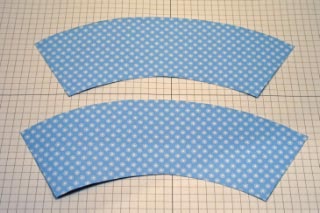
Step 7
Place template on 12" x 12" patterned paper (the side you don't want on the outside to hide pencil marks). Trace x2 and cut out.
-
Step 8
Upper basket piece- mark at 11/16", 1-3/8", and 2-1/16" to both short vertical sides. (You can make these marks across the whole piece as a guide for drawing your 3 sketched lines, but the piece is not the same measurement the whole length of the piece). Sketch 3 lines as shown to upper piece.
Lower basket piece- mark top basket curve at every 1-1/16" and bottom curve at every 11/16". Connect dots using a ruler and pencil to give you nine sections. (important to keep them in order. you can number them).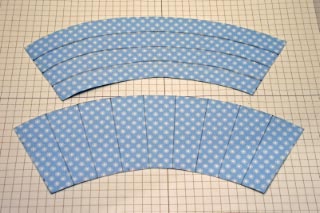
-
Step 9
Cut out pieces.
Optional:
Sponge edges to give more dimension to basket weaves.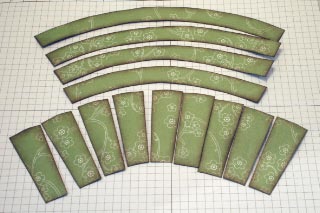
-
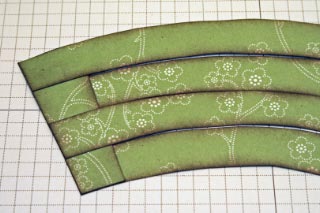
Step 10
Start weaving the pieces, pushed tight together, leaving no gaps, adhering as you go.
-
Step 11
Apply Sticky Strip™ to one side. Assemble basket, as you normally would with this die, using the die-cut base and Sticky Strip™.
-
Step 12
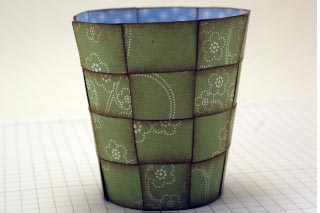
Your finished weaved basket. Embellish to your likings.
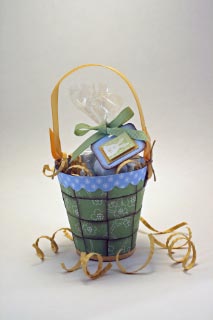
Your Turn
You've seen the tutorial, now you try it! We've got a section of the gallery set aside for Woven Basket with Die Cuts. Try this technique, then upload your artwork to the gallery. Show us your creations!
***Please note - Internet Explorer/Edge is not a supported browser, and will not allow you to see the videos. Please use Chrome, Firefox or Safari to view our tutorial videos.

Questions and Comments
We'd love to get your feedback or questions. Leave your comment below.
Pam
HTH! Oh, and all the baskets are truly goregous!!
In step #4...Took the top pieces in step #3 and the two smaller cut off pieces (without the basket hole) and adhered to where the basket handle openings are (refer to close up pic in step #5). This is basically to create the template eliminating the cut-out holes so you have a solid curved upper rim to your template.
In step #4...you will not use the two bottom pieces with the basket holes (just the two cut off portions).
I hope this helps:)
In step #3 that is, you will not use the two bottom pieces with the basket holes (just the two cut off portions).
Page 1 of 1 pages