Whitewashing

by Jenn Cochran

Use white embossing and a wash of white ink to make your images stand out on colored cardstock.

Supplies

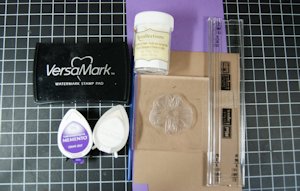
  • Kraft cardstock (or colored cardstock of your choice)
  • Stamps
  • White embossing powder
  • Embossing ink (Versamark used here)
  • Heat tool
  • Paintbrush
  • White chalk or craft ink (Versamagic used here)
  • Colored dye ink (Memento used here)

Step-by-Step

  1. Step 1

    Stamp onto kraft or colored cardstock using embossing ink.

    Heat emboss the image using white embossing powder.
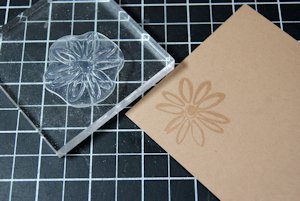
  2. Step 2

    Fill in the image using white chalk ink, applying it with a paint brush and water.

    Allow the ink to dry completely.

    Note:

    You can lift ink directly from the pad with a brush, or tap the inkpad onto a clean acrylic block to create a palette.
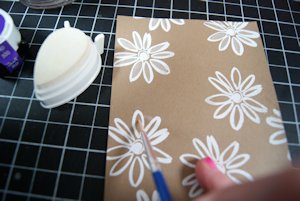
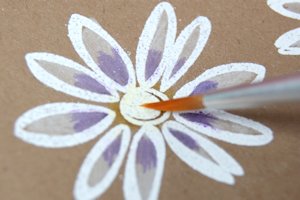
  3. Step 3

    Paint in accents to the whitened image using colored dye ink and water as needed.

  4. Step 4

    Assemble and complete the project.

Video!

Your Turn

You've seen the tutorial, now you try it! We've got a section of the gallery set aside for Whitewashing. Try this technique, then upload your artwork to the gallery. Show us your creations!

***Please note - Internet Explorer/Edge is not a supported browser, and will not allow you to see the videos. Please use Chrome, Firefox or Safari to view our tutorial videos.

Questions and Comments

We'd love to get your feedback or questions. Leave your comment below.

I love this technique. It's gorgeous. Thanks for sharing.
Rebecca Reynolds  |  Wed Mar 26, 2014 at 5:51 AM
So simple yet so lovely!
Shirley Bennett  |  Wed Mar 26, 2014 at 5:55 AM
I never knew that you could add a bit of water to inks and paint with them. (other than Distress inks) I was wondering if it is only the Versa Magic and Memento that you can do this with.
Being able to paint with the inks present many possibilites. Thank you so much for this video. I am going to have some fun with this.
Cathy DiBlasi  |  Wed Mar 26, 2014 at 6:54 AM
Cathi, Stampin'Up! has blender pens and and "Aqua Painter", both using water to blend the inks from the pad to your card stock. Aqua Painter is much wetter, and more like water color.
Lynn Embrey  |  Wed Mar 26, 2014 at 7:01 AM
So delicate and eye-catching. Can't wait to try it. Thank you for teaching this technique. Painting techniques are my "Zoloft"!
hopemitchell  |  Wed Mar 26, 2014 at 7:15 AM
What a fabulous technique. Your video was excellent.
kab  |  Wed Mar 26, 2014 at 7:57 AM
So pretty! Great video
Vicki Talley  |  Wed Mar 26, 2014 at 8:59 AM
Jenn, I love this technique. You have just given me a million ideas for creating cards. Love, love, love it!!!!
Ann Lanphere  |  Wed Mar 26, 2014 at 9:23 AM
Good idea--thanks for sharing!
Susanne Gleason  |  Wed Mar 26, 2014 at 9:27 AM
Love this technique! Can you also use Stampin up Craft White ink pad?
Cindy  |  Wed Mar 26, 2014 at 9:54 AM
Fantastic technique!!
Julie Heyer  |  Wed Mar 26, 2014 at 10:12 AM
Inks are fun to paint with! Any water-based or water-soluble inks will work for painting. My favorites are dye inks, Distress inks, and the Versamagic chalk inks that Jenn used. I typically tap the ink pad on a ceramic tile or acrylic block and pick up the ink there with my wet brush, rather than picking it up directly from the inkpad. I also keep an old watercolor palette full of drops of reinker, and love watercoloring with those. You can also buy bottles of white India ink - they would work well with this technique too.
Dina K  |  Wed Mar 26, 2014 at 3:20 PM
Painting with inks is only something I have done with my Distress Inks. It never dawned on me to try it with other inks. Dina - Love your idea of using an acrylic block. I can see that idea preventing the ruination of my inks.
Cathy DiBlasi  |  Thu Mar 27, 2014 at 6:21 AM
This is a great technique - check out my cool card!

http://www.flickr.com/photos/64578152@N06/13437775333/
Kathy Stacy  |  Thu Mar 27, 2014 at 5:19 PM
That's gorgeous Kathy!!!!
Lydia Fiedler  |  Thu Mar 27, 2014 at 5:24 PM
Kathy - Your card is gorgeous! I am anxious to try this technique too!
Cathy DiBlasi  |  Thu Mar 27, 2014 at 7:50 PM
This is a great idea, thanks for showing us how to do this. This is a lovely card.

I would suggest that you do not use a wet brush or water brush directly onto your ink pads as you can start to dilute them or end up with a paler patch. Pressing them onto something shiny such as a saucer, or cellophane wrapping from a new stamp set (what a great excuse to shop!) is better. You can also then dilute the colour as much or as little as you like.
Pat Harrison  |  Fri Mar 28, 2014 at 8:12 AM
What a great looking card!!! Would this technique work with pigment inks as well?
Melissa Clark  |  Fri Mar 28, 2014 at 9:55 AM
Thank you, Pat! I tap a corner of my inkpad onto a clean acrylic block for watercoloring, as suggested above. A drop or 2 of reinker in a palette is a good alternative too. A little bit goes such a long way.

Melissa - I don't have any pigment inks out to play with at the moment (we're moving and everything's packed), but I would think pigment ink would have issues either not wanting to mix with the water or not drying well. I may be wrong, though - maybe someone can play around with it and let us know for sure. I have some white India ink that works well for painting, and also a small bottle of Tsukineko All-Purpose Ink that I used on my project in the gallery.
Dina K  |  Fri Mar 28, 2014 at 3:39 PM
Dina - Just wanted to give you a little update --- while I was waiting for a response, I decided to give pigment inks a try. They work really well, however, they do take longer to dry - but I just hit it with my heat gun for a moment and it allowed the pigment ink to dry - it looks great too!!
Melissa Clark  |  Fri Mar 28, 2014 at 4:06 PM

Page 1 of 2 pages  1 2 >

You need to be logged in to comment

GET OUR NEWSLETTER


Splitcoaststampers's privacy policy