Tying a bow

by Heather Jensen

Learn how to tie a bow around card layers.

Supplies

  • Ribbon (satin ribbon used here)

  • Scissors

  • Card layer

Step-by-Step

  1. Step 1

    Place the spool of ribbon under and to the right side of the card layer. You should have the spool on the right and the cut end to the left of your card.

  2. Step 2

    Take the left end across and over the right side of the ribbon.

  3. Step 3

    The left side should cross over and then under the ribbon coming from the right side. The right side that is attached to the spool comes up and the cut end of the ribbon is pointed down.

  4. Step 4

    Make a loop with the ribbon in your left hand, shiny side up and take the other piece in your right hand.

    Hint:
    Make sure that the piece that is in your right hand has the shiny side going in the correct direction so that when you go around the loop it will be shiny side up on booth loops.
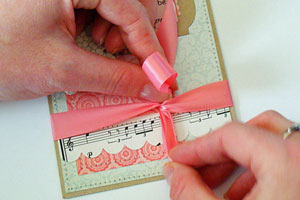
  5. Step 5

    Take the piece in your right hand and go around the loop in your left hand from the bottom and around to the right.

  6. Step 6

    This step makes a big difference in how your bow will look in the end!

    Make sure that you twist the ribbon before you go through the knot to make your second loop.

  7. Step 7

    Pull the loop through so you have two shiny sides of the bow showing. Pull the knot tight so my bow doesn't move after you are finished.

    Hint:

    Add little bit of glue under the knot to make sure it stays secure.

  8. Step 8

    Cut the end that is still attached to the spool.

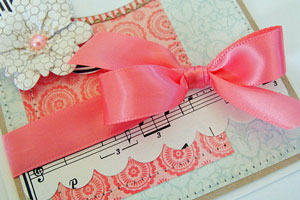
  9. Adhere the layers to your card base to finish your card.

Video!

Your Turn

You've seen the tutorial, now you try it! We've got a section of the gallery set aside for Tying a bow. Try this technique, then upload your artwork to the gallery. Show us your creations!

***Please note - Internet Explorer/Edge is not a supported browser, and will not allow you to see the videos. Please use Chrome, Firefox or Safari to view our tutorial videos.

Questions and Comments

We'd love to get your feedback or questions. Leave your comment below.

Neat tutorial thanks for sharing. How long is the initial "tail" of ribbon on the left please, I always manage to make mine too long!
lin  |  Wed Mar 7, 2012 at 3:51 AM
Love these tutorials. They are real and easy to follow. The leader isn't afraid of showing the difficulty or minor glitches we could all face. Thanks SCS
Cheryl Swoverland  |  Wed Mar 7, 2012 at 5:42 AM
Brilliant - thanks for the lesson!
Jean Harney  |  Wed Mar 7, 2012 at 5:42 AM
Thanks for this post. I have an awful time with bows and this really helps make it easier.
MaryLou  |  Wed Mar 7, 2012 at 5:55 AM
Thank you so much for your help, I am new to card making and appreciate all the help. You make tying a bow so simple.
Pat Doucette  |  Wed Mar 7, 2012 at 6:01 AM
Fabulous tutorial! Now I can finally learn to tie a beautiful bow, too! smile Thanks, Heather
Cheryl Lea  |  Wed Mar 7, 2012 at 6:27 AM
Got any Lefties on staff that can make me a left-handed tutorial
Julie O  |  Wed Mar 7, 2012 at 7:08 AM
Wow, this is so awesome! You did a wonderful job!
Michele in IL  |  Wed Mar 7, 2012 at 7:13 AM
Thanks for showing us how to make a bow. I am keeping this 'how to' in my folder until I REALLY remember how to do it!!!
Joan  |  Wed Mar 7, 2012 at 7:29 AM
Love this tutorial. You make it look so easy! The card you made is so beautiful. May I ask what stamp set that came from? thanks for sharing!
Fran MacDonald  |  Wed Mar 7, 2012 at 7:36 AM
GREAT tutorial!! Sometimes the basics are exactly what people need, LOL!
Susan @ PaperCrafter's Corner  |  Wed Mar 7, 2012 at 7:50 AM
Hi Julie,

I am a lefty. I show how I tie my bows in my video tutorial for the double pocket card about 4 minutes in.
beate  |  Wed Mar 7, 2012 at 8:08 AM
tr�s jolie merci pour la d�mo bise raymonde
raymonde  |  Wed Mar 7, 2012 at 8:16 AM
Thanks, I love these videos
Scarlett  |  Wed Mar 7, 2012 at 8:20 AM
What about knots? Mine never look the same.
Billye  |  Wed Mar 7, 2012 at 8:42 AM
Not only a great tutorial, but a lovely card, as well!
StampinCatMom  |  Wed Mar 7, 2012 at 8:58 AM
So useful! My bow tying success has been a little on and off. Thanks for sharing a tried and true method.smile And of course, I love the music paper, as I'm a singing teacher......smile
la -la -lovely!
Singinstamper  |  Wed Mar 7, 2012 at 9:20 AM
You made bow making look easy. It is hard with arthritic fingers to make mine look quite as nice as you have shown. Thanks so much for sharing.
Shirley A. Griffith  |  Wed Mar 7, 2012 at 9:48 AM
Nice tutorial. The basics are always needed! I loved the chirping birds int he background and so did my pet bird! She chirped right along with them!
Cathy D.  |  Wed Mar 7, 2012 at 9:53 AM
Thanks for the tut! My fingers always get twisted , so I'll try this next tme!
Sharon H  |  Wed Mar 7, 2012 at 9:54 AM

Page 1 of 3 pages  1 2 3 >

You need to be logged in to comment

GET OUR NEWSLETTER


Splitcoaststampers's privacy policy