Twisted Card

by KellyJean Gettelfinger

A diagonal fold gives this twisted card a pocket inside for a gift card or cash gift.

Supplies

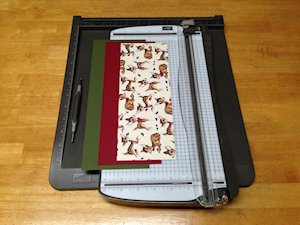
  • Cardstock, one piece measuring 4 1/4" x 11" and one piece (optional for mat) measuring 4" x 10 1/2"
  • Decorative paper, one piece measuring 3 3/4" x 10"
  • Scoring tool and stylus
  • Paper trimmer
  • Bone folder
  • Other supplies as needed to complete the project

Step-by-Step

  1. Step 1

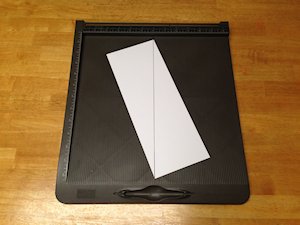
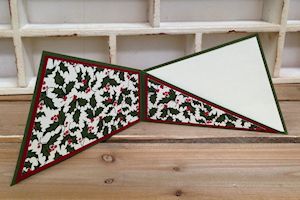
    Score large piece of cardstock from corner to corner using a stylus and scoring tool by placing the cardstock on the 6” mark of the score tool.

  2. Step 2

    Fold on the score line and press firmly with a bone folder.

  3. Step 3

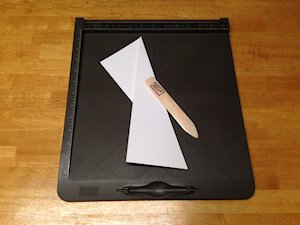
    Again on the 6” mark of the score tool, score directly at the center of the folded cardstock where the folded pieces of cardstock meet, making the card perfectly symmetrical.

  4. Step 4

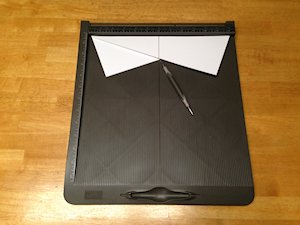
    Keeping the first fold, now fold again on the second score line. Press firmly with a bone folder. This creates the Twisted Card base.

    NOTE:

    If the edges of the folded cardstock do not match up perfectly, simply work with the paper using your hands and a bone folder to adjust and line it up as you wish.
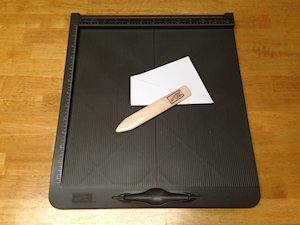
  5. Step 5

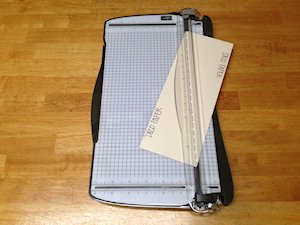
    Cut the piece of decorative paper from corner to corner with a paper trimmer.

  6. Step 6

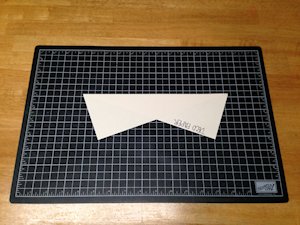
    Aligning the cut edges, place one trimmed piece of paper on top of the other trimmed piece of paper as shown.

  7. Step 7

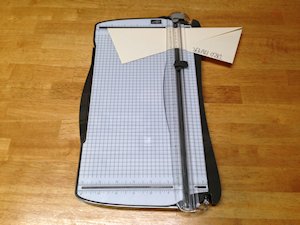
    With the papers still stacked as above, trim through the center of both of them in one motion. (This trim is positioned just like Step 3, except the paper is being cut instead of scored.)

  8. Step 8

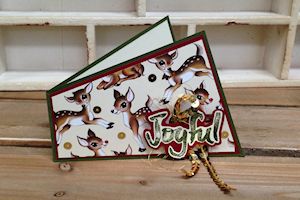
    Use the four pieces of trimmed decorative paper to decorate the Twisted Card.

    NOTE:
    The optional smaller piece of cardstock mentioned in the “supplies needed” can be trimmed exactly like the decorative paper to create mats for the decorative paper layers.

  9. Step 9

    Complete the project.

  10. Tuck in a gift card or some cash for a holiday gift.

Video!

Your Turn

You've seen the tutorial, now you try it! We've got a section of the gallery set aside for Twisted Card. Try this technique, then upload your artwork to the gallery. Show us your creations!

***Please note - Internet Explorer/Edge is not a supported browser, and will not allow you to see the videos. Please use Chrome, Firefox or Safari to view our tutorial videos.

Questions and Comments

We'd love to get your feedback or questions. Leave your comment below.

A wonderful fold, I will be using this for my adult children. Thank you for sharing!
Penny Douphinett  |  Mon Nov 9, 2015 at 7:13 AM
MP, Penny! Thank YOU for such sweet words of compliment!
KellyJean Gettelfinger  |  Mon Nov 9, 2015 at 11:12 AM
It's a wonderful tutorial, Kelly. Your instructions are easy to follow. I must try this. Thanks!
Benzi  |  Mon Nov 9, 2015 at 5:09 PM
Kelly thanks so much for this fabulous video tutorial. I especially loved the part when your said "it's only paper" LOL. Your instructions are very clear and I am looking forward to giving this a try today. Thanks again.
Susie Williams  |  Mon Nov 9, 2015 at 6:02 PM
Great tutorial--I always wanted to know how to make this "wonky" card! smile Excellent job Kelly!
Susanne Gleason  |  Mon Nov 9, 2015 at 6:57 PM
TY so much, Benzi! "Easy" is my goal for all of my tutorials. If it's easy to be made, it's even easier to give. THAT is the real goal <3
KellyJean Gettelfinger  |  Tue Nov 10, 2015 at 9:08 AM
Yay! Thank YOU, Suzie, for such sweet words! I'm so excited you are ready to give the Twisted Card a whirl... or twist, wink. I'd love to see your card. Upload when you get a chance wink
KellyJean Gettelfinger  |  Tue Nov 10, 2015 at 9:09 AM
Suzanne, I LOVE that you used that word... "wonky." That is exactly what it is. HA! I will never forget when I came up with it. I knew for a fact that no one had ever done it because I had researched and researched before I posted my very first video of it. I remember thinking, "No one is gong to like this 'wonky' card!" Hehehe... I'm glad I was wrong :D
KellyJean Gettelfinger  |  Tue Nov 10, 2015 at 9:11 AM
Thanks so much for a very fun, easy to follow project idea! Just one question...did I miss it or do you use any adhesive on the card base to keep it from unfolding? I imagine if you put a solid piece on the front to cover the pocket, it would hold things down, but nothing in the spine?
Megan Linden  |  Tue Nov 10, 2015 at 11:36 AM
NO adhesive, Megan smile It's like magic! And TY for the fun compliment!
KellyJean Gettelfinger  |  Tue Nov 10, 2015 at 11:43 AM
I really like this. It's different and not too time consuming.
Kit  |  Thu Nov 12, 2015 at 8:55 AM
I love this type of card, but the 2 that I have made won't fit in an envelope. What am I doing wrong?????
Marie Adamski  |  Thu Nov 12, 2015 at 10:47 AM
Marie, it helped me to line up the top and right side of the card with the sides of the envelope. I have a picture in my blog post here: http://mamadinis.blogspot.com/2015/11/holiday-blitz-tutorial-twisted-card.html
dina  |  Thu Nov 12, 2015 at 11:01 AM
Great tutorial and card fold. What are those adorable papers you are using?
Jen  |  Thu Nov 12, 2015 at 10:48 PM
Exactly, Kit! And thank you kindly!
KellyJean Gettelfinger  |  Fri Nov 13, 2015 at 3:48 PM
Marie, you've done everything perfectly! I should have made a note of that in the video. There are two ways for the Twisted Card to enter into the envelope... one is upside down. I use this method and almost never have my gift card fall out. The other way to insert the card into the envelope is to insert it normally but at a slight angle, lining up the shortest edge of the card with the shortest side of the envelope. I hope that helps! Dina has a photo on her blog if you need to check it out wink
KellyJean Gettelfinger  |  Fri Nov 13, 2015 at 3:51 PM
Thank you so much, Jen! All products used are from SU! and can be found in the Holiday Catalog.
KellyJean Gettelfinger  |  Fri Nov 13, 2015 at 3:53 PM
so fun! perfect for some last minute gifts!!
gabrielle howey  |  Fri Dec 25, 2015 at 7:29 PM
IKR, Gabrielle! Thx for your kind words! Merry Christmas!
KellyJean Gettelfinger  |  Fri Dec 25, 2015 at 8:56 PM

Page 1 of 1 pages

You need to be logged in to comment

GET OUR NEWSLETTER


Splitcoaststampers's privacy policy