Totally Totebag
by Leigh O’Brien
Create a darling little tote bag out of one sheet of cardstock.
Supplies
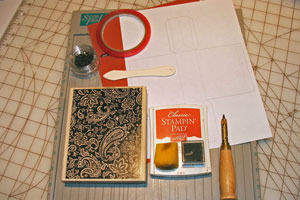
- One 8.5" x 11" sheet of cardstock
- Scoring tool
- Scissors or craft knife
- Large background stamp or stamps of your choice
- Inkpad - color of your choice
- Red Line Tape (or strong adhesive of choice)
- 1/16" hole punch
- 12 small brads
- Brown or contrasting ink and marker for stitching and sponging edges (optional)
- Embellishments
Step-by-Step
-
Step 1
Download pdf template file. Print directly onto cardstock or print on white paper and photocopy onto cardstock. (Template will print in a very light gray color and lines will not be seen on your finished project.)
Totally Totebag Template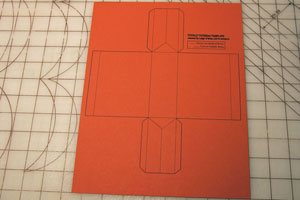
-
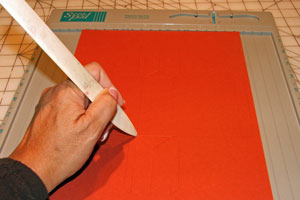
Step 2
Score template on all dotted lines.
-
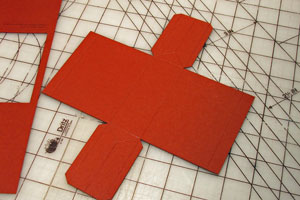
Step 3
Cut out pattern on solid lines. Save scraps to use for bag handles and side straps.
-
Step 4
Turn pattern face down and stamp background on front and back sides as well as thinner side pieces.

-
Step 5
Fold down top 1/2" on both front and back of totebag towards stamped side of bag. Adhere with red line tape and crease fold with bone folder.
You now have a contrasting top edge since it's plain and not stamped.
Optional:
Add stitch lines to edges as shown in the sample. Use contrasting ink to sponge edges of all sides. Set aside.
-
Step 6
From cardstock scraps, cut side straps - 2 pieces (1" x 2.5") and handles - 2 pieces (1/2" x 6").
Optional:
Add stitch lines to edges as shown in the sample. Use contrasting ink to sponge edges of all sides.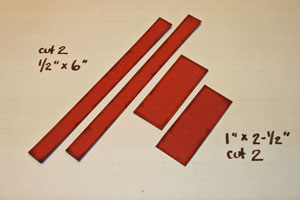
-
Step 7
Measure 3/4" from left edge of top front of bag and adhere one end of handle.
Measure 3/4" from right edge of top front of bag and adhere other end of handle as shown in photo.
Punch 1/16" hole and insert brad to decorate and reinforce handle. Repeat for the back to the bag.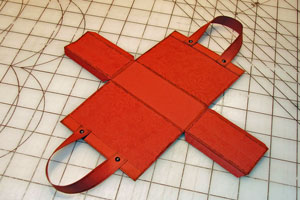
-
Step 8
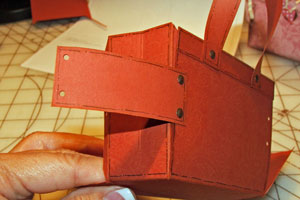
Measure 3/4" down from top edge of front of bag and put right end of side strap approx. 3/8" overlapping left edge of the front of the totebag.
Punch 1/16" holes in corners of side strap and totebag front at the same time. Do not adhere at this time.
Repeat this step for each side of both the front and back of totebag and for each end of the side strap.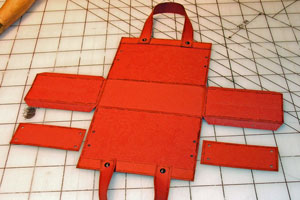
-
Step 9
Fold small flaps on sides of totebag inwards as if your were now making the bag. Use punched holes to mark where holes need to be punched on those small inside flaps. Make sure to mark all four flaps. Punch 1/16" holes.
-
Step 10
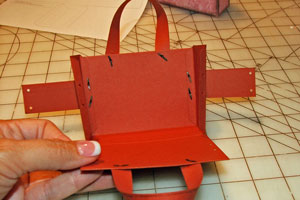
Hold one end of side strap over edge of front side of totebag - lining up holes in side strap, front of bag, and inside flap. Insert brads.
-
Step 11
Repeat with other side of bag front.
-
Wrap side straps around to back of bag, again lining up all punched holes - and insert brads.
Note:
It will help if you crease the small inward "v" on the sides of the bag when inserting brads on the back side.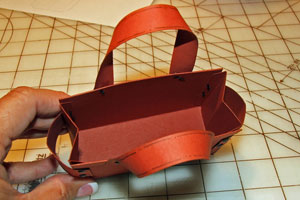
-
Step 12 (Optional)
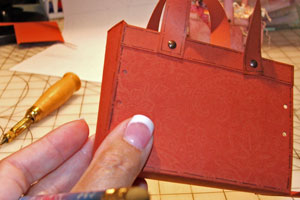
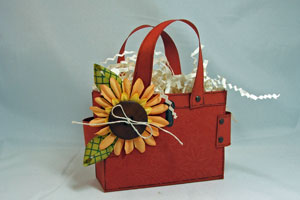
Adhere photo turn, button, or buckle to top fold of front of bag as a clasp.

-
Step 13
Decorate straps of the bag with ribbon or add a big flower to the front. The decorating portion is up to you! Fill with raffia or goodies and have fun!
Video!
Variations
Patterned Paper Tote
Try the template with a two sided piece of patterned scrapbook paper for a cool look for holiday favors.
Your Turn
You've seen the tutorial, now you try it! We've got a section of the gallery set aside for Totally Totebag. Try this technique, then upload your artwork to the gallery. Show us your creations!
***Please note - Internet Explorer/Edge is not a supported browser, and will not allow you to see the videos. Please use Chrome, Firefox or Safari to view our tutorial videos.

Questions and Comments
We'd love to get your feedback or questions. Leave your comment below.
The finished box measures
heigh:t 2 3/4"
width: 3 3/4"
depth: 1 1/2"
Thanks for sharing!
Page 1 of 3 pages 1 2 3 >