Tent Topper Card

by Beate Johns

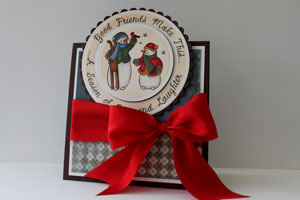
For an out-of-the-ordinary card that will still fit in a regular envelope, try this card created by Dirty Dozen Alumni Michelle Wooderson.

Supplies

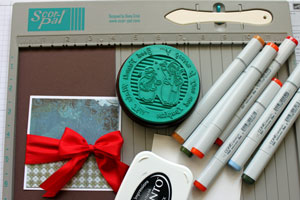
  • 4 1/4" x 8 1/2" piece of cardstock for card base

  • Scor-Pal™, or other scoring tool

  • Scor-Tape™, or other strong adhesive

  • Stamps, JustRite Stampers' Old Fashioned Christmas
  • Ink

  • Additional cardstock for your main image and card front

  • Patterned Paper for your card front

  • Embellishments

Step-by-Step

  1. Step 1

    Score your 4 1/4" x 8 1/2" piece of cardstock at 4 1/4".

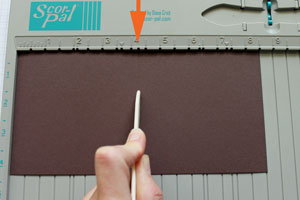
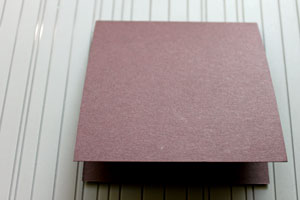
  2. Fold cardstock at score line to create your card base.

  3. Step 2

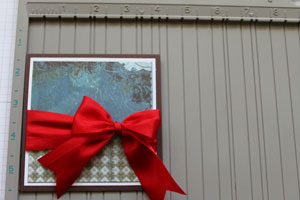
    Decorate your card front with additional cardstock, patterned paper and embellishments.

    Leave room on the top to add your focal point.
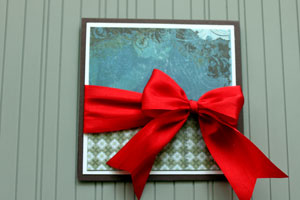
  4. Step 3

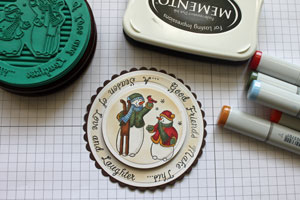
    Stamp, color and layer your main image.

  5. Step 4

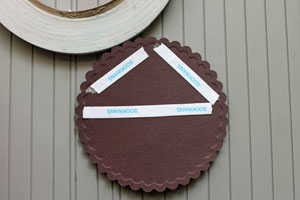
    Add Scor-Tape™ to the lower half of the back of your image.

  6. Step 5

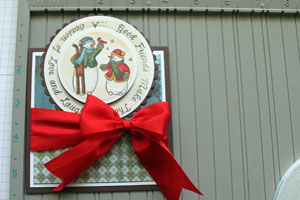
    Line up your card front at 5 1/2" either on your Scor-Pal™ or your grid paper.

  7. Step 6

    Adhere your main image so that the top of the image will line up with 0" to create a 4 1/4" x 5 1/2" card.

  8. Your tent topper card is done.

Video!

Variations

    Different sizes
    Try different card sizes. Whatever size you want to create, make your card base a bit smaller and then let your image stick over so much that it will end at the regular height of that card size.

Your Turn

You've seen the tutorial, now you try it! We've got a section of the gallery set aside for Tent Topper Card. Try this technique, then upload your artwork to the gallery. Show us your creations!

***Please note - Internet Explorer/Edge is not a supported browser, and will not allow you to see the videos. Please use Chrome, Firefox or Safari to view our tutorial videos.

Questions and Comments

We'd love to get your feedback or questions. Leave your comment below.

Beate - Wie ueblich eine tolle Karte und ein verstaendliches Tutorial. Danke fuer Deine nicht enden wollende Kreativitaet!
Nessie  |  Wed Sep 9, 2009 at 9:14 AM
I love this, so cute and "easy peasy" - Beate I love your video you attached as well, it really helped a lot - thanks for such a beautiful idea (and also thanks to Michelle Wooderson!)
pigfingers  |  Wed Sep 9, 2009 at 10:51 AM
Thank you very much for this tutorial. The tip about using the measurement on my Scor-pal to determine the topper placement is BRILLIANT!! A real light bulb moment for me.
Thanks again!
Carol W  |  Wed Sep 9, 2009 at 10:52 AM
So cute! I'm going to try this. Maybe use it for my Christmas cards this year.

~Robin
www.robinredd.typepad.com
Robin Redd  |  Wed Sep 9, 2009 at 3:31 PM
What size JustRite did you use for this example. I went to the site and they had many sizes. Love all your tutorials. Thanks!
norma evans  |  Wed Sep 9, 2009 at 4:18 PM
Hi Norma, thank you for hte sweet comment. Click on the name of the stamp set in the supply listing. It will take you to the set I have used. It fits on the 3 1/4" wood stamper.
Hugs and smiles
Beate  |  Wed Sep 9, 2009 at 4:30 PM
Love this card. Thank you for the video, and showing how to use the JustRite stampers.
Vivian  |  Wed Sep 9, 2009 at 5:15 PM
I just have to try this. Really fun design!!!!
Patricia Gessner  |  Wed Sep 9, 2009 at 6:32 PM
I love this card idea, now to go thru my stamps and find the round ones. I can hardly wait to try it.
Carole Philpot  |  Wed Sep 9, 2009 at 7:27 PM
LOVE this card idea! Can't wait to try it. Thanks so much for doing the video too of how to make it plus how to use the JustRite stampers.
Jocelyn  |  Thu Sep 10, 2009 at 1:05 AM
I love your hint about laying the card base on the Scor-Pal to determine the finished size of the card. No guess work. Thanks for a great tutorial.
NancyJ  |  Thu Sep 10, 2009 at 8:20 AM
Where do you buy that round just right stamp---I have never seen it before---it is so clever---I would like to get one----Thank You Nancy Hjortness at [email protected]
Nancy  |  Thu Sep 10, 2009 at 1:41 PM
Hi Nancy,

Check the supply list on top of the tutorial. There, click on the name of the stamp set. Old fashioned Christmas. It will take you directly to JustRite Stampers online store.

Hugs and smiles
Beate
beate  |  Thu Sep 10, 2009 at 2:11 PM
Precioso tutorial y si viene acompa�ado de video es fant�stico, enhorabuena.
Monika  |  Thu Sep 10, 2009 at 3:10 PM
Really nice! Great tutorial (:
julie Crossley  |  Fri Sep 11, 2009 at 8:25 AM
Great card! I want to try it. What product did you use to cut the scalloped circle?
Julie Barker  |  Wed Sep 16, 2009 at 6:17 AM
Hi Julie,
I used Circle Nestabilities to cut the image and the scallop circle behind it.
Hugs and smiles
Beate  |  Wed Sep 16, 2009 at 7:15 AM
Where can I purchase Circle Nestabilities?
Julie Barker  |  Thu Sep 17, 2009 at 6:18 AM
Love this card and have already bought the stamp set to make my own!

I have a question: It looks like you have layered the stamps on some soft beige paper? I'm trying to get a good look at how you got the beige color on the background of the snowmen and the phrase. Any help would be appreciated.

Thanks, Jackie
Jackie  |  Thu Sep 24, 2009 at 4:47 PM
This is my favorite card ! I love the look, and although I usually like to be unique, I want to reproduce this card exactly! I ordered all the things to make it, icluding the ribbon. Thanks for the beautiful , yet simple design!!!
Leslie Scudiere (stampinfeat)  |  Fri Feb 26, 2010 at 10:14 AM

Page 1 of 2 pages  1 2 >

You need to be logged in to comment

GET OUR NEWSLETTER


Splitcoaststampers's privacy policy