Snowman Shelf Sitter
by Dina Kowal
This snowman shaped card sits on the edge of a shelf.
Supplies

- Sturdy cardstock (Neenah Classic Crest 110# used here)
- Printable template
- Shape dies in the following approximate sizes: circles (1 7/8" and 3 3/4")
- Die cutting machine
- Scissors
- Ruler
- Craft knife
- Markers or other coloring medium of choice (Touch Twin Markers used here)
- Glue or other adhesive
- Foam tape
oval (2 1/4" x 3")
rectangle (2" x 2 1/2")
heart (2 3/4" x 3")
Step-by-Step
-
Step 1
Cut cardstock base to 4" x 11".
Score at 2 3/4", 5 1/2", and 8 1/4". Fold card base in half, then fold both the front and back panels toward the back on the score lines. Use a bone folder or other tool to flatten the creases.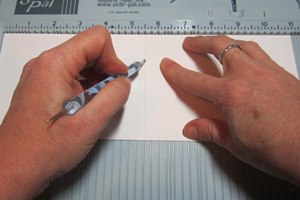
-
Step 2
Measure and mark in from each side with a pencil:
- 1/2" in along the top and bottom edge and center score line
- 1" in on the other two score lines
-
Connect the dots and cut away the excess from both sides with scissors as shown.
Save one of the scraps to cut the arms and nose!

-
Step 3
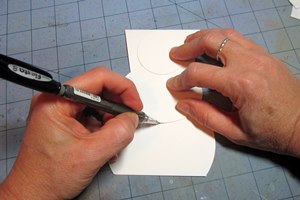
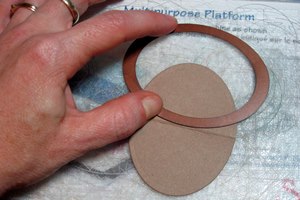
Cut out the pieces of the snowman from the printable template and/or using dies.

-
Step 4
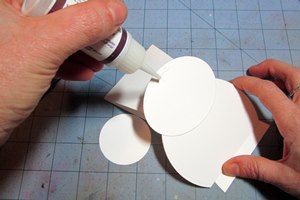
Fold the card base in half. Position the 3 3/4" circle to cover the bottom half of the front panel, and adhere. Do not glue above the score line. Trim the bottom along the straight edge of the card base.

-
Step 5
Determine the position of the oval and head, so that the head does not go past the top edge of the card base. Mark the position of the bottom of the oval with a pencil.
-
Bend the card to adhere first the oval to the larger circle and then the small circle to the oval, so that nothing is glued to the upper part of the card base.
-
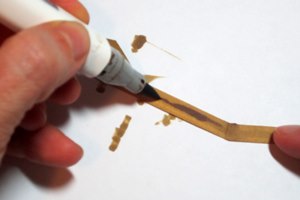
Step 6
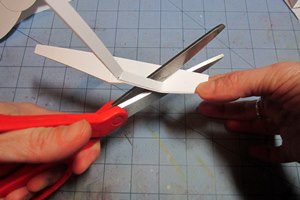
To cut the arms, fold the scrap piece from the card edge in half. Cut along the angled edge beginning at the fold, about 1/4" from the side.
-
Stop about 1" from the open end of the scrap, and cut out to the side to create a fork. Inside that angle, cut out a small wedge to form a hand.
Again, save the longer cut-away portion for the snowman’s nose.
-
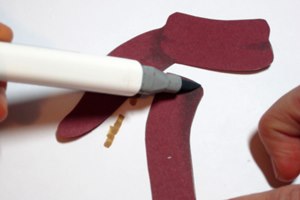
Step 7
Color the arms on both sides using markers or another medium. If using markers, color a base color for the wood, then use a slightly darker color to draw lines with varied pressure to create the look of wood grain.
-
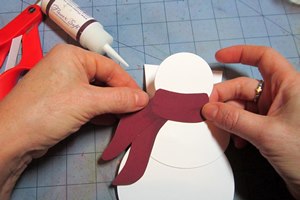
Step 8
Shade and assemble the scarf.
-
Glue the scarf to the card front, making sure to not exceed a width of 4 1/4" for the total card.
-
Step 9
Cut a thin triangle about 1 1/2" long from the cardstock left from the arms for a carrot nose. Color it orange. Attach it to the face.

-
Draw eyes on the snowman’s face. Add a smile if you like.

-
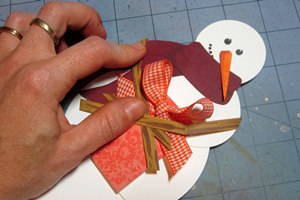
Step 10
Create a rectangular package for the snowman to hold. Add a die cut bow or tie ribbon to decorate the package.
Align the package with the bottom of the card front and attach with foam tape.
-
Step 11
Center the arms along the back of the oval piece (center point up), and adhere across the oval.

-
Fold the arms around the oval to the front. When displayed, the thumbs can tuck in behind the package with elbows out. For mailing, fold the arms over one another.
-
Step 12
To create the legs, lightly draw a slightly curved line from the dip in the heart toward the opposite straight side. Shade to the outside of the line using a marker or other coloring medium. This gives the appearance that the legs are crossed.

-
Step 13
The shoes are cut from a die cut oval. Cut the oval first, then fold it in half to have a guideline for the middle. Turn the oval die 90 degrees, and center the long side of the die along the fold line. Cut, then repeat to create 2 shoes. The desired shape is indicated on the printable template.
-
Attach one shoe to the top of the heart, centered at the bottom of the forward leg. Glue or foam tape may be used as adhesive.
Attach the other shoe to the back side of the heart, centered at the bottom of the leg that appears to be covered up.
-
Step 14
Attach the legs to the bottom portion of the inside of the card. Be sure the shoes do not extend past the bottom edge of the card. The top of the heart will extend past the fold line. This will allow the card front to rest against it and stand. Do not glue above the score line.

-
Use a craft knife to trim away the card base around the legs and shoes.

-
Step 15
Complete the card, and display it on the edge of a shelf or mantel.
The card front sits like an easel card, with the bottom of the base against the back of the upraised knees.

-
The card folds flat to fit in a standard A2 envelope.

Video!
Your Turn
You've seen the tutorial, now you try it! We've got a section of the gallery set aside for Snowman Shelf Sitter. Try this technique, then upload your artwork to the gallery. Show us your creations!
***Please note - Internet Explorer/Edge is not a supported browser, and will not allow you to see the videos. Please use Chrome, Firefox or Safari to view our tutorial videos.

Questions and Comments
We'd love to get your feedback or questions. Leave your comment below.
My sister received her card in today's mail. She said it is in a place of honor on her mantle and that it has found a "forever home". Thanks again for the great tutorial
Thanks for the tutorial.
Page 1 of 1 pages