Quilled Flower Bookmark
by Clare Buswell
Use basic quilling techniques to transform strips of paper into a beautiful floral bookmark.
Supplies

- Paper (pink, yellow, and green used here)
- Cardstock (pink, green and white used here)
- Quilling tool
- Paper trimmer
- Scoring tool
- Glue
- Sentiment stamp
- Black ink
- Corner rounder
- Needle nosed tweezers
Step-by-Step
-
Step 1
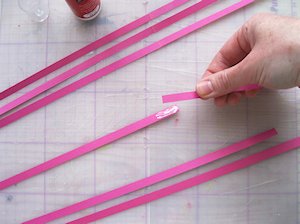
Cut 10 strips of paper for the flower petals, 1/4" wide and 11-12" long.

-
Glue two strips together, overlapping slightly. Repeat for remaining strips. Allow glue to dry.
-
Step 2
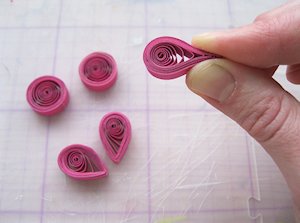
Using a quilling tool, roll a paper strip into a coil. Remove from tool, release slightly and glue the end. The coil should be about 3/4" wide. Repeat for remaining strips.
HINT:
If you don't have a quilling tool, straighten a large paperclip and squeeze one end into a tight hook with pliers.
-
Pinch each coil into a teardrop shape.
-
Step 3
Cut a 1/4" x 12" piece of paper for the flower center. Roll into a closed coil and secure end with glue. Remove from quilling tool.

-
Step 4
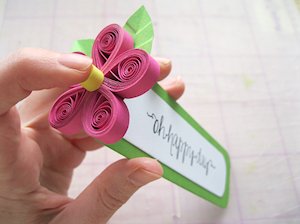
Glue the petals together as shown.

-
Glue the center on top of the formed flower.

-
Step 5
Cut two rectangles of cardstock to match the flower, 1" x 5". Cut two semi-circle tabs from the same cardstock. Score along the middle of each tab.
TIP:
To cut the tabs from punched or die cut circles, score a line across the center of the circles. Cut a rectangle below the line.
-
Step 6
Adhere tabs to the top of the rectangles and then together as shown. Fold out the ends to create a circular platform for the flower.

-
Step 7
Cut two pieces of cardstock 1 1/2" x 6" to form the base of the bookmark. Round the bottom corners if desired. Sandwich and glue the cardstock platform insert between the green pieces, with the tabs at the top.

-
Step 8
Cut two 1" x 5 1/2" pieces of white cardstock. Round bottom corners and stamp text. Adhere to both sides of bookmark.

-
Step 9
Cut two leaf shapes from green paper. Fold in half and pinch vein lines in cardstock using needle-nosed tweezers.

-
Step 10
Glue leaves together, overlapping slightly. Glue flower to leaves as shown.

-
Step 11
Apply glue to circle tab at top of bookmark and attach quilled flower. Leave to dry.
-
Step 12
Complete the project.

Video!
Your Turn
You've seen the tutorial, now you try it! We've got a section of the gallery set aside for Quilled Flower Bookmark. Try this technique, then upload your artwork to the gallery. Show us your creations!
***Please note - Internet Explorer/Edge is not a supported browser, and will not allow you to see the videos. Please use Chrome, Firefox or Safari to view our tutorial videos.

Questions and Comments
We'd love to get your feedback or questions. Leave your comment below.
Page 1 of 1 pages