Pop-Up Diorama Card

by Julie Davison

Hide a surprise scene inside this pop-up card.

Supplies

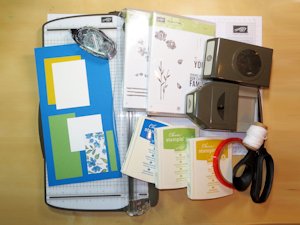
  • Cardstock cut to 5 1/2" x 10 1/2"
  • Paper trimmer
  • Scoring tool
  • 2-inch circle punch or die
  • Double sided tape
  • Other supplies as needed to create the diorama and card front (Stampin’ Up! Supplies used here: Inks (Pacific Point, Wild Wasabi, Hello Honey; Tuxedo Black Memento ink); cardstock (Wild Wasabi, Whisper White, Hello Honey); Painted Blooms designer paper, cotton twine, Ornate Tag Topper Punch

Step-by-Step

  1. Step 1

    Score the 5 1/2" x 10 1/2" cardstock at:
    3 1/2", 6 1/2", 7", and 10".

    Fold on all score lines.
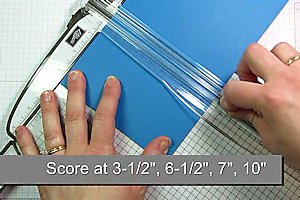
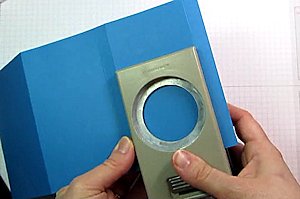
  2. Step 2

    Use a 2" circle punch or die to cut a window in the top center of the section next to the 1/2" flap. (When folded up, this will be the inside face of the card.)
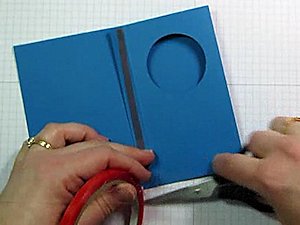
  3. Step 3

    Apply double sided tape along the 1/2" flap of the card.

  4. Remove the tape liner and fold the card closed to adhere.

    NOTE:
    The taped flap will fold back to the inside center of the card and stick to the inside of the card front (NOT the card back).
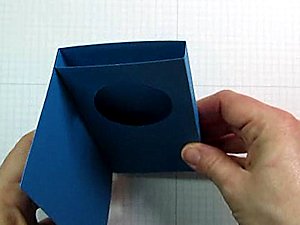
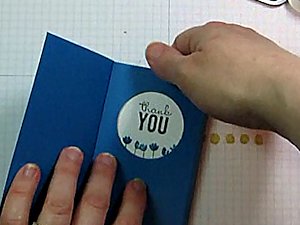
  5. Step 4

    Decorate a 2 1/2" x 2 1/2" piece of cardstock to go inside the diorama. With the card open, line up the cardstock inside the diorama and adhere it to the back of the diorama.

  6. Step 5

    Embellish and complete the card front.

  7. Step 6

    Assemble and complete the card.

  8. Finished card size is 3 1/2" x 5 1/2" and will fit in an A2 envelope.

Video!

Your Turn

You've seen the tutorial, now you try it! We've got a section of the gallery set aside for Pop-Up Diorama Card. Try this technique, then upload your artwork to the gallery. Show us your creations!

***Please note - Internet Explorer/Edge is not a supported browser, and will not allow you to see the videos. Please use Chrome, Firefox or Safari to view our tutorial videos.

Questions and Comments

We'd love to get your feedback or questions. Leave your comment below.

Love this card and the technique. All of you designers are awesome, coming up with all these things. I will be making some of these for sure! Thank You
colleen howell  |  Wed Jan 21, 2015 at 4:29 AM
Thanks for the really neat card tutorial. I can't wait to try it myself. Nice change from just a flat card.
Dottie  |  Wed Jan 21, 2015 at 5:40 AM
I love new techniques and this one looks easy but looks like a lot of effort was put in to it. Thanks for giving me the opportunity to try something new.
Carol  |  Wed Jan 21, 2015 at 6:13 AM
Sweet card, and very clear tutorial-- nice job!
Carolynn  |  Wed Jan 21, 2015 at 6:21 AM
Julie, another great card and tutorial - just love it - what size envelope did you use for your card? Again, thank you for the inspiration. grin
Dottie Macken  |  Wed Jan 21, 2015 at 6:30 AM
Great card! Wonderful tutorial! TFS smile
Jean ~  |  Wed Jan 21, 2015 at 6:36 AM
Great card and tutorial, Julie. Love your cheerful and easy style.
Leanne Cyr  |  Wed Jan 21, 2015 at 6:52 AM
Great idea! Great card! Thank you!
Rose Suenram  |  Wed Jan 21, 2015 at 7:03 AM
Thank you for this wonderful idea. The video is terrific and the card just terrific.
Prisssequito  |  Wed Jan 21, 2015 at 7:09 AM
Julie, just read the printed instructions, and found the answer to my question (A2). grin
Dottie Macken  |  Wed Jan 21, 2015 at 7:13 AM
Thanks for a great tutorial! Looking forward to trying it out!
Bev Gerard  |  Wed Jan 21, 2015 at 8:50 AM
Wow! This is a fabulous project and an excellent tutorial! Thanks so much!!! I can't wait to try some valentines with this technique.
Miriam Permut  |  Wed Jan 21, 2015 at 10:45 AM
WOW! This is darling! What a quick, cute card to make at my next stamp camp! Thanks for the great tutorial. I must subscribe to your blog, fellow SU demonstrator! grin
Bobbi Miller  |  Wed Jan 21, 2015 at 11:10 AM
love different ways for folding cards, this one is a must try for me.
Paula DiGiovanni  |  Thu Jan 22, 2015 at 3:56 AM
How cute! Thanks for an excellent tutorial. It was well done. I'm going to try this right now!
Diane Carpenter  |  Thu Jan 22, 2015 at 9:41 AM
So much fun!
muscrat  |  Wed Jan 28, 2015 at 7:33 AM
Wow!!! How cool is this. Thanks so much for Julie.
Susie Williams  |  Mon Feb 23, 2015 at 6:53 PM
What a great card! Tks for posting the video, you make it look so easy that I have to make one too.
Therese Hoffman  |  Fri Mar 13, 2015 at 7:53 AM
You did a terrific job both on the card itself and in the tutorial. This is the first time I've seen your work and it's just great! Thank you very much.
Mary Decker  |  Sat Sep 5, 2015 at 6:53 PM

Page 1 of 1 pages

You need to be logged in to comment

GET OUR NEWSLETTER


Splitcoaststampers's privacy policy