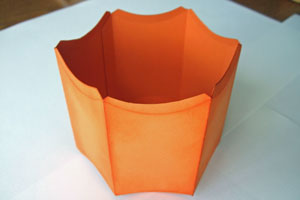
Pillow Box Bucket
by Lynn Put
Create an adorable bucket with Pillow Box die cuts.
Supplies
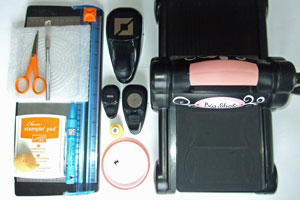
- Three Pillow Box Die Cuts (Pumpkin Pie Cardstock used here)
- Tacky Tape™, or other strong adhesive
- Scissors
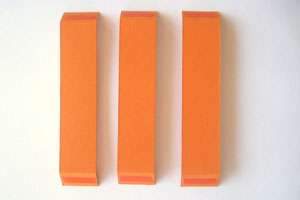
- Three 1" x 5" Cardstock Strips for bucket bottom (Pumpkin Pie Cardstock used here)
- One 3/4" x 11" Cardstock Strip for bucket handle (Old Olive Cardstock used here)
- Two 4" cardstock Circle for bucket bottom
- Additional cardstock and punches for embellishment
- Paper Cutter with scoring blade
- Horizontal Slot Punch
- Sponge
- Ink (Pumpkin Pie Classic ink used here)
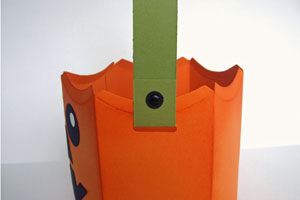
- Two Brads
Step-by-Step
-
Step 1
Pre-fold each pillow box die cut on score lines and sponge with ink.
-
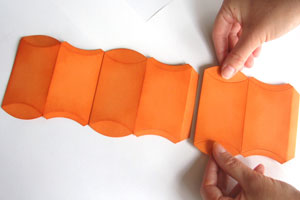
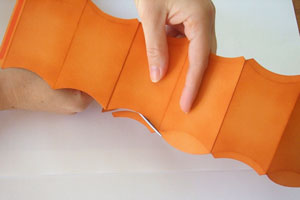
Step 2
Apply Tacky Tape™ to the long horizontal tabs on two of the boxes and tape together as shown in picture, leaving flat.
-
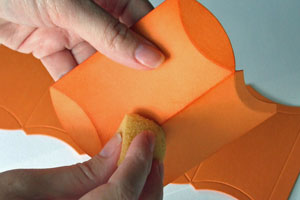
Step 3
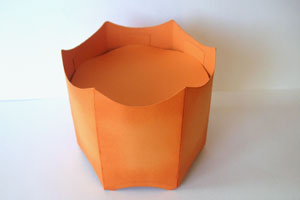
Choose one side to be the top of your bucket and trim the three rounded Pillow box tabs so that all edges are the same.

-
For the bottom edge of your bucket you will need to trim off all tabs (as shown in picture).
-
Step 4
Using Tacky Tape, tape last pillow box to form your bucket.
-
Step 5
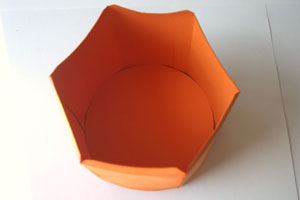
Each 1”x 5” strip of card stock will need to be scored at each end ½”.
-
Apply Tacky Tape™ to the very ends (on one side) and tape them to the inside bottom of the bucket ¾” from the bottom with the ½”scored strip facing the bottom of the bucket.
-
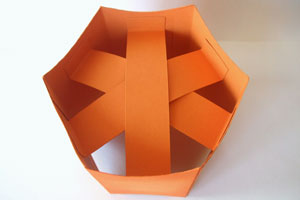
Step 6
Apply tape to the bottom of the criss crossed strips
-
and tape 4” circle in place.
-
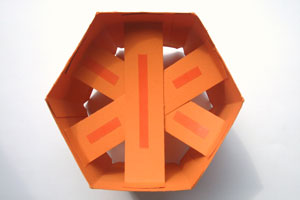
Step 7
Flip bucket over and place the second 4” Coluzzle circle inside the bottom of the bucket.
-
Step 8
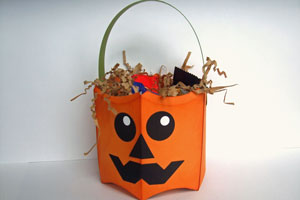
Decorate Bucket front if wanted.
Used here:
Two 1" black circles for eyes, 3 1/4" white circles for eyes, 3 black photo corner punch-outs for mouth, one hand-cut triangle for nose.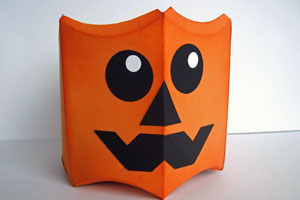
-
Step 9
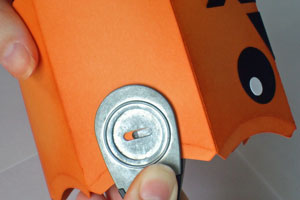
Make elongated punches on each side of the bucket using the Horizontal Slot punch
-
and feed the handle through, fold and attach with tape or brads.
-
Step 10
Fill your Pumpkin Bucket with Halloween candy or small gift.
Video!
Variations
-
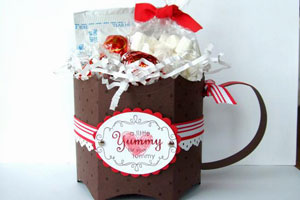
Make it a cup!
Add handles on the side of the bucket.
Before adding the criss cross pieces for the bottom of the bucket (after step 4) add the handle to the side of the cup (the cup handle is 3/4" x 8" and I scored 3/4" on each end). Use the Slot punch and punch two elongated punches (I did mine on a scored/taped edge of the cup because other wise the handle would either be to far back or to far forward) one 3/4" from the top and one 3/4" from the bottom above one another. Then insert the scored ends of the handle and tape them to the inside of the cup. Continue with step 5-8 to finish your cup.
Your Turn
You've seen the tutorial, now you try it! We've got a section of the gallery set aside for Pillow Box Bucket. Try this technique, then upload your artwork to the gallery. Show us your creations!
***Please note - Internet Explorer/Edge is not a supported browser, and will not allow you to see the videos. Please use Chrome, Firefox or Safari to view our tutorial videos.

Questions and Comments
We'd love to get your feedback or questions. Leave your comment below.
Thanks for sharing and the video too!!
Linda
http://www.youtube.com/watch?v=hpap24HCJSs
Bill,
The pillow die is 2 1/4" wide from score line to score line ( 4 1/2", plus glue tab). Without the glue tabs the longest point measures 3 1/2", the lowest 2 7/8".
For Emily who was asking which die this is---it is from Stampin Up! and called the Pillow Box Bigx Die and is available through SU in the catalog. I think it costs about $20.
Page 1 of 3 pages 1 2 3 >