Pencil Tree
by Barbara Schram
Create a pencil holder shaped like a Christmas tree.
Supplies

- Cardstock, White & Pink used here
- Patterned Paper, Webster’s Pages Girl Land used here
- Scalloped Border Stamp, JustRite Papercraft Classic Sentiments Edges One used here
- Ink, Memento Tuxedo Black used here
- Dies, Spellbinders Nested Lacey Pennants & Classic Edges One used here
- Grand Calibur, or other die cutting machine
- Scor-Tape, or other strong adhesive
- Tombow Mono Liquid Glue, or other liquid adhesive
- Small Embellishments, Taylored Expressions Tiny Twinkle Gems/Tweezers used here
- Pencil
- Scissors
- Silver Metallic String
Step-by-Step
-
Step 1
Stamp scalloped borders.

-
Step 2
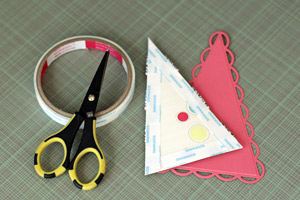
Die cut stamped borders and colored card stock with scallop border die. Adhere stamped and solid cardstock borders together, allowing the color to peek out at the bottom of stamped border.
Die cut cardstock with largest Spellbinders Lacey Pennant die.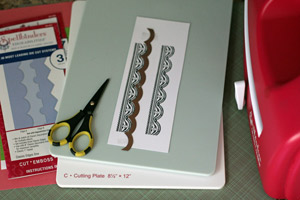
-
Step 3
With pencil draw the inner pennant triangle shape onto patterned paper using the metal straight edge of the die for your guide. Cut out triangle.

-
Step 4
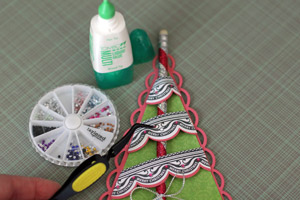
Take borders, place on hand cut triangle to determine where to trim border side edges. Trim and create three borders to use as tree garland.
Secure sides of borders to underside of hand cut triangle to resemble tree garland allowing room for the pencil.
-
Step 5
Run Scor-Tape along the back of cutout triangle tree, this will also secure the folded over garland edges. Remove tape backing and place onto Lacey Pennant Die Cut, pressing along edge to secure.
-
Step 6
Insert Pencil and add embellishments (Silver String Bow on pencil base & Gems to stamped border garland).
-
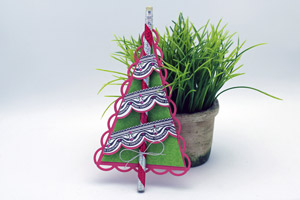
Step 7
Your pencil tree is completed.
Video!
Variations
-
Change it up a bit:
• Add string to top, allowing Pencil Tree to become a tree ornament or package tie on
• Add lettering for personalization
• Add additional embellishments such as ribbons, lace, glitter, sequins etc
Your Turn
You've seen the tutorial, now you try it! We've got a section of the gallery set aside for Pencil Tree. Try this technique, then upload your artwork to the gallery. Show us your creations!
***Please note - Internet Explorer/Edge is not a supported browser, and will not allow you to see the videos. Please use Chrome, Firefox or Safari to view our tutorial videos.

Questions and Comments
We'd love to get your feedback or questions. Leave your comment below.
I so enjoy the tutorials. Thank you very much!
Thank you in advance.
Texasrose
Page 1 of 1 pages