Out of the Box with Nestabilities

by Diane Zechman

Create an image that comes partly out of a Nestabilities™ die cut.

Supplies
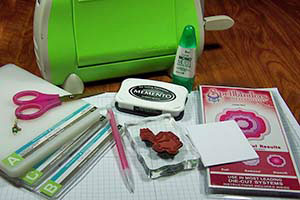
  • Die Cutting Machine (Cuttlebug™ used here)
  • Nestabilities die
  • Cardstock
  • Stamps, (Cookie Crumbs "Time For Cake" used here)
  • Ink
  • Pencil with eraser
  • Scissors
  • Adhesive
  • Patterned papers, ribbon, brads, and other embellishments to finish your card

Step-by-Step

  1. Step 1

    Stamp the image and place the Nestabilities die on top of it.
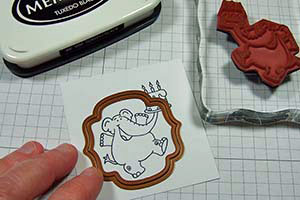
  2. Step 2

    Using a pencil, lightly mark a small line on the inside of the die, above and below the portion of the image that you want to leave outside of the die cut shape.
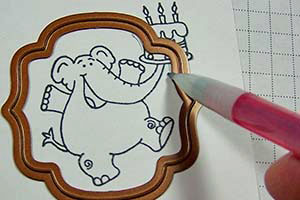
  3. Step 3

    Remove the die. With a pair of sharp scissors, cut from the edge of your paper up to the line you drew, cutting along the lines of the image. Then cut around the section that will pop out.

    Here, I cut up to the lines and then cut around the cake.
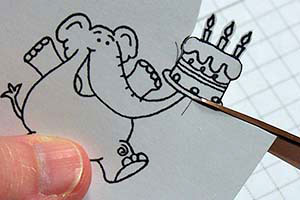
  4. Step 4

    Place the die back into position, with the cutting edge down. When you slide the die into place, lift the section that will pop out so that it lays above the die. This will keep it from being cut off when it is put through the die cut machine.
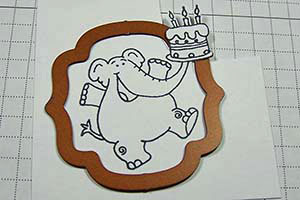
  5. Step 5

    Sandwich the image and die with the cutting plates and run it through the die cutting machine.
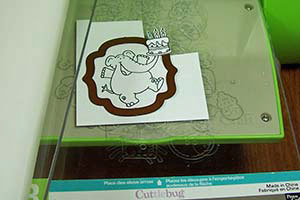
  6. Step 6

    Remove the die and erase the pencil marks.
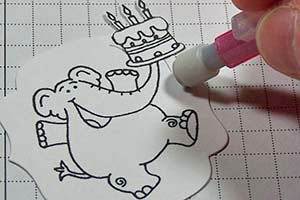
  7. Step 7

    Attach image to your card and embellish as desired.
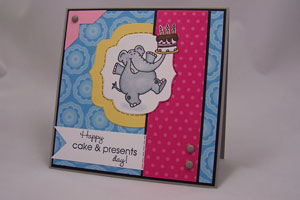
Video!

Variations

    No dies needed
    Instead of using a Nestabilities™ die, try drawing a shape and cutting it out with scissors. Use a ruler, shape template or even trace a cookie cutter.

Your Turn

You've seen the tutorial, now you try it! We've got a section of the gallery set aside for Out of the Box with Nestabilities. Try this technique, then upload your artwork to the gallery. Show us your creations!

***Please note - Internet Explorer/Edge is not a supported browser, and will not allow you to see the videos. Please use Chrome, Firefox or Safari to view our tutorial videos.

Questions and Comments

We'd love to get your feedback or questions. Leave your comment below.

Oh, So Cool!!! Can't wait to try this!!! Thanks for the step by step instructions!!!
Lori Prince  |  Wed Apr 14, 2010 at 4:23 AM
ahhhhh, a penny has suddenly dropped. Thanks so much for sharing this. Love it.
Jill  |  Wed Apr 14, 2010 at 4:49 AM
Hey, I know that voice. Thanks, Diane, for putting this in writing *and* on video for us. I will do this some day.
lindylou1220  |  Wed Apr 14, 2010 at 5:04 AM
Neat! Thanks for that.
Sandra K  |  Wed Apr 14, 2010 at 5:11 AM
Ingenious! Thank you!!!!
muffincards  |  Wed Apr 14, 2010 at 5:47 AM
This is brilliant!!! Thanks so much for sharing this tip.
Angela xxx.
angela  |  Wed Apr 14, 2010 at 6:09 AM
this is the greatest thing.... I have been wondering about how to do something like that - and now I know! thank you for sharing!!!!!
dani  |  Wed Apr 14, 2010 at 6:32 AM
Brilliant!! Thanks for sharing your creative idea!
Anne  |  Wed Apr 14, 2010 at 7:49 AM
That is just soooo fun! Thanks for this great idea (:
julie Crossley  |  Wed Apr 14, 2010 at 8:39 AM
Really cute card and great tip and instructions. Thank you.
Mary Sara P.  |  Wed Apr 14, 2010 at 8:40 AM
Hi Diane. My maiden name is Zechman. I was born in Cleveland, OH. Where are you?
Sherry Steffan  |  Wed Apr 14, 2010 at 8:43 AM
What a unique idea. I'll have to give this on a try. Thanks for the inspiration.
Jan B  |  Wed Apr 14, 2010 at 9:52 AM
This has long been one of my fave techniques. I'm glad we have gallery to put them in now. Super job on your tutorial!
Julie- justwritedesigns  |  Wed Apr 14, 2010 at 10:07 AM
Thank you so much.....I really didn't know how this was done.....now I do ......with your awesome tutorial......again thank you......
Gloria Westerman  |  Wed Apr 14, 2010 at 10:18 AM
Thanks for the sweet comments, ladies!
Sherry, I am in PA.
diane (cookiestamper)  |  Wed Apr 14, 2010 at 10:39 AM
Thanks for the step by step instructions. I love your card and am anxious to give this a try.
Colleen  |  Wed Apr 14, 2010 at 11:54 AM
great tutorial, it seems to be easy and makes such a great effect.... I'll try this!
thanks for sharing!
mimibricole  |  Wed Apr 14, 2010 at 12:05 PM
Your tutorial is wonderful! Thank you for the great demo and instructions - I love this idea.
lydia  |  Wed Apr 14, 2010 at 12:10 PM
Fun idea and terrific video! thanks for always being generous in sharing your talents!
Tina aka TeeGeeDee  |  Wed Apr 14, 2010 at 1:49 PM
I love this! What a great technique! Thank you for sharing.
GarnetJ  |  Wed Apr 14, 2010 at 2:52 PM

Page 1 of 3 pages  1 2 3 >

You need to be logged in to comment

GET OUR NEWSLETTER


Splitcoaststampers's privacy policy