Origami Box

by Jenn Balcer

This easy-to-make box is ready in a flash, and is perfect for when you need a package just as spectacular as the gift inside.

Supplies

  • 11" x 11" cardstock for box bottom
  • 11 1/2" x 11 1/2" cardstock for lid
  • Bone Folder
  • Adhesive
  • Ribbon
  • Embellishments
  • The finished box will be a 4" square.

Step-by-Step

  1. Step 1

    The steps for the box top and bottom are the same. Start by folding cardstock precisely in half. Use a bone folder for sharp creases.

    Unfold and fold in half, again using the bone folder for sharp creases. The intersection of the folds will be the box center.

  2. Step 2

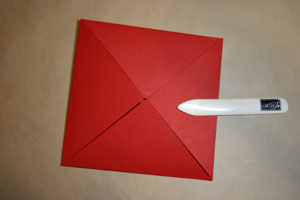
    Unfold, and fold a corner to the center of the box. Close attention is needed for sharp creases and precise folds.

  3. Step 3

    Repeat, bringing all corners to the center of the box.

  4. Step 4

    Fold the top of the square to middle of box, and the bottom of the square to the middle of the box. Make sure to use the bone folder! Depending on the cardstock thickness, this could be difficult.

  5. Step 5

    Unfold top and bottom and repeat step 4 with remaining two sides.
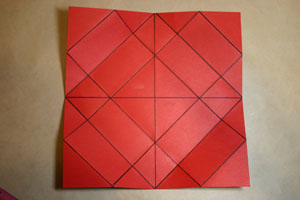
  6. Step 6

    Marker lines were added so that all fold lines would be visible.
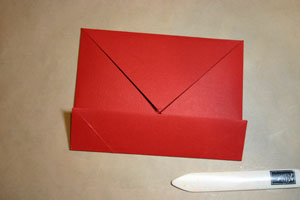
  7. Step 7

    Fold top corners to center of box as shown.

    If desired, add adhesive under points. If using sturdy cardstock, adhesive is not usually needed.
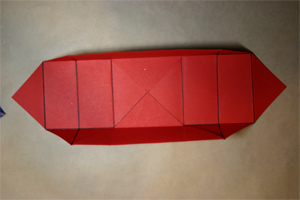
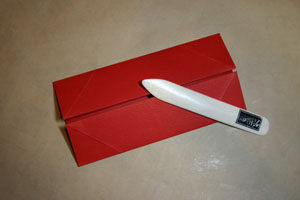
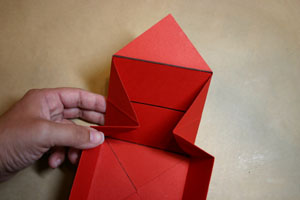
  8. Step 8

    To close box sides, fold at diagonal creases as shown and tuck corners in, apply adhesive if necessary.

  9. Step 9

    Completed box bottom.

    Repeat steps 1-8 to create box top using cardstock measuring 1/2" larger all around.
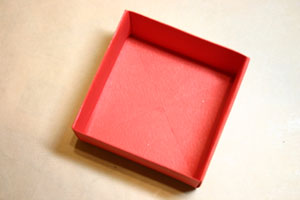
  10. Step 10

    Fill box, place top over bottom.

    Tie with ribbon and embellish to finish the package!
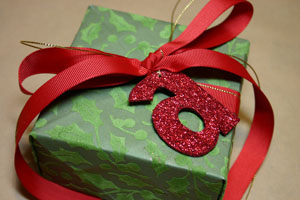
Variations

    Different sizes
    Create different sized boxes by starting with smaller or larger cardstock, making sure the cardstock for the lid is 1/2" larger all around.

    Belly band
    Instead of ribbon, try a belly band. Start with a strip of cardstock 2" x 12" and score at 1 1/4", 3 5/16", 7 1/2", and 9 5/8" and attach ends with Sticky Strip. Leave slightly loose so that the belly band can be slipped on and off easily.

Your Turn

You've seen the tutorial, now you try it! We've got a section of the gallery set aside for Origami Box. Try this technique, then upload your artwork to the gallery. Show us your creations!

***Please note - Internet Explorer/Edge is not a supported browser, and will not allow you to see the videos. Please use Chrome, Firefox or Safari to view our tutorial videos.

Questions and Comments

We'd love to get your feedback or questions. Leave your comment below.

What a gorgeous box. You can make these boxes without the crease through the middle if you simply draw a line from corner to corner using a straight edge, then bring each point up to the middle. Clear as mud? Nichole Heady has the directions on her blog http://nicholeheady.typepad.com/capture_the_moment/2007/05/1.html

Thanks for continuing to share such wonderful tutorials!

Smiles,
Anne
Anne Lawrie  |  Sun Nov 18, 2007 at 7:38 AM
What a beautiful gift box, Jenn - Thanks for the wonderful tutorial!
I'm lovin' the Holiday Tutorial Blitz ~ Thanks Everyone for all these awesome projects!!!
genescrapper  |  Sun Nov 18, 2007 at 8:02 AM
Another great idea.It's beginning to feel like Xmas already. What dedication,I didn't expect to receive one on a Sunday !. Many thanks.
barbara hickson  |  Sun Nov 18, 2007 at 9:10 AM
I LOVE your box!! Thanks for another awesome tutorial, Jenn!!
Rose Ann Reynolds  |  Sun Nov 18, 2007 at 9:31 AM
I remember making boxes like this a few years ago. Thanks for reminding about these very easy and cute little boxes. All of the tutorials are just so awesome.
melissa  |  Sun Nov 18, 2007 at 10:13 AM
Love these little boxes! Have been making them for couple of years and everyone I show them to are just amazed that they are made with just paper. Very handy and cute. Great for holding candy, gift cards, or jewelry.
Rhonda K.  |  Sun Nov 18, 2007 at 11:36 AM
What an adorable little box! I had to do it right away and I made mine with double sided designer series paper from SU! Very cute and perfect for either decoration or for that special gift! Thank you for a great and simple idea!
Kelli  |  Sun Nov 18, 2007 at 11:54 AM
So cute i'm making these for my group officers! TFS !
liz  |  Sun Nov 18, 2007 at 4:58 PM
I was wondering what the dimensions are when the box is complete? Will it fit a CD?
Erin  |  Mon Dec 17, 2007 at 2:02 PM
Finally, an easy-to-understand origami box tutorial. The rest threw me for loops. Thank you so much!
Krystal  |  Wed May 7, 2008 at 6:47 AM
So simple and extremely quick!
Carolyn  |  Fri Jun 20, 2008 at 12:57 PM
I would suggest you give the finished size of the box. If you need a larger or smaller version, you won't waste your time and material making this size.

Great idea!

Thanks for sharing!
Sandy  |  Wed Nov 5, 2008 at 4:13 PM
Wow! I looked up the directions to make this box the other day and I was totally confused! You made it so easy to understand! The lines helped a lot. =) Thank you!
Skylin  |  Mon Feb 16, 2009 at 8:13 AM
Thankyou soooo much. I have just started Soap making and have tried heaps of different templates, and the packaging i have tried looks shabby (not like the shop). Then I came across your site. What can i say but Thank You again and thats from the bottom of my heart
Sienna  |  Wed May 13, 2009 at 8:28 PM
I like your box!! Thanks for an awesome tutorial, Jenn!
Papuosalai  |  Wed Mar 17, 2010 at 6:53 AM
Nice tutorial, may i add it on my site?
kunbpn  |  Tue Sep 7, 2010 at 10:39 AM
I learned this technique a while back so I'm glad to be able to refresh my memory and have the directions here. I'm uploading a series of stacked boxes that I created today. Thanks!
Scrapcollectr57  |  Thu Feb 10, 2011 at 8:15 AM
my Aunt always made those boxes out of old Christmas and birthday cards....love them!
diane  |  Tue May 24, 2011 at 7:04 AM
Wonderful box easy to make.
Thank you for sharing!
Eva from Sweden  |  Sun Oct 23, 2011 at 5:55 AM

Page 1 of 1 pages

You need to be logged in to comment

GET OUR NEWSLETTER


Splitcoaststampers's privacy policy