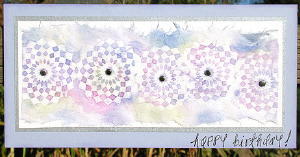
Mulberry Batik
by Erika Martin
Create a resist background with watercolor crayons and embossing.
Supplies
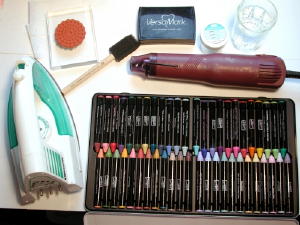
- White Mulberry Paper
- Stamp(s)
- Heat Tool
- VersaMark™
- Clear Embossing Powder
- Foam Brush
- Water
- Watercolor Crayons
- Iron
- Plain white printer/copy paper
Step-by-Step
-
Step 1
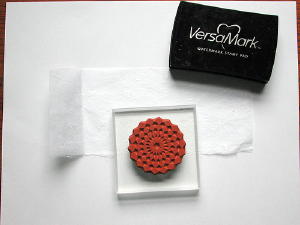
Ink up your stamp with VersaMark™ ink and stamp it across the white mulberry paper, making sure to press down on the mulberry paper for full ink coverage.
-
Step 2
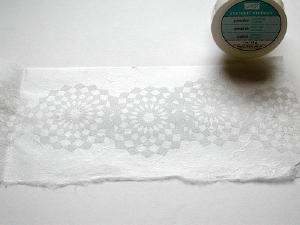
Sprinkle your Clear Embossing Powder over the images. Shake off the excess powder.
-
Step 3
Use a Heat Tool (also known as an embossing gun) to melt the powder.
Note: Mulberry paper is made up of very fine fibers and heats up quickly, so be very careful not to hold the heat in one place too long or the fibers will start to turn brown and may even start to smoke.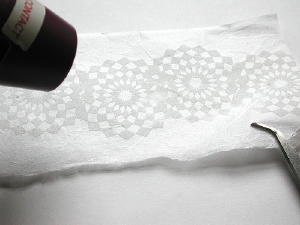
-
Step 4
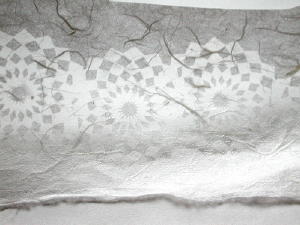
When your image is fully embossed, you should be able to see through the Mulberry paper when you hold it up to the light.
-
Step 5
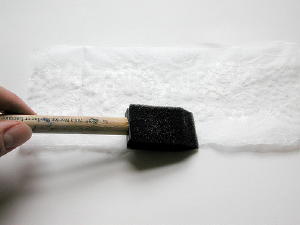
After the embossing has dried and cooled, dampen a foam brush with water and lightly coat the mulberry paper (embossed side up).
Note: You only want a DAMP brush, not a wet brush. Mulberry paper soaks up liquid very quick and can easily tear if the paper is too wet.
-
Step 6
Using the same damp brush, apply some color from a Watercolor Wonder Crayon. How much color you put on your brush depends on how deep you want the color to be. Keep in mind that as your mulberry paper dries, the color will become just a tad lighter.
For the Mulberry Batik technique, 3 colors minimum is the best way to start. 2 colors often doesn't seem like enough of a contrast and depending on how big or small your project is, more than 3 colors may be too many. Play around to see what you can come up with.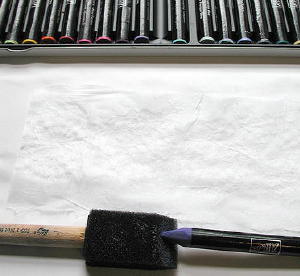
-
Step 7
Once you have your Watercolor Crayon color on your foam brush, dampen it just a little more with some water.
Carefully apply the color across the mulberry paper (embossed side up), being careful to lightly "pounce" the brush across, instead of wiping or brushing it, so as not to tear the paper.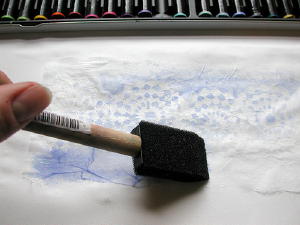
-
Step 8
Repeat step 7 with two more different colors, "pouncing" colors in different spots. Quickly dry your mulberry paper with your heat tool in between color applications to keep the paper from getting too wet and possibly tearing.
Once you have your colors the way you want them, wet the top and bottom edges of the mulberry paper and carefully tear the edge in small pieces. This will give the edges a feathery look. Completely and carefully dry your mulberry paper with your heat tool.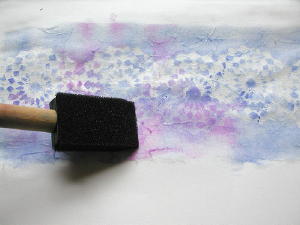
-
Step 9
To create the finished batik look, place your mulberry paper between a couple of pieces of plain white printer/copy paper folded in half. Use an iron on a medium setting and rub over the copy paper. Open the paper and carefully remove the mulberry paper and repeat this step a couple more times with fresh copy paper.
This step removes the shiny embossing powder from the mulberry paper, so that you have a batik look when it's all removed.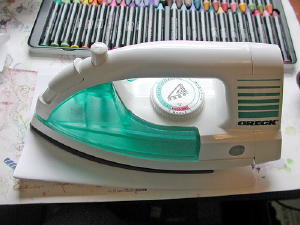
-
Step 10
Finish your card.
Your Turn
You've seen the tutorial, now you try it! We've got a section of the gallery set aside for Mulberry Batik. Try this technique, then upload your artwork to the gallery. Show us your creations!
***Please note - Internet Explorer/Edge is not a supported browser, and will not allow you to see the videos. Please use Chrome, Firefox or Safari to view our tutorial videos.

Questions and Comments
We'd love to get your feedback or questions. Leave your comment below.
Page 1 of 1 pages