Mini Blinds
by Diane Zechman
Add blinds over your image that open and close.
Supplies
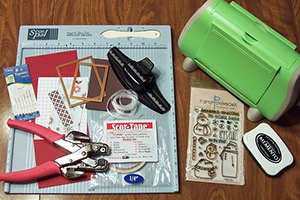
- One 5 1/2" x 8 1/2" piece of cardstock for card base
- One 4" x 5 1/4" piece of cardstock or patterned paper for card front layer
- One 2 3/8" x 4 7/8" piece of patterned paper for blind
- One 3/4" x 3 1/8" piece of cardstock or patterned paper for valance
- One 3 1/2" x 4 1/2" scrap of cardstock for die cutting
- Scor-Pal™
- Scor-Tape™
- Glue
- Stamps, Paper Smooches Swanky Snowdudes used here
- Ink, Tuxedo Black Memento Ink used here
- Crop-a-Dile™, or other hole punch
- Ribbon
- Rectangle Nestabilities©, or other nested dies
- Die Cutting Machine
- Large Eyed Needle, optional
Step-by-Step
-
Step 1
Adhere the layer to the card front. Using the next to the largest size of the Large Rectangle Nestabilities©, die cut an opening in the card front only.
Hint:
If you don’t have Rectangle Nestabilities, simply cut a 2 3/8" x 3" opening in the card front with a paper trimmer or craft knife.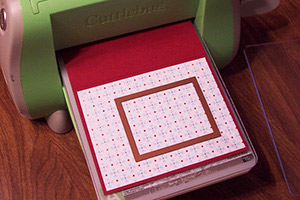
-
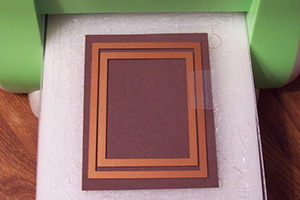
Step 2
Using the same die, along with the largest die, diecut a piece of complementary cardstock to create a window frame. Use a little tape to hold them in place if necessary. Attach this frame to the card front.
-
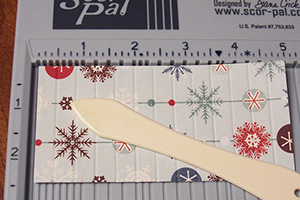
Step 3
Score the 4 7/8" side of the patterned paper for the blind every 3/8″.
Hint:
To do this on the Scor-Pal™- first align the paper against the left fence and score at 3/8″, 3/4″, 1 1/2″, 2 1/4″, 3″, 3 3/4″, and 4 1/2″.
-
Step 4
Next, move the paper over so the left edge is aligned at the 1/8″ groove. Score at 1 1/4″, 2″, 2 3/4″, 3 1/2″, and 4 1/4″.
-
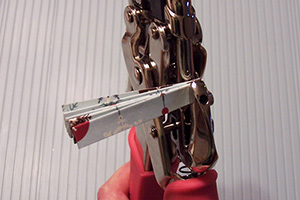
Step 5
Starting with a valley fold at the top, accordian fold the blind. Then, holding it folded up, punch each end with the smallest hole of the Crop-A-Dile.
-
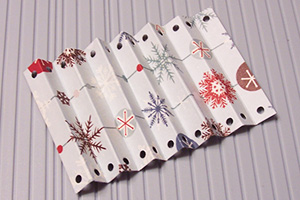
Step 6
Unfold. It should now look like this…
-
Step 7
Lightly trace the window opening onto the inside of the card with a pencil.
Hint:
If using a colored cardstock base, first adhere a neutral layer of cardstock to the inside.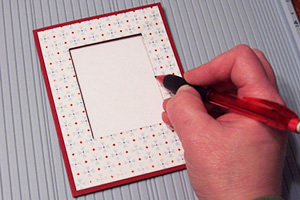
-
Step 8
Open the card and stamp images as desired using the pencil lines as a guide.

-
Step 9
Color your stamped images, if needed, and erase the pencil lines.

-
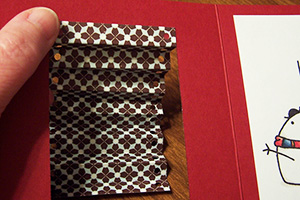
Step 10
Attach the top section of the blind to the inside of the card front, aligning the first (top) scored line with the top of the window opening.
-
Step 11
Apply Scor-Tape™ or glue to the inside of the card front as shown. Adhere the front to the back. (The finished card will not open like a normal card.)
-
Step 12
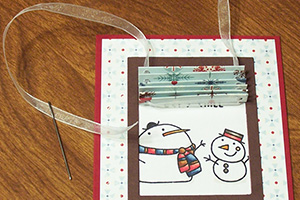
Thread ribbon through the holes in the blind, starting and ending at the top. A large-eyed needle may be used to thread the ribbon through if needed. Knot ends of ribbon.
-
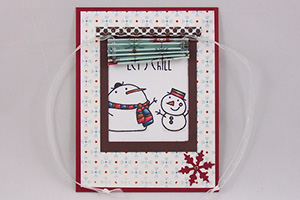
Step 13
To create a valance, score the 3/4” side at 1/4″. Then punch the other side with a scallop edge punch.
Attach valance to the top of the window and finish card as desired.
-
Step 14
Pull both ribbon tails at the same time, in opposite directions, to make the blind go up.

-
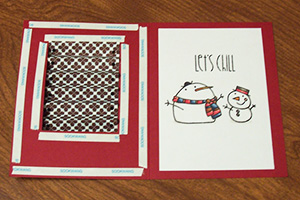
Step 15
Your finished card open.
-
Finished card closed.

Video!
Variations
Try using a window die instead of the rectangle dies to create the opening. Adjust the width of the blind as necessary.
Your Turn
You've seen the tutorial, now you try it! We've got a section of the gallery set aside for Mini Blinds. Try this technique, then upload your artwork to the gallery. Show us your creations!
***Please note - Internet Explorer/Edge is not a supported browser, and will not allow you to see the videos. Please use Chrome, Firefox or Safari to view our tutorial videos.

 *
*
Questions and Comments
We'd love to get your feedback or questions. Leave your comment below.
ALSO...if you like to add some "instructions" with your interactive cards when mailing, I have a printable sheet on my blog here:
http://papercookies.blogs.splitcoaststampers.com/2013/01/09/mini-blind-card-tutorial-with-video/
Page 1 of 2 pages 1 2 >