Matchbook Candy Holder

by Theresa Momber

Create a card shaped like a matchbook.

Supplies

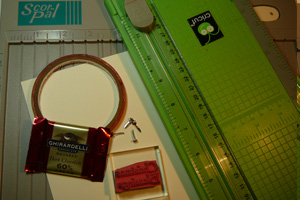
  • One 5 3/4" x 2 3/8" piece of cardstock
  • One 7 3/8" x 2 3/4" piece of cardstock
  • Paper Trimmer
  • Adhesive
  • Scor-Pal™, or other scoring tool
  • Brads or staples
  • Stamps and embellishments to finish project

Step-by-Step

  1. Step 1


    Score a 5 3/4" x 2 3/8" piece of cardstock at 2 1/4", 2 1/2", 2 3/4", 5", 5 1/4", and 5 1/2".
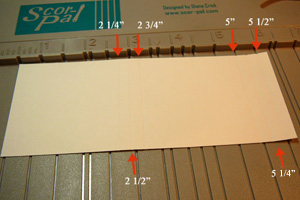
  2. Step 2

    Make mountain and valley folds as shown and adhere.

    This is the pocket insert.
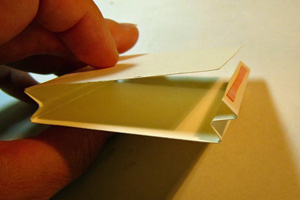
  3. Step 3

    Score the 7 3/8" x 2 3/4" piece of cardstock at 3", 3 1/2", and 6 3/4".

    Make your folds to the outside, add the pocket insert and fold over the small flap.

    Optional:
    You could use decorative staples to secure the pocket at this point instead of adding the brads, if you would like.
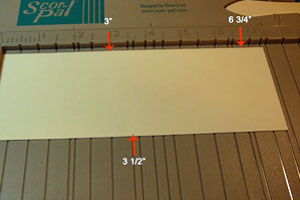
  4. Step 4

    Add a narrow piece of tape to the 1/2" flap and place the pocket insert as shown and adhere the flap to the insert.

    Avoid applying adhesive close to the edge or the top flap won’t be able to tuck inside when the project is completed.
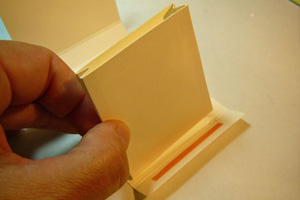
  5. Step 5

    After adhering the insert, open the matchbook up and pierce for brad placement.

    Then insert the brads.
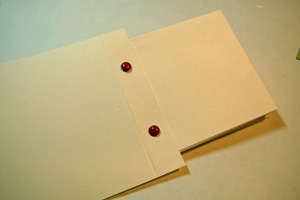
  6. Step 6

    Turn it over and spread the prongs of your brads.

    Add some adhesive tape over the brad prongs and press back into place.
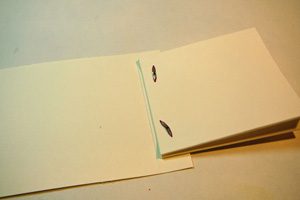
  7. Step 7

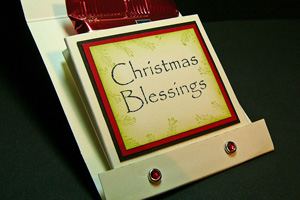
    Add stamped layers and embellish the inside as desired. Card stock cut to 2" x 1 3/4" will fit perfectly on the inside.

  8. Step 8

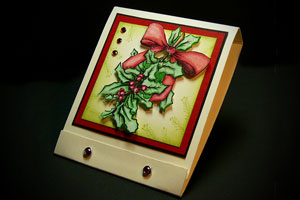
    Decorate your matchbook holder. 2 1/2" card stock squares will fit the front.

Video!

Your Turn

You've seen the tutorial, now you try it! We've got a section of the gallery set aside for Matchbook Candy Holder. Try this technique, then upload your artwork to the gallery. Show us your creations!

***Please note - Internet Explorer/Edge is not a supported browser, and will not allow you to see the videos. Please use Chrome, Firefox or Safari to view our tutorial videos.

Questions and Comments

We'd love to get your feedback or questions. Leave your comment below.

super cute! I'm going to give this a try. Thanks for sharing!
Jan Hennings  |  Mon Nov 2, 2009 at 8:12 AM
Great tutorial, however I can't see the video. Message states: "This is a private video. If you have been sent this video, please make sure you accept the sender's friend request."
Stampin'HappyInCT  |  Mon Nov 2, 2009 at 8:24 AM
Dog gone it!!! I didn't plan on doing any more projects until I finished a few already in progress. However, these are wayyyy too cute to not make! Here I go.....Thanks for sharing. Great tutorial and awesome project! Love it.
Jill  |  Mon Nov 2, 2009 at 9:11 AM
LOOOOOVE IT....super cute and looks relatively easy....definitely on my to-do list for co-workers! TFS!
Anette  |  Mon Nov 2, 2009 at 1:03 PM
Thanks for sharing! I can't wait to try this!
dawnsview  |  Mon Nov 2, 2009 at 1:47 PM
This is adorable! Small enough to make in multiples, yet with that personal touch. Thanks so much for sharing it!
Theresa Romani  |  Mon Nov 2, 2009 at 4:26 PM
Oh my goodness Theresa this is fabulous! I LOVE the video - how about a sponging video! (LOL) Truly a cute project and I'm all about cute and inexpensive ways to recognize people. LOVE IT! Thanks for sharing.
Stampin Pam  |  Mon Nov 2, 2009 at 4:29 PM
Wonderful video, Theresa. I have made these match books before but never with an insert - ingenious !
Very nice.
Marsha  |  Mon Nov 2, 2009 at 10:00 PM
Thats a very cool idea. I never seen that before. Thanks for the tutorial.
Eric  |  Tue Nov 3, 2009 at 1:47 AM
Way too cute. Hadn't planned on doing any more project, but will need to try this one.
Shirley  |  Tue Nov 3, 2009 at 4:56 AM
This a really cute project and great for times when you want to give a little something - e.g. get together with the girls for lunch, co-workers, etc. Great video. Lining up the scores a bit confusing but I'm sure I'll figure it out. Can't wait to try these.
Darla  |  Tue Nov 3, 2009 at 9:49 PM
there's a Matchbook swap in the forums here...
ELIZABETH  |  Wed Nov 11, 2009 at 5:01 AM
I was so inspired by this tutorial that I made 17 to give out to my co workers at Christmas.
Some thought they were so cute that they were going to hang them on there Xmas tree.
Alison  |  Tue Dec 15, 2009 at 1:43 AM
This is really cute...do u have dimensions if i wanted to make this a full size 5 1/2 by 4 1/4 card size???? Thanks so much...Please emal me direct
[email protected]
Susie T  |  Wed Feb 10, 2010 at 3:20 PM
Great Idea!! Always looking for little "treat" holders for my kids to share with friends at school and church! Thanks!
Monica  |  Mon Feb 15, 2010 at 10:19 AM
thank you so much for sharing this. It's been a fund little project! Please visit to see mine smile
Gail Bolander  |  Tue Feb 16, 2010 at 1:12 AM
Cute! Great little stocking stuffer or party treat.
Rosa M. Vasquez  |  Wed Feb 17, 2010 at 3:08 PM
What a great idea! The directions are so clear. I can't wait to make some!!
Judy W  |  Wed May 26, 2010 at 12:44 PM
I just came across this and really want to make one for my granddaughter. I would also like to know if there are directions for a full size card as I would like to tuck a small gift into the holder. I want to do this for Valentine's Day, so time is of the essence. Thanks so much for your help.
Jeanne Johannes  |  Thu Jan 26, 2012 at 3:45 PM
would be nice to figure out dimensions to make this into a gift card holder...wouldn't be the "matchbook" size, but would be a nice holder for gift cards, and could be done in Hannukah colors for gifts, I imagine, also (could it be somehow be tied into lighting the candles? I am not Jewish, but I just thought of it ... perhaps something like an advent calendar, where they are numbered for each day of the holiday, with a small gift inside each one, and a "match" (I woudn't put a real one) in each one...just an idea.)
Mary Wright  |  Wed Dec 9, 2015 at 4:39 AM

Page 1 of 1 pages

You need to be logged in to comment

GET OUR NEWSLETTER


Splitcoaststampers's privacy policy