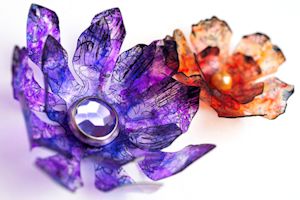
Faux Glass Flowers
by Mary Dimercurio Prasad
Create a beautiful flower embellishment from plastic packaging.
Supplies
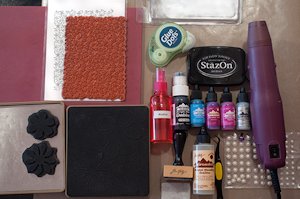
- Clear plastic packaging
- Flower-shaped dies in different sizes (steel rule dies recommended; Sizzix/Tim Holtz Tattered Florals dies used here)
- Die cutting machine
- Heat tool
- Alcohol inks (2-3 coordinating colors - Ranger Adirondack Alcohol Inks used here), metallic mixatives and blending solution (optional)
- Alcohol ink applicator and applicator felt (Ranger/Tim Holtz Adirondack version used here)
- StazOn ink (Jet Black used here)
- Detailed background stamp (Inkadinkado Flowers & Butterflies Background used here)
- Acrylic paint (Adirondack Acrylic Paint Dabber, Pitch Black used here)
- Jewel embellishment for flower center
- Strong adhesive
- Other: Non-stick craft sheet, foam mat, tweezers, and scrap paper for stamping, alcohol in spray bottle and paper towel for cleanup
Step-by-Step
-
Step 1
Die cut two flowers in different sizes out of plastic packaging.
Note:
Steel rule dies are recommended. Wafer dies may not work or may require extra pressure, as the plastic tends to be too thick.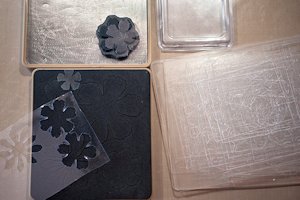
-
Step 2
Lay the die cuts on a non-stick craft sheet. Add a drop or two of each alcohol ink to one side of the applicator felt.
If desired also add a metallic or pearl mixative sparingly.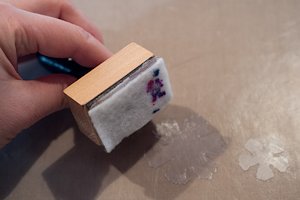
-
Pounce the ink over the die cuts, turning the applicator and/or flowers to get a nice all-over mottled look.
Dry the piece briefly with a heat tool. Do not heat too much, or the plastic will start to curl.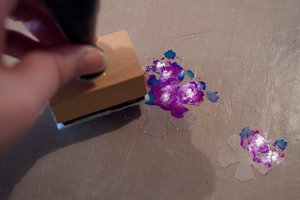
-
Step 3 (Optional)
Add a little Alcohol Blending Solution to the clean side of the applicator felt; pounce in a few places. This moves the ink around, varying the intensity. Where it is applied, the centers tend to lighten a little while the edges darken.
Clean mat with alcohol and paper towel.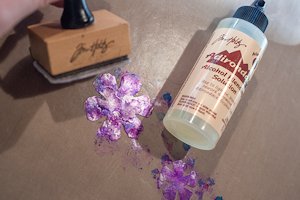
-
Step 4
Apply StazOn or other permanent ink to a background stamp (pigment or dye ink will not dry or stay on the nonporous surface). Newsprint, script text, dots or other detailed stamps are good choices.
Dry the piece briefly with a heat tool. Do not heat too much, or the plastic will start to curl.
Note:
If using a foam mat for stamping, be sure to protect its surface with scrap paper. Tweezers may be needed to pull the plastic away from the stamp.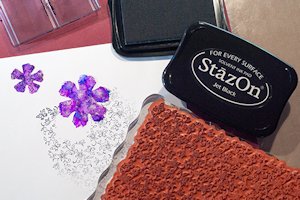
-
Step 5
Apply acrylic paint with a dabber (or StazOn directly from the pad) to the edges of the petals using a swiping motion.
Hint:
Instead of paint dabbers, try using a relatively dry paint brush or sponge to apply acrylic paint.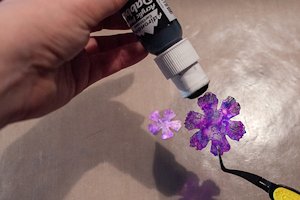
-
Step 6
Now for the tricky part - shaping the petals. Put just the petals in front of the heat tool for a short time, then shape the petals quickly before they become too cool. Do not overheat the plastic. It heats up rapidly.
Caution!
Do not get your fingers in front of the heat tool!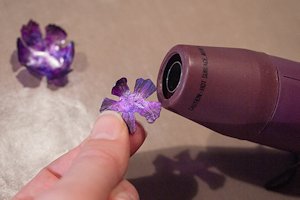
-
Step 7
Once you are happy with the shape of each layer, use Glue Dots or other strong adhesive to glue the layers together. Be sure to offset them.
Add some bling to the center of the flower.
Hint:
To create a matching center, pounce one of the colors of alcohol ink used to create the flower on a half pearl.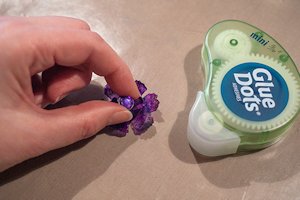
-
Step 8
Use the finished flower to embellish a project.
Video!
Your Turn
You've seen the tutorial, now you try it! We've got a section of the gallery set aside for Faux Glass Flowers. Try this technique, then upload your artwork to the gallery. Show us your creations!
***Please note - Internet Explorer/Edge is not a supported browser, and will not allow you to see the videos. Please use Chrome, Firefox or Safari to view our tutorial videos.

Questions and Comments
We'd love to get your feedback or questions. Leave your comment below.
Page 1 of 2 pages 1 2 >