Faux Rimmed Tags
by Lisa Strahl
Make vellum square or circle tags in any quantity you like!
Supplies
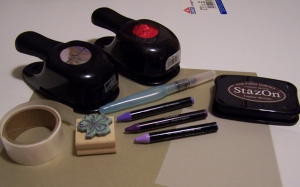
- Outline Style Stamp
- StazOn® Ink
- Vellum
- Brushed Metallic Cardstock
- Two Sizes Circle or Square Punches
- Coloring Medium (markers, crayons, chalks)
- Glue Dots
- 2-Way Glue Pen [ buy it ]
- Scratch Paper
Step-by-Step
-
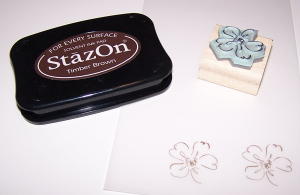
Step 1
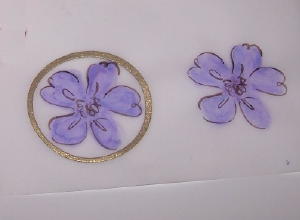
Stamp image with StazOn™ on vellum.
-
Step 2
Turn vellum over and color image from behind. Be careful not to get the vellum too wet if watercoloring.

-
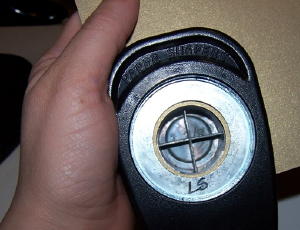
Step 3
Punch a circle from the corner of metallic cardstock with the smaller of the two punches.

-
Step 4
Make a tag rim with the larger punch by turning the punch over and positioning the larger circle equally over the smaller circle.
-
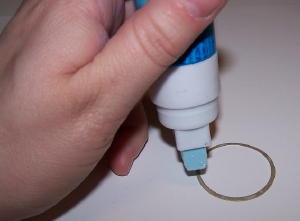
Step 5
On a piece of scratch paper, dab a small amount of 2-Way glue around the tag rim.
-
Step 6
Position tag rim over stamped image. Let dry.
-
Step 7
Punch out rim and stamped image with largest punch.
Repeat steps 3-4 to make a second rim, and adhere it to the back of the tag.
-
Step 8
Adhere tags to your project using glue dots, brads, eyelets, or ribbon.
Repeat steps 3-4 to make a second rim, and adhere it to the back of the tag.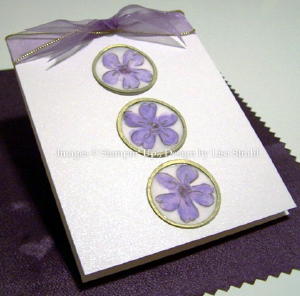
Variations
Give it Some Color
Make tag rims with colored cardstock or use colored cardstock for the center of the tag.
Your Turn
You've seen the tutorial, now you try it! We've got a section of the gallery set aside for Faux Rimmed Tags. Try this technique, then upload your artwork to the gallery. Show us your creations!
***Please note - Internet Explorer/Edge is not a supported browser, and will not allow you to see the videos. Please use Chrome, Firefox or Safari to view our tutorial videos.

Questions and Comments
We'd love to get your feedback or questions. Leave your comment below.
Page 1 of 1 pages