Double Z-Fold Card
by Beate Johns
Add a few score lines to a cardstock strip to create a unique card fold.
Supplies

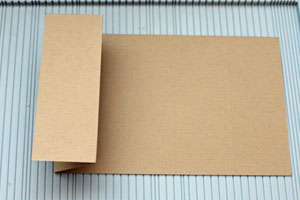
- One 5 1/4" x 12" piece of cardstock for card base
- Two 1 3/4" x 5" piece of cardstock for side panel
- One 3 3/4" x 5" piece of cardstock for inside of card
- Patterned Paper to decorate panels (optional)
- Additional cardstock for center panel
- Scor-Pal™ or other scoring tool
- Scor-Tape™ or other strong adhesive
- Dimensional adhesive
- Ribbon
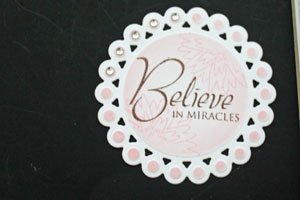
- Stamps (Verve Stamps Believe used here)
- Embellishments
Step-by-Step
-
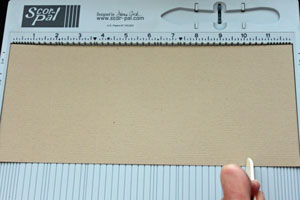
Step 1
Score cardstock at 2", 4", 8" and 10".
-
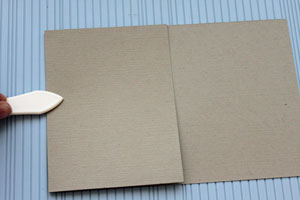
Step 2
Fold second score line in.
-
Fold the first score line back.
-
Step 3
Repeat step 2 on other side of cardstock. Your card base is done.

-
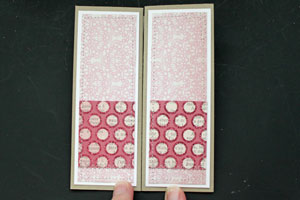
Step 4
Decorate the 1 3/4" x 5" pieces of cardstock. Adhere them to the side panels of the card base.
-
-
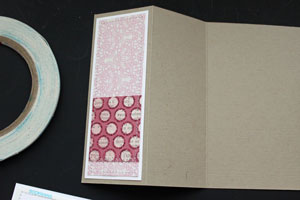
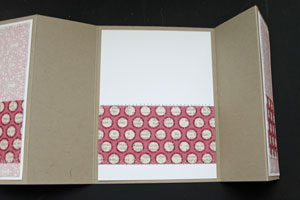
Step 5
Decorate the 3 3/4" x 5" piece of cardstock and adhere to center panel of card base.
-
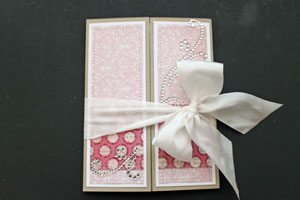
Step 6
Tie card shut with ribbon.
-
Step 7
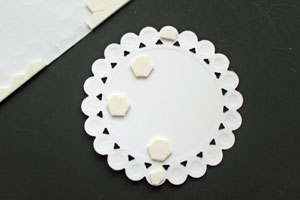
Create focal point panel.
-
Step 8
Add dimensional adhesive on the back side of your focal point. Only add adhesive on half of the panel.
-
Step 9
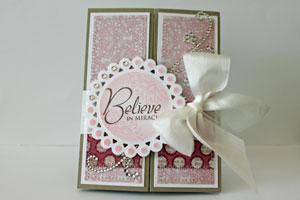
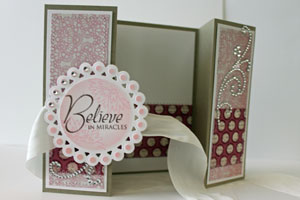
Adhere main image over center of card panel.
-
Your card is done.
Video!
Variations
No Ribbon Closure
Add a smaller image slightly over your main image to keep the card shut (check the Joy Fold Card Tutorial for a sample of that closure).
Different Sizes
To change up the size, divide your card length by 6 and score at 1/6, 1/3, 2/3 and 5/6 of the cardstock length. It's easiest if you decide how big you want your panels to be. For example. Your panel width is 1 3/4". Your final paper length will have to be 1 3/4" x 6 = 10 1/2". You would have to score at 1 3/4", 3 1/2", 7" and 8 3/4".
Smaller Flaps
After scoring your panels, cut the outer panels a bit smaller to let the second panel peek through.
Your Turn
You've seen the tutorial, now you try it! We've got a section of the gallery set aside for Double Z-Fold Card. Try this technique, then upload your artwork to the gallery. Show us your creations!
***Please note - Internet Explorer/Edge is not a supported browser, and will not allow you to see the videos. Please use Chrome, Firefox or Safari to view our tutorial videos.
 *
*
Questions and Comments
We'd love to get your feedback or questions. Leave your comment below.
Thanks for all the great tutorials you post
Thanks for your kind words. I used May Arts Silk Ribbon for this card. I love how easy this ribbon ties into beautiful bows. You can find it in several online stores. I get mine from starlitstudio.net.
Hugs and smiles
Lindsay
Love this card, it has my favorite word as the focal point...Believe! I do have to make a card, and am using yours as the template for a "thinking of you" card for a client of my Husband's. It is for a woman recently diagnosed with Breast Cancer. I would love to locate this stamp set. I will follow this email with a Google Search, but cannot make out the company from your pic of who makes the Clear Stamp Set you used. Could you help me out with the name of the Maker? We have Michaels, JoAnn Fabrics, AC Moore and Hobby Lobby near me. Plus Amazon ofcourse. Thank you for sharing your creation, it is inspirational and beautiful!
Cheers,
Jeanine
Love it! I'm definitely going to try making this for my card club. Thanks for sharing your talents with us.
Thanks!
Check this Blog Post for all the measurements.
Yes, those are two different patterned paper I adhered on top of each other before adhering them to white cardstock.
The patterned Paper is from My Mind's Eye Lost & Found Two Blush collection.
Shannon,
I love that round die. It's from the Beaded Circle Nestabilities die pack from Spellbinders! One of my favorite Circle dies.
Hugs and smiles
Page 1 of 2 pages 1 2 >