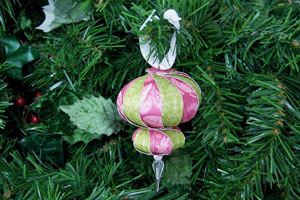
Double Ball Ornament

by Carol Dunstan

Create a gorgeous ornament out of paper strips.

Supplies
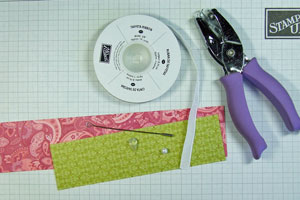
  • Two 2" x 2" pieces of patterned paper, of contrasting color

  • Two 3" x 3" pieces of patterned paper, of contrasting color

  • Hat Pin, small pearl bead and clear teardrop bead, from Stampin' Up!'s Pretties Kit

  • 1/16" circle hole punch

  • Ribbon, about 6" long

  • Paper Trimmer

Step-by-Step

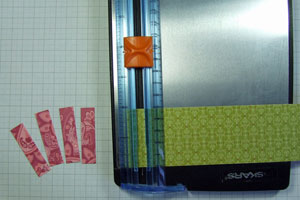
  1. Step 1

    Trim 1/2" wide strips from the 2" wide pieces of patterned paper.

    You'll have four of each color, eight in total.
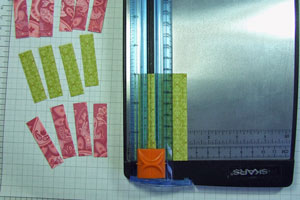
  2. Step 2

    From the 3" wide pieces of patterned paper trim 1/2" wide strips.

    You'll have six of each color, twelve in total.
  3. Step 3

    Take one strip and mark a dot in the middle and 1/4" from the short edge (it will be 1/4" from the three nearest edges).

    Repeat on other end.
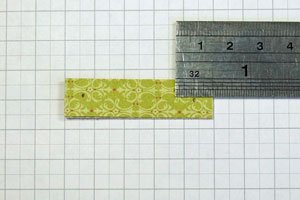
  4. Step 4

    Stack together the strips of the same colour and punch a hole where the dot is marked at each end.

    You can take one strip and use it as a template for the holes on the other pieces, or draw dots and punch those.
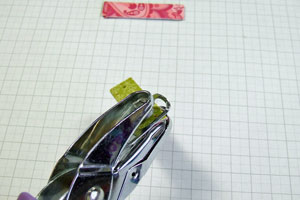
  5. Step 5

    Starting with the 3" long strips, thread one end onto the hat pin, alternating the colors.
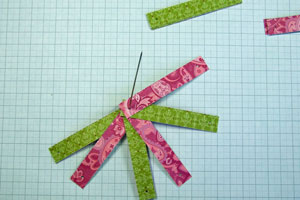
  6. Step 6

    Keep threading strips until all twelve 3" strips are on the hatpin.
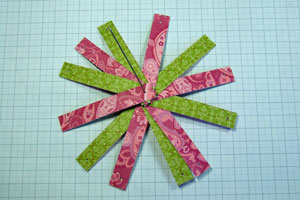
  7. Step 7

    Take the strip that is at the bottom of those threaded on the hatpin (ie closest to the loop/furthest from the tip), and thread the loose end onto the hatpin.

    Take the next strip (the one right above the one just threaded on) and thread its loose end onto the hatpin.
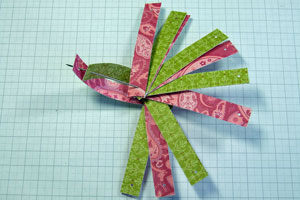
  8. Step 8

    Continue threading the loose ends onto the hatpin until all are done and you have the basic ball shape.
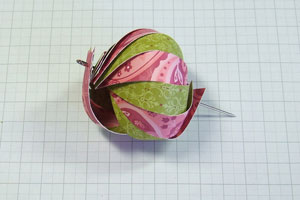
  9. Step 9

    Thread the 2" strips onto the hatpin, alternating colors just like in Step 5.

    Continue until all eight strips are on.
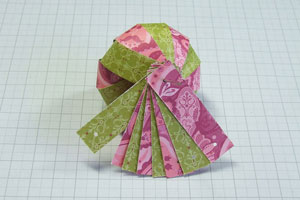
  10. Step 10

    Take the loose end of the bottom strip (ie the one furthest from the tip) and thread it on.

    Repeat with the next strip. You will find you will need to hold these in place with one hand so they don’t slide off the end.
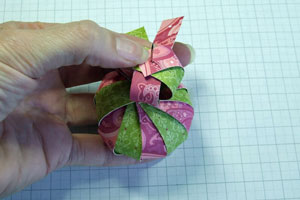
  11. Step 11

    When all strips are threaded on, add the beads and replace the cap on the tip of the hat pin.

    While you only need the hatpin cap to hold the strips on, the beads help squash them up and give the balls a nice shape.
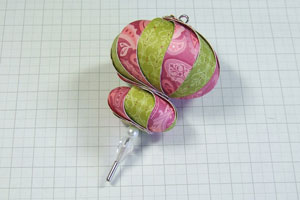
  12. Step 12

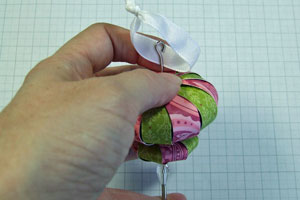
    Place ends of ribbon together and tie a knot in the ribbon, working it so it is pulled tight near the ends.

    Push the strips down from the loop of the hatpin so you can slide the ribbon through the gap .
  13. Step 13

    Hang your ornament!


Video!

Your Turn

You've seen the tutorial, now you try it! We've got a section of the gallery set aside for Double Ball Ornament. Try this technique, then upload your artwork to the gallery. Show us your creations!

***Please note - Internet Explorer/Edge is not a supported browser, and will not allow you to see the videos. Please use Chrome, Firefox or Safari to view our tutorial videos.

Questions and Comments

We'd love to get your feedback or questions. Leave your comment below.

Yes! I can finally use those hat pins in my Pretties Kit. LOL...I like using them on cards, but they can make things a bit bulky. These ornaments are so pretty! I'll be playing with this tutorial this weekend. Thank you!!
Regina Davis  |  Fri Nov 6, 2009 at 11:54 AM
What a great use for the hatpins! Any ideas on where to buy them in bulk? I'm out and don't want to buy a whole new pretties kit.
Carolyn Dick  |  Fri Nov 6, 2009 at 12:22 PM
Love these, now need to find some hat pins!!
Susan White  |  Fri Nov 6, 2009 at 12:33 PM
wow! How beautiful!
Franziska  |  Fri Nov 6, 2009 at 1:43 PM
Absolutely GORGEOUS project!!! Thanks Beate for making the video and thanks Carol for coming up with this fabulous idea and writing everything down. For those looking for the head pins, Lori over at Clear Dollar Stamps has some. They come in packages of 3 for $ 1 or so. She has them in brass and silver and they are 3" long and do have the loop for the ribbon. HTH, Hugs, Sabrina
Sabrina aka okimom2girlz  |  Fri Nov 6, 2009 at 2:23 PM
wow!!! so adorable!!! i had to try this one out but was not up for finding hat pins. i figured i'd try some 20 gauge beading wire that i have laying around. it came out beautifully. definately adding it as a finishing touchto my christmas presents.
cissy  |  Fri Nov 6, 2009 at 6:06 PM
I really like this.

I looked Clear Dollar Stamps and didnt see any hat pins. Am I over looking them?
Tammy  |  Fri Nov 6, 2009 at 7:58 PM
You must have, but if you go there the first time, you might overlook ;D.

Here is the link to the brass ones the silver ones are on another page

http://www.cleardollarstamps.com/proddetail.php?prod=14000

I hope it is all right to post a link. I would have PM'ed you, but did not know which Tammy you are :D.
Sabrina aka okimom2girlz  |  Fri Nov 6, 2009 at 8:19 PM
This looks really stunning! Thank you for sharing!
(and another Aussie crafter!)
Sandra K  |  Sat Nov 7, 2009 at 4:02 AM
Thank you Sabrina.

I searched for just "hat pin" not "SILVER hat pin". Thats the key. lol

Have a great day!
Tammy  |  Sat Nov 7, 2009 at 2:28 PM
I just made one and they are just too cute!!! I lvoe love love them...will be making more to use up my hat pins in the pretties kit...might even have to get more hat pins!!!
Silvia mabie  |  Sun Nov 8, 2009 at 1:22 AM
OH wow Carol this is just fabulous! Thanks so much for sharing your creative talent with us!
Makeesha Byl  |  Sun Nov 8, 2009 at 6:09 AM
perfect project for a class of girls - definitely doing this for their Holiday party at school!
stephanie  |  Mon Nov 9, 2009 at 7:23 AM
Thanks for sharing! The pics are great help!
dawn  |  Mon Nov 9, 2009 at 1:26 PM
where else other then stampin up could you get these sort of hat pins? i tried looking at HL and i couldnt find them there....
sherrie  |  Mon Nov 9, 2009 at 2:03 PM
Thanks, that was so cool! The video make it look super easy, just patience, I guess. Now, i have to look for hat pins! This is great for fun parties even for young adults!
Marcia  |  Tue Nov 10, 2009 at 5:01 PM
whooop whoop Carol smile
alisa tilsner  |  Wed Nov 11, 2009 at 1:27 AM
You can get packages of the hatpins in 2 types of silver, brass, and copper for sure at Hobby Lobby, but I have yet to find the clutches anywhere. It seems like the packages had about 20 hatpins for $2.99, or something close to that.
Lucy  |  Mon Nov 16, 2009 at 10:14 PM
Absolutely brilliant!
Vivienne  |  Tue Nov 17, 2009 at 2:19 AM
I used 3 inch eye pins from the beading section. 50 in a pack for about $4.50 CDN. They work great and you just need to glue a couple of beads at the bottom to secure it.
Tiger  |  Tue Nov 17, 2009 at 1:24 PM

Page 1 of 2 pages  1 2 >

You need to be logged in to comment

GET OUR NEWSLETTER


Splitcoaststampers's privacy policy