Decorative Corner Card

by Laura Lipe

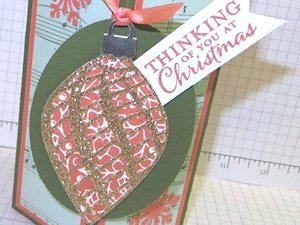
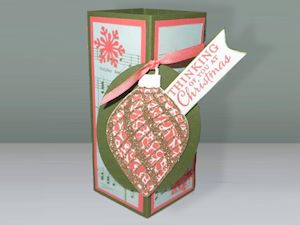
The front panel stands out from this card when displayed.

Supplies
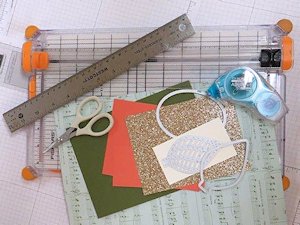
  • Cardstock for base, cut to 5 1/2" x 8 1/2"
  • Cardstock, same as above, cut to 1" x 5 1/2"
  • Two 1" circles cut or punched from cardstock above
  • Coordinating cardstock for layering – 4 pieces cut to 5 1/4" x 1 7/8"
  • Patterned and neutral papers for layering – 4 pieces cut to 5" x 1 5/8"
  • Die cut shape or label to use as base for smaller images
  • Images to decorate the corner piece – die cut or stamped and fussy cut
  • Sentiment stamp (opt.)
  • Double sided tape
  • Paper trimmer
  • Scoring tool

Step-by-Step

  1. Step 1

    Along the long side of the card base, score at 2 1/8", 4 1/4", and 6 3/8". Fold all as mountain folds.
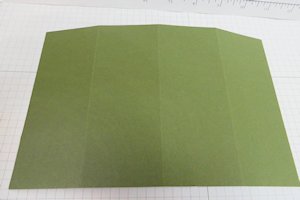
  2. Step 2

    Add layering panels of cardstock and patterned paper to the panels of the base.

    Score the 5 1/2" x 1" strip of cardstock in half lengthwise at 1/2". Glue one side of the 1” piece to one short side of the card from the back side, so that the card will stand up as a tall box shape.
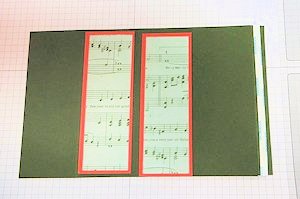
  3. Add adhesive to the other side of the strip. Fold the card in a gate fold to the center back of the card, and close the card to adhere the seam.
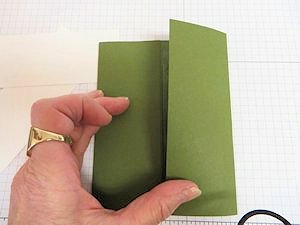
  4. Step 3

    Stamp and decorate the back pieces or add a handwritten message if desired. Glue them to the two back panels.
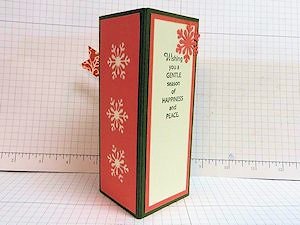
  5. Step 4

    Score and fold both 1" circles in half.
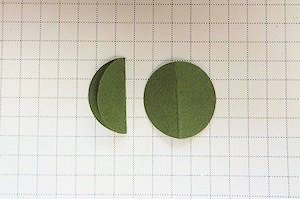
  6. Apply glue to only one side of each circle and affix them to the front corner with folds facing each other and aligned with the center fold of the card.
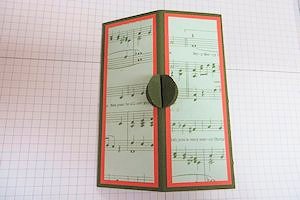
  7. Step 5

    Put glue on the circle tabs that are facing out, and adhere a large die cut shape or label as a base for smaller die cut or stamped images.
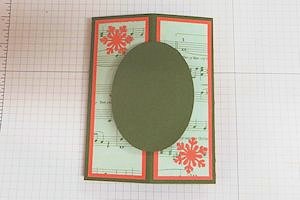
  8. Adhere die cut or stamped images to the panel. When you stand the card up like a square, they will stand out from the corner.

    Decorate the back as desired.

    NOTE:
    If desired, more circle hinges can be added to include additional sentiments, images, etc.
  9. Step 6

    Decorate and complete the card. The card folds flat for mailing in an A2 envelope.
Video!

Your Turn

You've seen the tutorial, now you try it! We've got a section of the gallery set aside for Decorative Corner Card. Try this technique, then upload your artwork to the gallery. Show us your creations!

***Please note - Internet Explorer/Edge is not a supported browser, and will not allow you to see the videos. Please use Chrome, Firefox or Safari to view our tutorial videos.

Questions and Comments

We'd love to get your feedback or questions. Leave your comment below.

What a great idea. Thanks so much Laura for the inspiration.
Annette  |  Wed Nov 25, 2015 at 3:42 AM
FANTASTIC and JUST what I needed TODAY. Thank you for this different, and beautiful idea.
pssequimages  |  Wed Nov 25, 2015 at 4:13 AM
What a fantastic idea! This was the first tutorial I copied immediately after reading it and seeing the video (I love the videos!!!)
Thank you so much!
Nessie
Nessie  |  Wed Nov 25, 2015 at 4:46 AM
How fun! Can't wait to give this a try! Will definitely be on my "to do" project list...Thanks so much for sharing! Love it!
Joanne Hoffmann  |  Wed Nov 25, 2015 at 5:56 AM
Nice clear directions. No boring pauses. Wonderful video. I'll save this one to my favorites. Thank you.
Bethem  |  Wed Nov 25, 2015 at 6:46 AM
Great, fun tutorial! I think I will follow this to make a few of my cards for Christmas! Thanks Laura! And thanks to Dina for doing a video for us!
muscrat  |  Wed Nov 25, 2015 at 7:10 AM
Dina....thanks for sharing---great card!
Susanne Gleason  |  Wed Nov 25, 2015 at 7:41 AM
Love this idea for a different card! Thanks, Laura. Copied the directions to a notebook for reference.
Nina  |  Wed Nov 25, 2015 at 7:46 AM
Thanks Dina and Laura for a new take on a dimensional card! There are so many uses for other occasions as well. I also like that it is A2 sized so smaller images can be used. Now if I could just get those score lines and creases to be as sharp as those in the video... Diane
Diane aka ciocidi  |  Wed Nov 25, 2015 at 7:52 AM
Thank you for sharing this - can't wait to try making my own. The video is extremely clear and easy to follow.
Jackie Bates  |  Wed Nov 25, 2015 at 8:07 AM
This looks SO EASY! JUST MAYBE, I'll have to change up my plans for my cards this year! LOL wink
Becky Green  |  Wed Nov 25, 2015 at 8:19 AM
A timely idea for an impressive card that is easy to make! Wonderful video, too. Thank you!
Cheryl  |  Wed Nov 25, 2015 at 9:51 AM
love this! I want to try some of my striplet dies in the front side panels and adding a battery tea light to be placed in the center for the recipient.
Leslie Bass  |  Wed Nov 25, 2015 at 11:17 AM
Looks like a really fun card to make. Can't wait to try it!
Marianne Oakes  |  Wed Nov 25, 2015 at 4:33 PM
CUTE projects and great tutorial...thanks so much! I am in the midst of Christmas cards and thankfully have everything all cut and ready to assemble or I would be changing projects! However I will look forward to doing this card real soon--thanks for the wonderful video tutorial!
Jan Hoyt  |  Wed Nov 25, 2015 at 5:11 PM
You do an excellent job giving instructions in this tutorial!!!
Kay Zink  |  Wed Nov 25, 2015 at 7:08 PM
Love the card idea, thank you for sharing, cannot wait to try it.
Donna Cowden  |  Thu Nov 26, 2015 at 4:01 PM
Lovely cards ladies! I will definitely be trying this one. The tutorial was very well done - so easy to follow. TFS
Lura  |  Sat Nov 28, 2015 at 11:07 AM
What a great idea. Wish I had thought of it. Made a number of Christmas cards using this technique.
Love it.
margi klein  |  Sun Dec 27, 2015 at 9:21 PM
I echo all the above comments. Love the idea, the video was well done, and I'm going to use this idea immediately to make my granddaughter's card using Quinceianera. Thank you Dina and Laura!
Ila O'Brien  |  Fri Jan 1, 2016 at 7:37 PM

Page 1 of 2 pages  1 2 >

You need to be logged in to comment

GET OUR NEWSLETTER


Splitcoaststampers's privacy policy