Cross Box
by Lisa Walsh
This cross-shaped box is perfect for a special keepsake gift.
Supplies
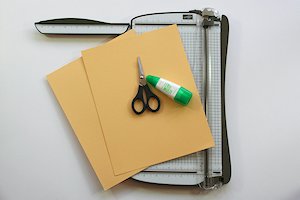
- Cardstock
- Paper trimmer with scoring blade or scoring tool
- Scissors (if needed to clean up cut edges)
- Strong adhesive
- Other supplies as needed to complete the project
Step-by-Step
-
Step 1
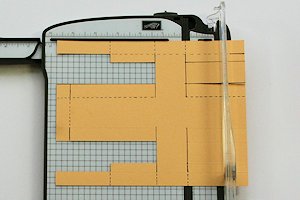
Cut cardstock to 9" x 7 1/4". Place the cardstock on the trimmer vertically. The short sides will be at the top and bottom.
Place cardstock at the 1" line on the paper trimmer. Cut from the top down to 1", lift the cutting blade, place it at 6 1/4", and cut to the bottom. Score in between the two cuts.
NOTE:
Black marker lines have been drawn in to accentuate the cut and score lines for the tutorial. Do not mark these lines yourself.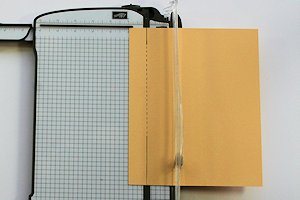
-
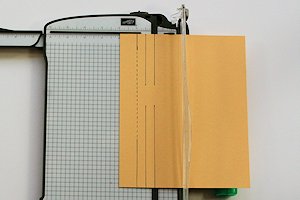
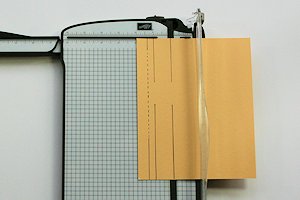
Step 2
At the 1 1/2" and 2" lines, cut from the top down to 3", lift the cutting blade, place at 4 1/4", and cut to the bottom.
-
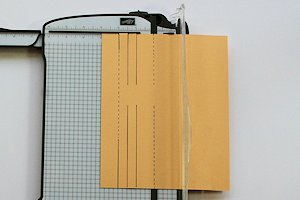
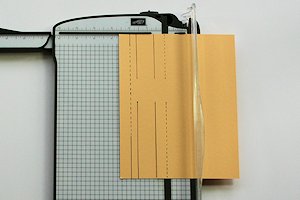
Step 3
Place cardstock at the 3" line on the trimmer. Score from the top down to 3", lift the scoring blade, place at 4 1/4" and score to the bottom.
-
Step 4
Flip the cardstock over side to side so that all of the cuts are now on the right side of the paper.
Repeat steps 1, 2 and 3.
-
Step 5
Turn the cardstock clockwise one quarter turn.
NOTE:
It’s very important to turn the cardstock the correct direction.
-
Step 6
Place cardstock at the 1" line on the trimmer. Lift the cutting blade, place at 2" and cut to 3", lift cutting blade, place at 4 1/4" and cut to 5 1/4”.
Score in between the two cut lines from 3" to 4 1/4".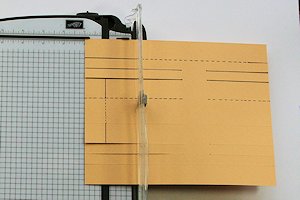
-
Step 7
Place cardstock at the 2 3/4" line on the trimmer. Lift cutting blade, place at 1" and cut to 1 1/2", lift cutting blade, place at 5 3/4" and cut to 6 1/4".
Score from the top down to 1", lift scoring blade and score from 6 1/4" to the bottom.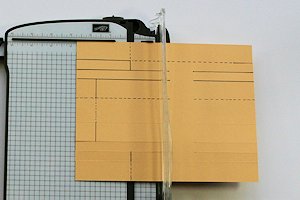
-
Step 8
Place cardstock at the 4 3/4" line on the trimmer. Lift the cutting blade, place at 1" and cut to 3", lift the cutting blade, place at 4 1/4" and cut to 6 1/4".
Score from the top down to 1", lift scoring blade, place at 6 1/4" and score to the bottom.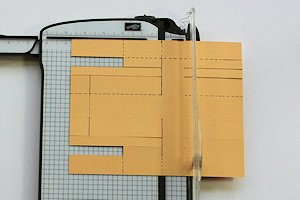
-
Step 9
Place cardstock at the 6" line on the trimmer. Repeat the cutting and scoring from STEP 8.

-
Step 10
Place cardstock at the 8" line on the trimmer. Lift the cutting blade, place at 1" and cut to 3", lift the cutting blade, place at 4 1/4" and cut to 6 1/4".
Score from the top to 1", from 3" to 4 1/4", and from 6 1/4" to the bottom.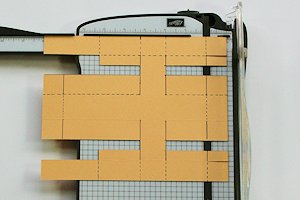
-
Step 11
Fold all score lines inward, except the four corners -- fold those back.

-
Starting with the vertical portion of the cross, adhere the four tabs to the inside of the long sides of the box.

-
Step 12
Fold in the side of the horizontal portion of the cross, keeping all of the tabs on the inside of the box.
Adhere the top and bottom tabs to the inside of the vertical portion of the cross, and the remaining tabs on the inside bottom of the horizontal portion of the cross.
-
Step 13
To create the box lid, trim cardstock to 8 3/8"x 6 5/8". Place the cardstock on the trimmer vertically. The short sides will be at the top and bottom.
Place cardstock at the 5/8" line on the trimmer. Cut from the top down to 5/8", lift the cutting blade, place at 6" and cut to the bottom. Score in between the two cuts.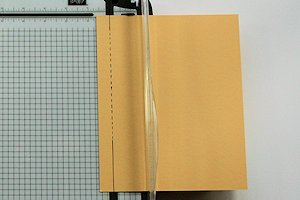
-
Step 14
At the 1" and 2" lines, cut from the top down to 2 5/8", lift the cutting blade, place at 4" and cut to the bottom.
-
Step 15
Place cardstock at the 2 5/8" line on the trimmer. Score from the top down to 2 5/8", lift the scoring blade, place at 4" and score to the bottom.
-
Step 16
Flip the cardstock over side to side so that all of the cuts are now on the right side of the paper.
Repeat steps 13, 14 and 15.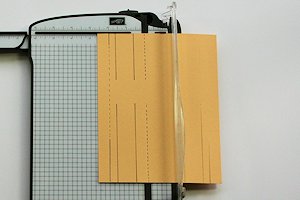
-
Step 17
Turn the cardstock clockwise one quarter turn.
NOTE:
It’s very important to turn the cardstock the correct direction.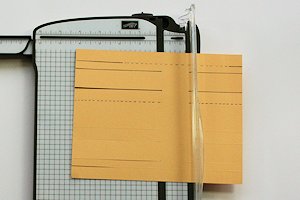
-
Step 18
Place the cardstock at the 5/8" line on the trimmer. Lift the cutting blade, place at 2" and cut to 2 5/8", lift the cutting blade, place at 4" and cut to 4 5/8".
Score in between the two cuts.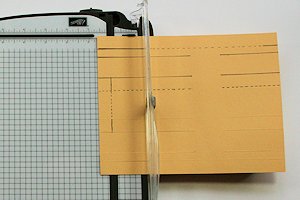
-
Step 19
Place cardstock at 2 3/8" line on the trimmer. Lift the cutting blade, place at 5/8" and cut to 1", lift the cutting blade, place at 5 5/8" and cut to 6".
Score from the top down to 5/8", lift the scoring blade, place at 6" and score to the bottom.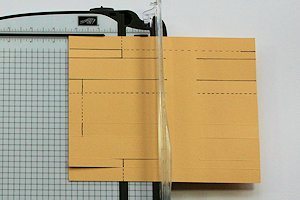
-
Step 20
Place cardstock at the 4 3/8" line on the trimmer. Lift the cutting blade, place at 5/8" and cut to 2 5/8", lift the cutting blade, place at 4" and cut to 6".
Score from the top down to 5/8", lift the scoring blade, place at 6" and score to the bottom.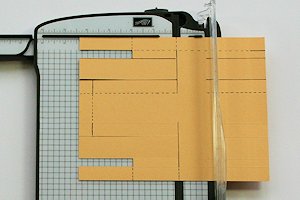
-
Step 21
Place cardstock at the 5 3/4" line of the trimmer and repeat the cutting and scoring from step 20.
-
Step 22
Place cardstock on the 7 3/4" line on the trimmer. Lift the cutting blade, place at 5/8" and cut to 2 5/8". Lift the cutting blade, place at 4" and cut to 6".
Score from the top down to 5/8", from 2 5/8" to 4" and from 6" to the bottom.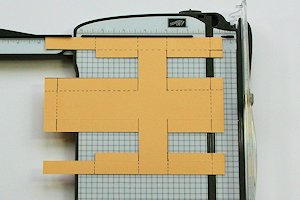
-
Step 23
Fold and assemble the box lid as in steps 11 and 12.

-
Decorate the finished box top, using coordinating cardstock, patterned paper, die cut flowers, or other embellishments.
The cardstock strips in the sample were cut to 7" x 1 1/4" and 5 1/4" x 1 1/4". The patterned paper strips were cut to 6 7/8" x 1 1/8" and 5 1/8" x 1 1/8".
-
Step 24
Complete the project.

Video!
Your Turn
You've seen the tutorial, now you try it! We've got a section of the gallery set aside for Cross Box. Try this technique, then upload your artwork to the gallery. Show us your creations!
***Please note - Internet Explorer/Edge is not a supported browser, and will not allow you to see the videos. Please use Chrome, Firefox or Safari to view our tutorial videos.

Questions and Comments
We'd love to get your feedback or questions. Leave your comment below.
Lori, I put Hershey's Kisses in mine.
Dina, thank you for the reassurance!
Lori, I've put in Lindt Truffles or Hershey Kisses like Dina. For a a picture I took of the box I put in a bit of cellophane grass and the small malted milk ball "robin eggs" candy.
Thank you everyone for the kind words.
Happy blessed Easter!
BJ, I hope you'll share in the gallery!
Page 1 of 1 pages