Color Wash Faux Bleach

by Sherry Cheever

Create a faux bleached look by spraying Color Wash sprays over embossed images.

Supplies

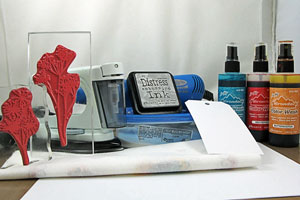
  • Silhouette Image Stamp

  • White Shipping Tag (alternative – White Cardstock)

  • Ranger Adirondack Stream, Red Pepper and Butterscotch Color Wash (alternatives to Color Wash sprays: Glimmer Mist, Alcohol inks, Liquid RIT Dye)

  • Embossing Ink

  • Clear Embossing Powder

  • Craft Iron

  • Paper Towel

  • Non-Stick Craft Sheet (optional)

  • White Printer Paper

Step-by-Step

  1. Step 1

    Stamp silhouette images on tag with emboss ink.

    Pour clear embossing powder over image, tap off excess, and emboss with heat tool.
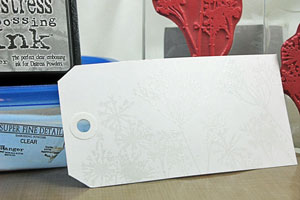
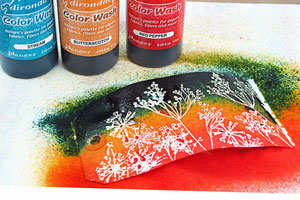
  2. Step 2

    Place embossed tag on paper towel and spray with various colors of Adirondack Color Wash.
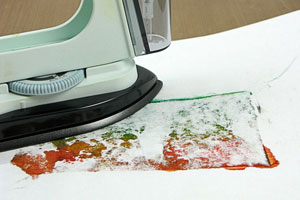
  3. Step 3

    Place wet ink tag between printer paper and iron with craft iron set on highest setting (no steam).

  4. Iron tag until the embossed image appears on printer paper and the embossing powder is absorbed into the printer paper.

    Note: if paper sticks, re-heat areas with iron.
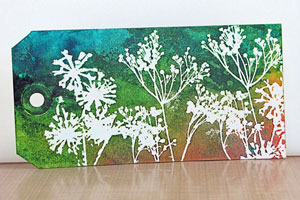
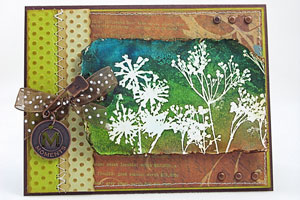
  5. Step 4

    Finish your project.

Video!

Your Turn

You've seen the tutorial, now you try it! We've got a section of the gallery set aside for Color Wash Faux Bleach. Try this technique, then upload your artwork to the gallery. Show us your creations!

***Please note - Internet Explorer/Edge is not a supported browser, and will not allow you to see the videos. Please use Chrome, Firefox or Safari to view our tutorial videos.

Questions and Comments

We'd love to get your feedback or questions. Leave your comment below.

WOW Sherry! What an awesome tutoril! I absolutely LOVE IT!!! Thanks for sharing!
Silvia Mabie  |  Wed Dec 31, 2008 at 9:13 AM
I'm not often moved to come back and comment but this is wowser!! I just love it...thanks for inspiring.
Chris  |  Wed Dec 31, 2008 at 9:36 AM
This is great! Question: How would you use the alcohol inks instead of the color wash? Brush it on?
Starla (star)  |  Wed Dec 31, 2008 at 9:42 AM
This is a definately 'must do' for my class.
Marian  |  Wed Dec 31, 2008 at 9:47 AM
To use the alcohol inks you apply them to your blending tool with blending solution and dab all over. This is really cool!
jaime  |  Wed Dec 31, 2008 at 9:57 AM
This is the answer to Starla's question: You would pounce them on like any other time you would use alcohol inks. You would follow the tutorial and replace the Color Wash with the Alcohol inks.
Sherry Cheever  |  Wed Dec 31, 2008 at 9:58 AM
WOW! Great idea. Thank you for sharing.
Dawn  |  Wed Dec 31, 2008 at 10:24 AM
You can also paint with alcohol inks. Using a paint dish, drop several drops (about 10) of ink into each impression. Let dry completely. Fill a water brush with alcohol blending solution and use as a paint brush. It adds a beautifully colored highlight, or can be used to paint on acetate, etc. even in small spaces.
Linda
Linda Hahola  |  Wed Dec 31, 2008 at 10:37 AM
What is the reason for the ironing step? to dry the ink?
Jennifer  |  Wed Dec 31, 2008 at 10:38 AM
This is a wonderful effect! I'm curious about the ironing, too. What is different about a craft iron? Would a regular iron work also?
Nancy
Nancy  |  Wed Dec 31, 2008 at 10:52 AM
My guess, is that ironing the image causes it to feather out a bit...you can see how strong the image and inks are in the first image and how it softens the look after ironing. Almost like a tye-dye or wax effect.
So can I just say that I may now have to buy these color washes?! Any chance to get my fingers inky with some new products! I love this effect, it would be perfect for altered art projects.
Melanie  |  Wed Dec 31, 2008 at 10:53 AM
I think this is beautiful! I too would like to know if a regular iron would work; if so, what setting would be used?
Kim  |  Wed Dec 31, 2008 at 10:59 AM
So awesome!! I have several bottles of the color washes which I've rarely used. Thanks for the inspiration!! Can't wait to try this!
KarenRI  |  Wed Dec 31, 2008 at 11:39 AM
Answer to the ironing question: Yes a regular household iron or travel iron will work just as well! The reason for the ironing is to remove the embossing. The iron melts the embossing and in turn the embossing sticks to the printer paper. You will have a somewhat waxy feel to your image.
Sherry Cheever  |  Wed Dec 31, 2008 at 11:39 AM
Sherry, I have no alcohol ink or Ranger Color Wash. Is the Color Wash a mixture that I can create on my own with reinker and water or is it color with an alcohol mixture of some kind? You know me....a big duh with this stuff. I have never even heard of Ranger Color Wash. Gasp! I need to get out of my zone more.
Kittie  |  Wed Dec 31, 2008 at 12:38 PM
whats the point of removing the embossing?
isnt that cool to have that raised effect?
nina  |  Wed Dec 31, 2008 at 12:52 PM
Kittie, I've done this with Shimmer Mist before. Mix some up using reinkers and water and then spray over you're embossing. There is a sample in my blog post today.
Sherry Cheever  |  Wed Dec 31, 2008 at 1:13 PM
Nina you can leave the embossing, but then it wouldn't be a faux bleach but more like the resist techniques. Too many people are afraid to stamp with bleach (me being one of them), and this is an alternative for that.
Sherry Cheever  |  Wed Dec 31, 2008 at 1:17 PM
NICE JOB!!!
This really looks GREAT!
wendy
Wendy Vecchi  |  Wed Dec 31, 2008 at 1:33 PM
This is gorgeous! Can't wait to try it out. Thanks so much Sherry for the inspiration!
Janet Davis  |  Wed Dec 31, 2008 at 3:11 PM

Page 1 of 3 pages  1 2 3 >

You need to be logged in to comment

GET OUR NEWSLETTER


Splitcoaststampers's privacy policy