Colored Dry Embossing

by Jeanne Jachna

Learn tips for using inks to enhance dry embossed designs.

Supplies

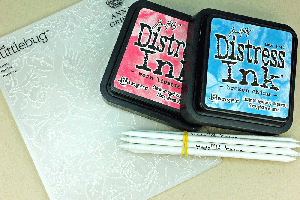
  • White cardstock or smooth watercolor paper
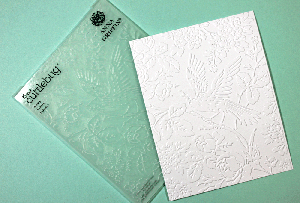
  • Embossing folder (Anna Griffin Aviary by Cuttlebug used here)
  • Die cutting/ embossing machine
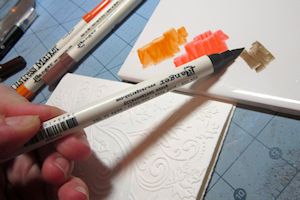
  • Coloring medium (Ranger Distress Inks used here)
  • Paper stumps or a blender pen
  • Other supplies as needed to complete the card

Step-by-Step

  1. Step 1

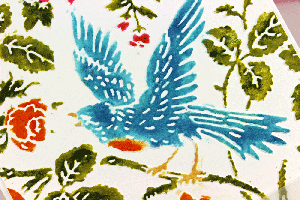
    Trim a piece of white card stock to 4.25" x 5.5" and emboss with an embossing folder according to your machine's instructions.

  2. Step 2

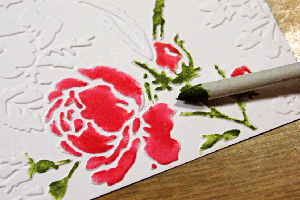
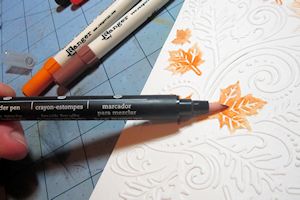
    Apply the flat side of the tip of a paper blending stump to an ink pad to lift color. Begin with a lighter shade as a base coat of color, then use a darker color to add shading and depth if desired. For fine areas (like the stems here) use the very tip of the nib.

    TIP:

    Hold the blending stump further back to give the flat side of the tip a better angle for coloring the raised areas.
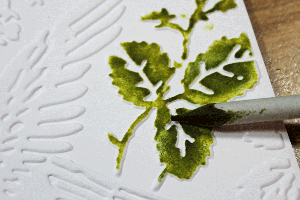
  3. Step 3

    To switch colors use a different paper stump or the opposite end. If you want to use the same paper stump, sand the end down to a fresh point. (See video for tips on cleaning and sharpening stumps.)

  4. Step 4

    Work across the entire image until coloring is complete.

  5. Step 5

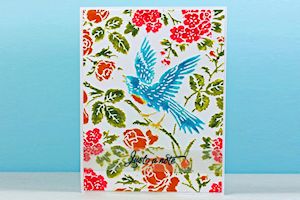
    Trim the panel to fit your card base and complete the card.

Video!

Variations

  1. For a watercolored look, create a palette using dye inks or water-based markers. Chalks or PanPastels can also be used.

  2. Use a blender pen to lift and apply color to the embossed images (Stampin' Up! Blender Pen used here).

Your Turn

You've seen the tutorial, now you try it! We've got a section of the gallery set aside for Colored Dry Embossing. Try this technique, then upload your artwork to the gallery. Show us your creations!

***Please note - Internet Explorer/Edge is not a supported browser, and will not allow you to see the videos. Please use Chrome, Firefox or Safari to view our tutorial videos.

Questions and Comments

We'd love to get your feedback or questions. Leave your comment below.

Hi, What is a paper stump and where do you get them? Can you make your own? This is the first time I've left a comment......I simply love your site, can hardly wait for Wed. morining to come Thanks so much for providing us with all your woderful techniques. CMC
Carol  |  Wed Aug 27, 2014 at 5:18 AM
Very nice technique. --and I also ask "what is a paper stump?
Thanks.
Carol Herrmann  |  Wed Aug 27, 2014 at 6:45 AM
Great little tut! I hadn't thought of directly coloring an embossed piece like this. I have the exact embossing folder and it's gorgeous, so off I go to try this technique! smile
Ambelleina  |  Wed Aug 27, 2014 at 7:41 AM
Great tut---how fun this will be to try today! The paper stumps come in packages of three or four and can be found near Gamsol, or mineral spirits at your crafting stores.
prissequito  |  Wed Aug 27, 2014 at 7:46 AM
Thanks, Jeanne and Dina, for the great tutorial! Beautiful technique!!
CherylQuilts  |  Wed Aug 27, 2014 at 8:20 AM
GREAT tutorial Jeanne!

For those of you asking about paper stumps - here's what they are: http://amzn.to/VNvcnY
lydia  |  Wed Aug 27, 2014 at 8:40 AM
Hmmm - my link isn't working - try this:

For those of you asking about paper stumps - here's what they are: http://amzn.to/VNvcnY
lydia  |  Wed Aug 27, 2014 at 8:50 AM
I simply love these tutorials, but I'm having a problem, I watch the videos and I seem to have what Jeanne is saying written in very large bold letters all across the screen! I can't see what she is doing, I'm a visual learner so I much prefer to watch the video. Is there something I can do to correct this. Thanks so much
Sue Brunson  |  Wed Aug 27, 2014 at 9:07 AM
Hi Sue - that means you have your closed captions turned on. Just click the little CC on the YouTube player and they will toggle off smile
lydia  |  Wed Aug 27, 2014 at 9:09 AM
Thanks everyone for your sweet comments. This is my first tutorial here and I was so excited to be asked.

RE: Paper Stumps � I got mine at Dick Blick here http://www.dickblick.com/products/gray-paper-stumps/
I�ve also seen them at Hobby Lobby
A paper stump is a stick made from tightly spiral-wound, soft gray paper. If you color with mineral spirits chances are you are already familiar with these. They come in different sizes � I like the 1/8� for detailed areas.
Jeanne Jachna  |  Wed Aug 27, 2014 at 9:28 AM
Love the tutorial can't wait to play! My videos on SCS always come up with closed captioning on and I just click to turn it off. I use paper stumps and mineral spirits with my prismas so I'm good to go. Just need to pick a folder. Decisions, decisions!
muscrat  |  Wed Aug 27, 2014 at 12:51 PM
Thanks so much for this tutorial, I have always had trouble colouring dry embossing but now I see I've been holding my markers/pens wrong, can't wait to have another go, will give the paper stumps a try to.
Margaret Jenks  |  Wed Aug 27, 2014 at 1:20 PM
Wow, LOVE the effect of the colouring on the dry embossing! I had never thought to do something like this. Thanks for the tutorial.

For other posters: you can buy paper stumps at any Art Supplier.
Jocelyn Knight  |  Wed Aug 27, 2014 at 8:34 PM
Love this tutorial. I just bought some EFs with the exact intent of having the raised area colored. I dont do brayering on the EFs well so this is terrific for me! (I was thinking cor'dinations paper that I will sand)

Thank you!
wavejumper  |  Sat Aug 30, 2014 at 7:22 AM
So very lovely effects! Thank you for sharing your tutorial! I had tried this before, but didn't keep the chalks flat :( so it smeared and looked ugliful... Now I know a new way to go about this, so Thank You!
Rosy Newlun  |  Sun Sep 7, 2014 at 12:28 AM
Thanks for sharing this tutorial.I love the finished look!
elizabeth Boggs  |  Wed Oct 22, 2014 at 6:35 PM
YES! I can hardly wait to try this with some Blender Pens! Thanks a bunch for your great tutorial and completely lovely technique!!
Bev Gerard  |  Tue Jan 6, 2015 at 12:52 PM
I love this technique - it has so many possibilities for all seasons -- I see it in the fall especially with leaves and trees -- thank you!
Anne Fletcher  |  Tue Jan 6, 2015 at 2:43 PM
Thx for the tutorial! Very informative
Kathy Burgess  |  Sun Oct 18, 2015 at 2:20 PM
I know this is 8 years old, but I am so excited to try the technique! The tutorial image--just like member cards in the gallery for this tutorial--is gorgeous!
Lara  |  Thu Feb 17, 2022 at 12:23 AM

Page 1 of 1 pages

You need to be logged in to comment

GET OUR NEWSLETTER


Splitcoaststampers's privacy policy