Watercolor Wash
by Beate Johns
Create soft backgrounds with this watercolor technique.
Supplies

- Watercolor brush
- Dye reinker
- Watercolor paper
- Palette
- Water misting bottle
- Stamps
- Waterproof ink
- Watercolor crayons or other coloring mediums
- Adhesive
Step-by-Step
-
Step 1
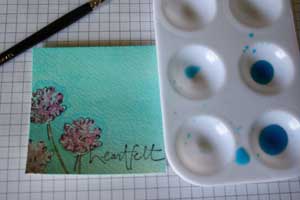
Add a drop of re-inker to the palette.
Add another drop in a second compartment if a gradated wash is desired.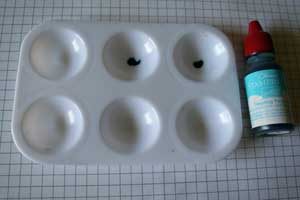
-
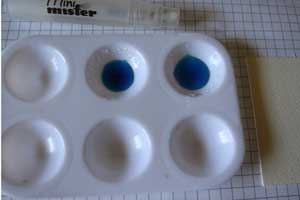
Step 2
Add water to the re-inker. Add more water to one than the other, and mix.
-
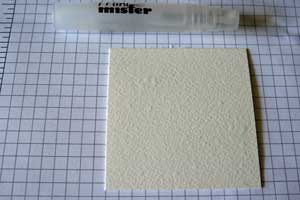
Step 3
Spray watercolor paper with a water misting bottle to dampen the paper. This will help the colors spread and blend.
-
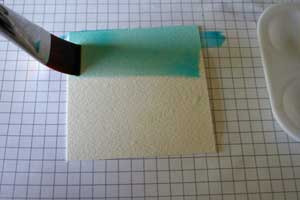
Step 4
Wet a watercolor brush. Dip in the darker re-inker solution.

-
Step 5
Apply ink wash from one side of the watercolor to the other with a single stroke.
Hint:
I am left handed and brush from right to left. Right handed people will probably do the opposite.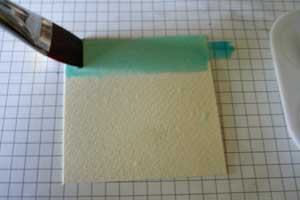
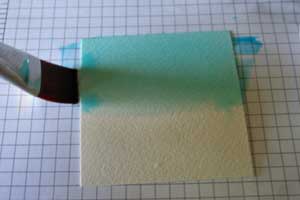
-
Step 6
Dip watercolor brush in re-inker solution and add a second stroke underneath the first. Make sure the brush strokes overlap.
-
Continue adding color.
-
Step 7
Repeat until the entire watercolor paper is covered. Let dry.
Variation:
For a gradated wash, use the darker mixture for the first half of the paper, then continue with the lighter color. Last go over the upper part with just a wet brush to get the lightest color for the bottom of the paper.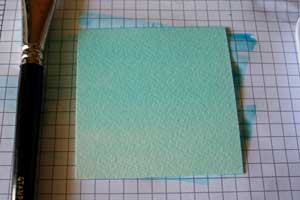
-
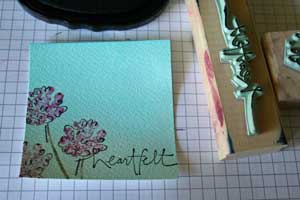
Step 8
Stamp your main image.
Here, Real Red, Pink Passion and Always Artichoke Watercolor Crayons were used with the Wet Watercolor Crayon technique.
-
Step 9
Over-stamp with an outline stamp and add sentiment.
-
Step 10
Add shading with the re-inker mixes and a smaller watercolor brush.
-
Step 11
Finished card.

Video!
Variations
-
Add Resist!
Try adding Embossing Resist or Crayon Resist to your card.
Spray it
There are several Color Wash sprays out to make this technique easier.
Multiple Colors
Add more than one color to your background.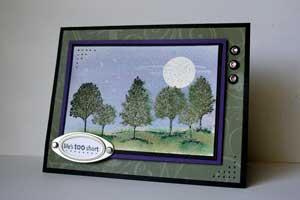
Your Turn
You've seen the tutorial, now you try it! We've got a section of the gallery set aside for Watercolor Wash. Try this technique, then upload your artwork to the gallery. Show us your creations!
***Please note - Internet Explorer/Edge is not a supported browser, and will not allow you to see the videos. Please use Chrome, Firefox or Safari to view our tutorial videos.
Questions and Comments
We'd love to get your feedback or questions. Leave your comment below.
My document margins are: Left-.75 inches, Right & Top-.25 inches, Bottom-.5 inches. (My new printer accepts .25 inches for all margins.)
I then put the whole document into 2 columns. That makes this tutorial only 3 pages when printed. I think this works with all of the tutorials I have saved from SCS. Some people make the pictures too large to fit into the two column format.
Daven - You all do an awesome job keeping up with the tech side of things - Thank You!!!
One stupid question: How did you do the scallops on the heartfelt card?
I embossed the circle for the moon with clear embossing powder. The fog before it is white crayon scribbled on before adding the watercolor wash.
Samantha,
I used Square nestabilities die templates to cut the scallop square.
thank-you
kathi
Thank you for the newsletters I love to open my emails to see what else is new.
Best wishes
Jayejaye
Your work is amazing.
Thanks!
Page 1 of 2 pages 1 2 >