Christmas Tag Wallet

by Brenda Quintana

Create a wallet to hold gift tags.

Supplies

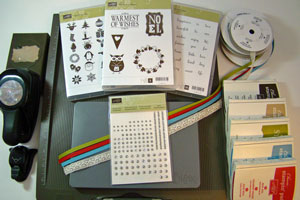
  • One 8 1/2" x 10 3/4" piece of cardstock for wallet
  • One 2 1/2" x 7 15/16" piece of cardstock for belly band
  • Scoring Tool
  • Additional cardstock and patterned paper to decorate wallet and create tags
  • Stamps
  • Ink
  • Embellishments

Step-by-Step

  1. Step 1

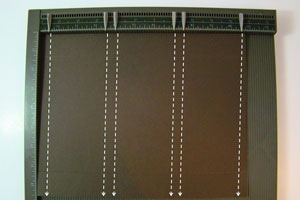
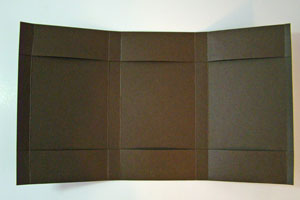
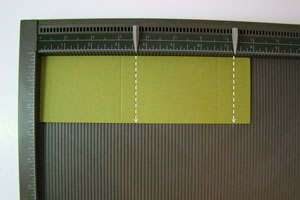
    For the wallet, score the 8 1/2" x 10 3/4" piece of cardstock on the short side at: 1 1/4" and 7 1/4".

  2. Step 2

    On the 10 3/4" side, score at 1/2", 3 1/2", 4" 7", 7 1/2" and 10 1/2",

  3. Step 3

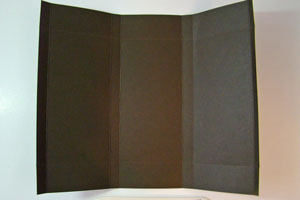
    Fold along all the score lines.

  4. Step 4

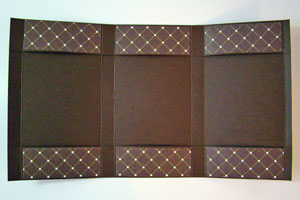
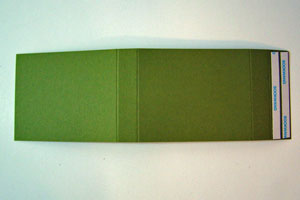
    With one of the long sides towards you, find the 4 small rectangles along the closest edge and the 4 small rectangles on the furthest edge (8 total) and place 1" pieces of Scor-Tape™ on them.
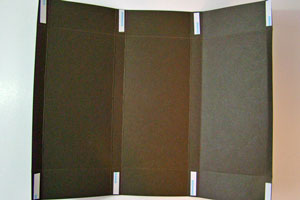
  5. Step 5

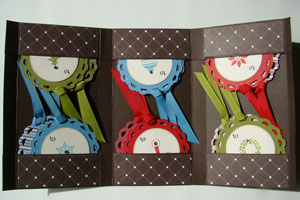
    Remove the Scor-Tape™ liner from one of the long sides and fold inwards. Do the same for the other side. When you are finished you will have 6 pockets (3 top and 3 bottom).

  6. Step 6

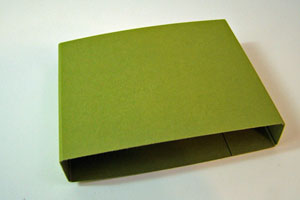
    Decorate pockets with strips of Patterned Paper.

  7. Step 7

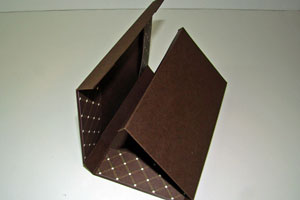
    When folding up the wallet make sure the thinnest scored piece gets folded to the inside first.

  8. Step 8

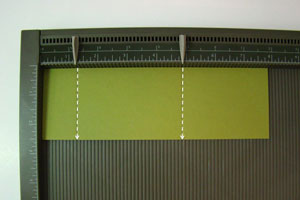
    For the belly band, score the 2 1/2" x 7 15/16" piece of cardstock on the long side at 1 1/4" and 4 7/8".

  9. Step 9

    Turn your project 180 Degrees (the opposite long side), score at 3 5/8" and 7 1/4".

  10. Step 10

    Fold piece in on all score lines. Put two strips of Scor-Tape on the end tab.

  11. Step 11

    Remove the Scor-Tape liner and bring together to form the belly band.

  12. Step 12

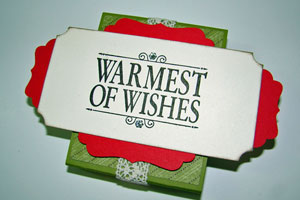
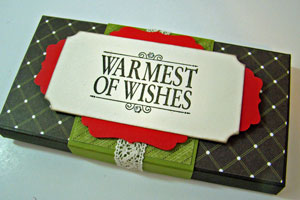
    Decorate belly band as desired.

  13. Step 13

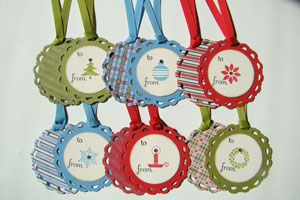
    Make 12 tags in an assortment of colors, stamped images and embellishments.

  14. Step 14

    Place two tags in each pocket.

  15. Step 15

    Fold the wallet and slide the belly band over top to close.

Video!

Your Turn

You've seen the tutorial, now you try it! We've got a section of the gallery set aside for Christmas Tag Wallet. Try this technique, then upload your artwork to the gallery. Show us your creations!

***Please note - Internet Explorer/Edge is not a supported browser, and will not allow you to see the videos. Please use Chrome, Firefox or Safari to view our tutorial videos.

Questions and Comments

We'd love to get your feedback or questions. Leave your comment below.

What a great tutorial.
I'm definately making one of those.
Thanks for sharing.
Gaby  |  Fri Nov 11, 2011 at 7:31 AM
Too cute!!!
Amber Cerda  |  Fri Nov 11, 2011 at 8:35 AM
This project is awesome! I like to give a few customers a little something when they order this time of year and here is the perfect thing! Thank you!
Mary Beth
lutheran  |  Fri Nov 11, 2011 at 9:37 AM
I love it... Going to my scrapping desk right now and start making. Thank you for the inspiration and please don't stop!
Carmen  |  Fri Nov 11, 2011 at 9:42 AM
Brilliant, that makes such a great gift, thanks for sharing!
Viviana  |  Fri Nov 11, 2011 at 10:32 AM
What a wonderful project! Your instructions and photos are very clear and easy to understand, and I can't wait to make one of these--thank you!
Cyndie  |  Fri Nov 11, 2011 at 11:43 AM
Love this!! Will be trying it soon. Was wondering how you got the scallop circle tags made. Is it a die or punches?
nytripletmommy  |  Fri Nov 11, 2011 at 2:34 PM
The Scallop Circle Tags are from the Stampin' Up! Perfect Pennants Die. The inner circle is a 1-3/4" Circle Punch. For a complete supply list, check here:
http://www.splitcoaststampers.com/gallery/photo/2079340
Brenda Quintana  |  Fri Nov 11, 2011 at 3:50 PM
Thanks, Brenda.....just another thing to save up for smile
nytripletmommy  |  Fri Nov 11, 2011 at 5:55 PM
That is adorable. The ideas this year for the holidays are amazing.
Lisa Lara  |  Fri Nov 11, 2011 at 6:34 PM
Great tutorial. I plan on making these for hostess gifts. Thanks!
Nancy  |  Sat Nov 12, 2011 at 5:25 PM
Thanks for the tutorial. I have adapted it for a metric scorepal: (all measurements in cms) Use 1 piece of 22 x 28. Line up short side and score at 3 and 19. Line up long side, score at 2,9,11,18,20 and 27. Follow the tutorial for the rest. For the band use 6 x 20. Score at 1,3 and *. Turn around 180 deg, score at +. The band is a little big and the pockets for the tags are a bit smaller than the tutorial, but you can get the whole project out of one sheet of 12in x 12in paper.
aussieK  |  Sat Nov 12, 2011 at 10:05 PM
AussieK, I'm glad you were able to adapt the tutorial. Thanks for sharing the metric directions with everyone!! smile
Brenda Quintana  |  Sun Nov 13, 2011 at 8:12 AM
Findnig this post. It's just a big piece of luck for me.
Edgar  |  Mon Mar 12, 2012 at 12:58 PM
Absolutely fabulous!!!!! What a great idea to give friends and family. I'm heading to my craft room and start making this adorable project. Thank you so much for your tutorials, Brenda and Beate. You gals make them so easy to follow.
Maria A. Rodriguez  |  Fri Oct 26, 2012 at 6:16 AM
This is so cute! I know just what I want to make it for!
lydia  |  Wed May 15, 2013 at 12:21 PM
Lovely. This is a gr8 tutorial. I will definitely try it out
Bhavisha Patel  |  Wed May 15, 2013 at 12:51 PM
I sooo like this.
Bhavisha Patel  |  Wed May 15, 2013 at 1:01 PM
Testing comments. Ignore. smile
lydia  |  Wed May 15, 2013 at 1:03 PM
Here i am with my trail and it works well
Bhavisha Patel  |  Wed May 15, 2013 at 1:04 PM

Page 1 of 2 pages  1 2 >

You need to be logged in to comment

GET OUR NEWSLETTER


Splitcoaststampers's privacy policy