Christmas Light Favor
by Alex Bleicher
Use the Stampin' Up!® Curvy Keepsake die or our free template to create a pretty Christmas favor.
Supplies
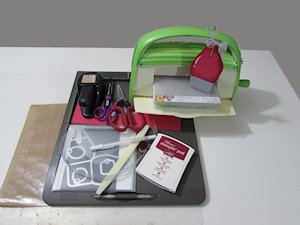
- Curvy Keepsake Die by Stampin' Up!® or downloadable Christmas Light template
- Die cut machine
- Scissors
- Scoring tool
- Bone folder
- Scallop square punch or scallop edge scissors
- Cardstock cut to 11" x 3" in any color (Recollections 65# red used here)
- Silver or grey cardstock, 1 1/4" x 6"
- Sponge or dauber
- Ink to match cardstock (Stampin' Up! Cherry Cobbler ink used here)
- White gel pen (Gelly Roll 08 used here)
- Ribbon, 10" - 12"
Step-by-Step
-
Step 1
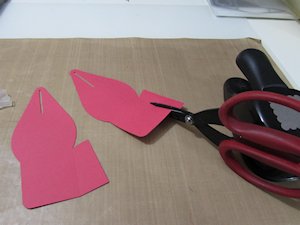
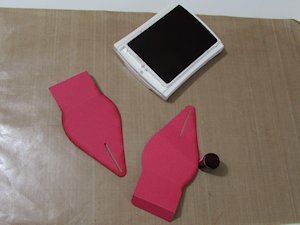
Place the Curvy Keepsake die slightly at an angle and focus on the long pointed side.

-
Die cut 2 shapes from the 11" x 3" strip of cardstock.

-
Step 2
Using scissors, trim the excess from both die cut pieces so only the pointed end and box bottom are left.
-
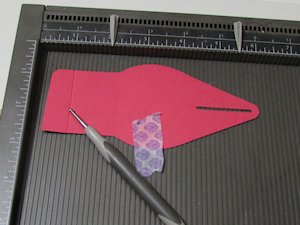
Step 3
Place one cut shape onto the score board, ensuring that the crease is lined up with one of the scoring channels. Score 1 1/4" below crease. Repeat with second die shape.
-
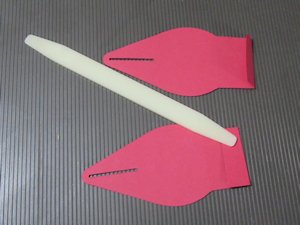
Step 4
Using a bone folder, fold each die shape at the newly created score lines. These flaps will become the bottom of your favor.
-
Step 5
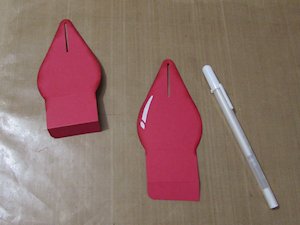
Sponge the edges of the cut shapes with coordinating ink.
-
Step 6
Create a reflection mark on one of the die shapes (front of favor) using a white gel pen.
-
Step 7
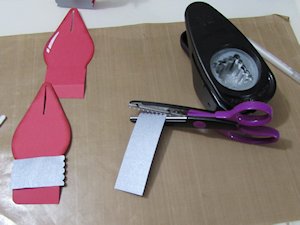
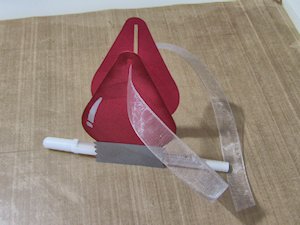
To create the light bulb screw cap, either cut two pieces from the silver cardstock slightly wider than the bottom width of your die shape using scallop edge scissors, or trim them using a scallop square punch.
-
If using the punch, insert only one end into the bottom of the punch as shown, and punch. Mark the correct width on the back of the silver cardstock strip and repeat with the opposite end. Repeat for the second screw cap piece for the back of the favor.

-
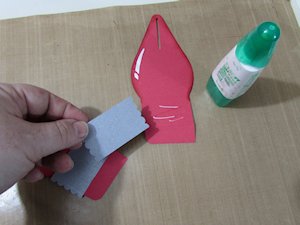
Step 8
Assemble the favor. Attached the screw cap pieces to each die cut between the score line and die crease.
-
Glue together the small flaps at the bottom to create the favor base.

-
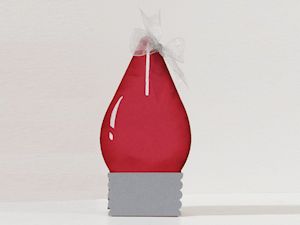
Step 9
Stand the favor upright on your work surface (if needed, place a pen inside to stabilize). Feed ribbon through the slots in both the front and back of the favor and tie a pretty bow. Trim bow tails as desired.
-
Step 10
Tuck in a treat to complete the project for gift giving.
Video!
Variations
-
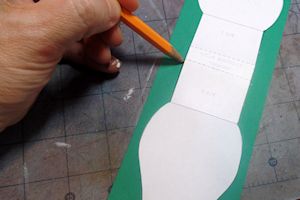
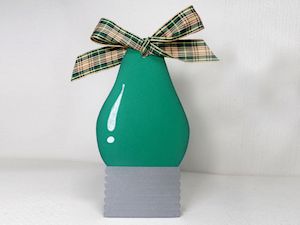
Print and trace the Christmas Light template onto colored cardstock. For a larger base, trace the top portion of the template down to the parallel lines, mark the score line, and then slide the template down to increase the center section.
-
Cut around the outline and score. Punch a hole and thread ribbon through, then decorate as above.
Your Turn
You've seen the tutorial, now you try it! We've got a section of the gallery set aside for Christmas Light Favor. Try this technique, then upload your artwork to the gallery. Show us your creations!
***Please note - Internet Explorer/Edge is not a supported browser, and will not allow you to see the videos. Please use Chrome, Firefox or Safari to view our tutorial videos.

Questions and Comments
We'd love to get your feedback or questions. Leave your comment below.
Also thanks for the template -- I do not own dies or do I plan on getting any. It'll be after Thanksgiving but I will post a picture.
Thanks for sharing...
Page 1 of 1 pages