Punch Around the Page
Brought to you by Martha Stewart Crafts
Coordinating corner and border punches that will create perfect photo and card backgrounds.
Highlights
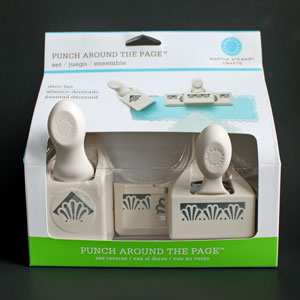


- >Punch set includes coordinating Border and Corner punches.
- >Instructions included in packaging.
- >Both punches have guide wings that fold in for compact storage.
- >Wings feature printed guidelines for easy, continuous punching.
- >Available in several designs.
Product Description
Manufacturer Description
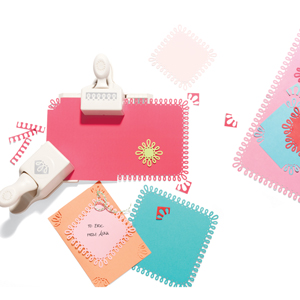
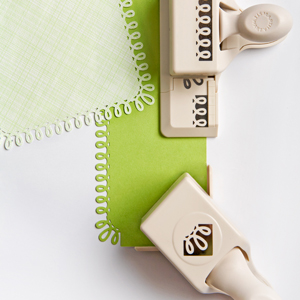
Martha Stewart Crafts presents new coordinating corner and edge punches that feature our Punch Around the Page system. This dynamic duo works together to add a decorative die-cut trim all the way around your cards, scrapbook pages, and other paper crafts. Simply align the corner punch with the corner of the paper, and press down firmly. The edge punch aligns with the corner design to flawlessly continue the pattern beyond the corner and all the way around the page. Once you’ve turned the corner, you’ll never want to go back.
Learn more about the Punch Around the Page set in this video:
Product Description
Each Martha Stewart Punch Around the Page set includes a border punch and coordinating corner punch. Cut your cardstock to a certain size and punch your corners, then borders to create perfect die-cut backgrounds. For easier storage, the guides on both punches fold in. Guidelines are printed on the wings of the border punch to make a continuous punched border easy.
Instructions are included in the packaging, but you can find them here, too!
Punch How-To (PDF, 315KB)
Reviews
-
GOING ALL THE WAY AROUND
By Mary BrownThe month we got to review the new Martha Stewart Punch Around the Page border punch and coordinating corner punch. The first thing I noticed with these punches is that they both actually close up to make them smaller to store easier. With each corner of the corner punch being able to fold in, you can punch a corner on the inside fold of a card. This is really a nice feature. I was concerned when I saw that I would be reviewing the coordinating eyelet [punches] because they are very detailed punches. The reason for my concern is that often very detailed punches can be difficult to punch. I found though, this was not the case. Even though it was very detailed, it was easy to punch. I used the punches to make 40 Christmas cards and didn't have any problems with difficulty punching.
A word of caution when going after the Punch Around the Page concept (now this is going to be a shocker coming from me): READ THE DIRECTIONS! All of the punches seem to be set up for the same set of directions but in order to get it to work ou' around the page, you do need to use the measurements given in the directions. I would recommend storing the directions with your punches so that you don't forget what measurements you need to use.
I did notice that I didn't always get it lined up 100% each and every time. It was VERY close and unless you REALLY looked closely, you wouldn't really notice it. Part of this might of been the detail of this particular punch.
How many times have you wanted to go around a layer of paper with your punch but just couldn't get those corners just right? Well, the Punch Around the Page solves with problem with beautiful, detailed borders and corners. -
Endless Edges
By Rose Ann ReynoldsAdding a fancy edge to the borders of my projects and cards is one of the easiest and quickest ways to add that extra wow factor to designs. I must admit my attraction to these tools, so I was very curious to see how the borders and corner punches worked together.
There are quite a few different styles to choose from, but one thing is for certain. You must follow the enclosed directions if you want everything to line up correctly. The specific sizes are given on the instructions, and you need to remember to punch the corners first. If you do this, you will have beautiful seamless punching all around your page.
Most of the time I only punch a single edge, but I love having the option of making a frame around my whole project. I also love how there are holiday designs to choose from as well as punches for your everyday projects.
I already have three different Punch Around the Page sets in my collection, so I guess that says a lot about how I like these punches! I know I will be getting more in the future too. Santa...are you listening? -
A Perfect Pair of Punches!
By Angel WildePunches are most definitely one of my favorite crafting tools and snowflakes are something I can never seem to get enough of. You can imagine my delight in being able to try out and review the new Martha Stewart Punch Around the Page Aspen Snowflakes.
This punch duo was simple to use and punched easily through both lightweight designer papers as well as cardstock. As soon as the punches arrived, I grabbed a random scrap of paper and started punching. I quickly learned that to create a continuous border and use both of the punches together easily, the paper does have to be measured and cut to one of the sizes listed on the instructions. I don’t see that as a drawback as the sizes are pretty standard and of course, I can use the punches together or separately for elegant corners and one sided borders. I’ll be saving and using the leftover punch outs to embellish my Christmas cards and wintery projects.
My favorite aspect of this product was the built-in space saving feature. The sides easily fold up or in so I have room for even more! -
Perfect Punched Edges
By Beate JohnsI was excited to try out Martha Stewart's new Punch Around the Page sets. I was a bit worried that the intricate pattern would be difficult to punch out of thicker cardstock. No need to worry, though. My punches went through it easily.
Adding a matching corner punch to the border punch is such a wonderful idea. How many times have I tried to use a border punch to create a rectangle or square only to give up because it just didn't quite come together right! Martha makes those tasks a snap. As long as you follow directions and use measurements provided there, your squares and rectangles will look great.
A really cool feature about these punches is that they have fold out wings. The guides will fold into the punch when you are not using them and can be stored standing up. I am always looking for ways to save storage space, and this design surely helps. I really like this concept and the designs that are available. I already bought me a second punch and I am sure that won't be my last! -
Packs a lot of Punch
By Ashley NewellMartha Stewart's Punch Around the Page punches are a great new addition added to the paper craft community. I was able to test out the snowflake and loopy punches. The snowflake punches are perfect for the holidays and the winter season. I liked the snowflakes punches because not only do you get a great decorative edge, but also punched snowflake shapes to use on your projects. The decorative edge punches only punch the border, but you do not get any punched shapes. The punches are versatile and allow you to punch only corners, borders, or around the entire page. The punches are made very well and even punch through heavy-weight cardstock. I really liked how the punches can be folded in for easier storage. If you want to punch around the page, there are measurement restrictions and a crafter must stay within those confines when creating their project. The punches come with instructions on those measurements, but can be a little confusing, in my opinion to follow. There are a wide variety of Punch Around the Page punches to give crafters many options on their crafting designs. I have enjoyed using the punches and recommend them to the paper crafter who likes decorative borders, shapes, and designs.
-
Another Great Product from Martha!
By Jeni AllenI was really excited to use my Martha Stewart Punch Around the Page Punches! I've been seeing them around and have thought that the idea of making punches work around your whole page or card is so smart! I opened the packages and started punching away! The set, including a corner punch with coordinating border punch, is great because you can use them together or separately, so you get a bit of bang for your buck when purchasing these great tools.
I opened the box and started punching away...the border punch is just like other border punches and is great. I really like that the wings of the border punch fold up, making it smaller to store and a bit more compact. I love the designs that Martha Stewart Crafts has created for these punches, no more decorative scissors for me! I love that the border punches are easy to keep straight; I can't cut straight to save my life!
The corner punch of the set is great! It also has wings that come out when you're using it as a corner punch, giving you a guide to set the corner of your paper into. A wonderful feature of the wings on this corner punch is that because both of them fold in and out, it allows you to punch the corner into the top of your card right along the top fold! I think that feature is genius!
Using the punches separately had gone well, but when I started trying to get my corners and borders to match I got really frustrated. There is a piece of paper included in the packaging. Don't throw it away until you read it! Because of the designs of the corner and borders, the paper you are using needs to be a certain size before beginning! If it isn't the right size, your designs won't line up right and you'll get frustrated. Yes, speaking from experience! Once I read the instructions, I was a much happier puncher!
I think these Punch Around the Page punches are great! They are Martha quality and really delightful. I'm sure my collection of them will be growing. The "around the page idea" is just too fun!
Product Gallery
See a gallery of creations made by our review team using products and materials from Martha Stewart Crafts.


Questions and Comments
What do you think? Leave your comments and questions.
I bought a few of these punches and you really have to be aware of the size of paper you are using…I am into card designs so I have to plan out the card (size increments) before I start the card for the punch around treatment. If you are off 1/4 of an inch or a “smidgen”...BOOM it gets botched…practice on scraps to get the hang of it…it is a GREAT IDEA—great new looks and I adore that loopy punch
i was happy to see this review. NOW, i understand the whole concept. the information i had seen didn’t make sense, because no where did it say that the paper must be cut to a certain size. i assumed that, but what size?? i am glad there are instructions! it’s too bad that the instructions are separate and must be saved, but there seems to be no other option.
Rush,
If you ever lose your instructions, we’ve attached them as a ‘how to’ PDF in the paragraph under the video. Just open and print.
what is the paper size to make the smallest loops tag that is shown on todays inklings? thanks,
I’m with Rush. I bought my punches at Walmart after Halloween (50% off). I bought the Spider web, Leaves and dots. I also, didn’t see where it said the paper had to be a certain size. I’m happy you have the instructions and the paper sizes.
Thanks,
Nancy
Beate - Wonderful pictorial review. Easy to use if I could just get the LOOP set. I’ve been going all over town and no one in Sacto. or Folsom has the LOOP set shown in all the videos. Martha doesn’t even have it on her web site and I have not found it anywhere else. Any suggestions. A frustrated fan
Melani Andrews
Great review gals! I just bought a few more of her punches the other day on sale at Michaels! Thanks for the info!
I have a few of these punch sets and I really like them. I used the Fall Leaves punches to frame the sentiment on my Thanksgiving cards.
I bought the loop corner punch today (at my local Michaels) because I really liked the creative way that Rose Ann (CuttersCallous) used it to create a circle. Not sure exactly how she did it, but I think she started with a square. Am I right?
Barbara,
Do you mean the smallest square in the fifth image on top? I would guess that was created by starting with a 3 1/4” square of cardstock, punching all the corners and then one border punch in each center.
Melani,
Try searching on the internet. I bet you can find it there somewhere. That’s how I do all my shopping.
Kathy,
Rose Ann started with a 1 1/2” square and punched each corner.
Hugs and smiles
I just love the idea of punching around a card edge. It is beautiful but I am not sure I can do it. I think I wil give it a try soon. Thanks for all of your tutorials , they really explain things in simple form.
Beate,
Thank you very much for the detailed information about the loop corner punch.
Have a great evening!
Kathy
I am curious to know if any of you have tried the new Fiskars border/corner punches and how you would compare them with the MS PAP’s.
When I was unable to find the MS snowflake border I ended up picking up the Fiskars snowflake one and am crazy happy with it.
for one thing its only one punch - I don’t like the idea of the MS ones being a two piece set…... storage issues….
http://store.scrapbook.com/f-01-005122.html?utm_source=amazon&utm_medium=cpc&utm_campaign=productads&utm_content=f-01-005122
Tammy
Tammy, The end result is a matter of personal preference.
I have a few of both the Fiskars border/corner punches and the MS PATP punches. I like using both brands. Both products have specific size instructions. With the Fiskars punches, there is still paper surrounding the design while with the MS PATP punches, the design is the edge of the paper. (Not sure if I’m explaining this correctly.) In my opinion, the MS PATP corner punches offer more versatility. Using the Loop corner punch, Rose Ann was able to create a circle. I don’t believe this is possible with the Fiskars border/corner punches, but I’m not as creative and talented as many of you are.
Hope this is helpful to you.
I sat in on the EK focus group for these last spring, before their release, and last week, with the release of the deep duos.
Last spring I was so so about them, and enjoyed the concept but the mesuring is way off for a card size and so so for scrapbook size for good bordering was a bit too much.
The new extra deep are about 2 inches deep This means on a card front, you would lose most of the space to work with. I like them with the one edge, top or open end. and am in love with the HAPPY BIRTHDAY punch, which is in the same catagory but no corner punch. The PLUS is that 12 ” is one of the sizes for this sized punch.
As for the measuring. The demos we worked with has the mexurements on a sticker on the punch, GREAT IDEA.
I am going to sticker every punch I have, with these, so I know the size papers for perfect around the card, square or rectangle.
I goofed up a couple times with the fan one, but found that just by punching a matching piece of cardstock and patching it in, no one even noticed it.
I may be a bit anal… but my question is this… with regard to using these two MS punches to go around the corner and all 4 sides ... do they come with instructions as to the different dimensions that will give you the exact results you show here with a 5” square? I can’t see that they would match up very well at the corners unless you’re pretty precise, right?
I’ve had real difficultly getting detailed Martha Stewart punches to punch throgh paper properly. It is not a matter of my strength, but rather a design flaw. My husband had a look at one of them , and showed me how I could make the punch actually punch through paper by using light/medium taps on the top of the punch with a rubber mallet. Be careful if you resort to that as I have .. and don’t tap on the handle , but rather right above the area of the punch that is supposed to punch.
I’d purchase more of them - but with caution as they do not always punch as they should.
I am not an SU demo, but I do find SU!punches much more reliable in punching ability.
SUPER BRAVO MD
I purchased the snowflake pair to punch around the page; however, much to my dismay, I could not get the punch to go thru the paper I was using (neenah 110) and had to change to a thinner paper to make it punch. Other than that, I really like the idea of being able to punch around the page.
@Gloria: I had the same problem with the snowflake punch set.
Am extremely upset right now because before I could even use the loop set, our resident poltergeist has moved it and I can’t find it. If only it had moved one of the Martha punches that are not applicable right now for Christmas cards, like all the Halloween ones I got after Halloween for $1.09 and $1.59 each…..it had to take that one. No doubt, after Christmas, I will find it where the poltergiest hid it and go “Aha, that’s where it was!”
This poltergiest has been in residence at my house for at least 20 years, ever since I started stamping and has really gotten very active now that stamping supplies are EVERYWHERE. Wonder if it will bother the next people to live in this house or it will go with us if we move? vbg
I’m in with some of the others that have had problems with the snowflake border not punching & just returned it to Michaels tonight. I have noticed that the small, detailed border punches she has don’t seem to work all that well either that or I haven’t had the best of luck with those types since this is the 3rd time I’ve returned a border stamp of hers, but I have 4 others that work great which aren’t detailed as much.
I posted a question about this technique but don’t see it or any response… or anyone else’s comments/responses… what am I doing wrong?
Hey Beate… My question was answered when I found the pdf above… it gives the exact measurements for several different sizes so that you get the same great results as your 5” sample… others might be interested in finding this link more easily… Have a wonderful Christmas… BTW… where do the questions and comments show up? I’m not seeing any of them at the end of the resource page… should I be lookin g somewhere else? I thought they’d show up there…
Tried to pull up tutorial on “Punch around the corner”.... Would not come up.
Your card was simply beautiful!
I’m leaving this comment on the puncharoundthepage tutorial page.
I would like to learn view the tutorial punch around the edge and corner.
Susan,
Click HERE to see the tutorial.
Why can I not access the Stampin Up Catalog & Minis?
Splitcoast is my resource for new materials as well as my inspiration for ideas. I have benefitted from it from way back when Stampin Up products were its main focus. I love how it has grown, and yet has not compromised its original intent. Since I live in an area with poor access to papercraft stores, it is my starting point for buying on line and for how-to information. I cannot believe the generosity of those who so freely offer their knowledge and expertise.
I would like to know if there is some technique when using a punch around the outside of a square or rectangle to make the corners line up and be symmetrical?? (or at least look alike?)
Learn How - punch perfect borders and corners - Punch Around the Page
I clicked on this link and nothing happened, except that I arrived at THIS page asking for a comment. Could you perhaps let me know how to get to the tutorial for punching around the page?
Thanks a bunch!
Angela
I’m trying to reach the easel card gallery and keep getting the message that I don’t have permission for it. (???) I reached the tutorial fine.
Help, please.
Joanne
H! I just received the new punch from SU sale-a-bration, and I can’t seem to figure out how to punch the corners accurately!?!? I have tried using the guide marker, but can’t seem to get it right…HELP!
http://puttinondaglitz.blogspot.com/2009/12/pinking-hearts-how-to-video.html
video on how to use the new punches…. she has some good tips! especially for punching all the way around! =) r
Loved the punch around the page tutorial!
I love my punch-around-the-page set.
Before I punched for the first time, I made a rectangle that precisely matched the measurements in the instructions and, then, I used that rectangle to paint two guide lines on my guillotine-style paper cutter. Now, I just align the edges of my papers with the guidelines that I painted and I can quickly make rectangles (and two different sizes of squares) that are suitable for the punch-around-the-page set.
how do i get the page size guide for the deep edge punch as seem to have mislaid mine and feel sure the size may be different to the above guide that is there? can you help?
thanks.
I will be in New York in the middle of July and would like to purchase some punches, where can I do this.
That’s cool that we are able to receive the loan and this opens new chances.
At present time, there are not a lot of college students, who finish term papers by their own, simply because it is better to utilize the online essays service.
Does anyone know where I can get the edge punch for Fall Leaves. It is discontinued but thought there might be one around. I purchased the corner punch and would like the edge so I would have the around the page set.
Thank you
Pat
Sorry if someone already told you this, but not all the MS punches have the same cutting measurements! The wild flowers, for example, runs in even incriments of 2 inches, rather than the measurements in your PDF. If someone tries to use those PDF measurements, it won’t work.
I just align the edges of my papers with the guidelines that I painted and I can quickly make rectangles (and two different sizes of squares) that are suitable for the punch-around-the-page set.
What is the benefits of this products??
How and where can we apply this one?
Regards@ Dementia
Hello dear if you need Hammock dont hesitate to visit our site.We sell metal arc hammock stand, jumbo hammock and another hammock.