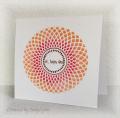
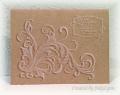
This is a card I made for an online card class I'm participating in. The focus of the class is one layer cards. This lesson demonstrated masking and stenciling or stamping to create a feeling of depth on a one layer card.
I cut a piece of plain paper an inch larger than my card and placed the circle dies in the middle to form a doughnut and cut my masks. The piece from the center of the doughnut was centered and adhered with temporary adhesive. The doughnut was placed next, aligning to the center piece, and the square aligned with that and taped to my work surface with removable tape. The doughnut was removed, the stencil placed where I wanted it and taped down, also with removable tape.
After sponging ink through the stencil, I shifted it slightly and sponged Unicorn, thinking to create a ghost effect. Unfortunately, the sponged picked up the ink on the stencil and transferred it to the clean areas.
Removed the stencil, outlined the mask in the doughnut hole with a black extra fine Micron pen and removed it. Put back the stencil and colored in the small diamonds and stamped the greeting. Shadowed the diamonds with red extra fine pen and orange Stardust pen and traced over the greeting and circle with the same pen. Misted with Shimmer spritz and removed the outer mask. DONE! Whew...
As always, thanks for looking!
Date: Thursday, March 13, 2014 GMT Views: 1948
Favorited:3
Ink: VersaFIne Onyx Black, Hero Arts Cantaloupe, Distress Wild Honey and Festive Berries
Accessories: TCW Mini Solace stencil, SB Grand & Standard Circles dies, red & black extra fine point markers, orange Gelly Roll Stardust pen, Pssst Shimmer Spritz - Sparkle