This is another February Sneak Peek for a great new stamp set from Clear Dollar Stamps. You won't believe this...but there are 45 stamps in this set! That's right! 45 Stamps! Wowza!!
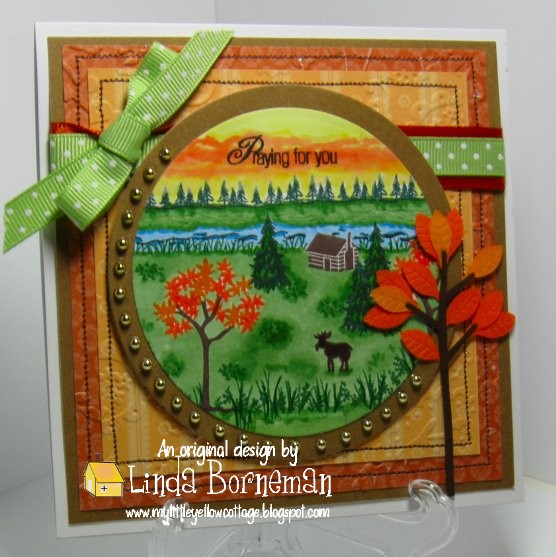
This card was a joy to make and incorporates Copic (alcohol ink) coloring and blending in conjunction with traditional stamping. I loved inking up all the individual stamps to create this Fall mountain scene. Using "Mini Silhouette Scapes" stamp set again, I wanted to get that cool, crisp and autumn feel to the card and couldn't wait to ink Mr. Moose. After stamping with inkpads, I was able to fill in the grass and backgrounds with Copic coloring and blending. I really like the combination of stamping and copic coloring and the end result! I know that you'll love playing with "Mini Silhouette Scapes", to be released February 1st. Special thanks to my good friend, Traci Major for the cute "Jolee's by You" tree embellishment.
INSTRUCTIONS:
A 5" x 5" card base was cut from Paper Trey White Cardstock and set aside. Three large square mats were cut to size: Brown - 4.75" x 4.75, Pumpkin 4.5" x 4.5", Apricot 4" x 4". The pumpkin mat was run through the Cuttlebug using the Stylized Flowers embossing folder and the pumpkin mat was run through the Cuttlebug, using the Perfect Paisley embossing folder, for texture. The three square mats were then glued together, and the using my Janome Hello Kitty ; ) Sewing Machine, I machine stitched around the 4 sides of the pumpkin and apricot mats, setting aside.
The main image is a handstamped, uniquely created scene using Clear Dollar Stamps "Mini Silhouette Scapes" Stamp Set. This stamp set is amazing as far as creative possibilities! The scene was stamped using various Stampin' Up! ink pad colors (as listed above), and the river and background was drawn and colored in using Copic Sketch Markers. Using a watercolor pen and Stampin' Up! Re-Inkers, I created the watercolor sunset sky above the scenery. The sentiment is from Clear Dollar Stamps "Pretty Little Scriptures" and was overstamped on the sky using Stazon Black Ink. The main image circle was then glued to the larger brown circular mat.
The stamped image was cut out using the Nestabilities Regular Round Die, as well as the Brown stamped image mat. I created a stacked ribbon out of Offray Rust Satin Ribbon and Offray Green Polka Dotted Grosgrain Ribbon, by using Duck Easy Stick Adhesive (my favorite tape runner!). The stacked ribbon was run across the upper part of the 3 sewn square mats and secured to the back of the card. Using Dimensionals, I popped up the matted stamped image overtop the ribbon on the card front. I embellished, tying a matching Offray Green Polka Dotted Grosgrain Ribbon to the ribbon strip. Using Michael's Self-Adhesive Gold Beads, I embellished the circular brown mat in a half circle, leading the eye to the Jolee's by You coordinated Tree Embellishment on the right hand corner of the card, which was adhered to the card front, as well. To finish, the card front was glued to the 5" x 5" white cardstock base.
Date: Thursday, January 29, 2009 GMT Views: 694
Favorited:6
Registered: March 11, 2008 Location: Sacramento, California Posts: 39766
Thu, Jan 29, 2009 @ 3:00 PM
WOW! What a pretty little scene here! Super job coloring it too! Love it! TFS :0)
------------------------------ Cathy B aka: Mutnik ....or is it Nutmeg?! I get so confused!
Smile.......people will wonder what you are up to! :0) Proud Fan Club Member 2010 DT forRubbernecker Stamps My Gallery