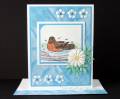
Measurements: image panel – 2 5/8 x 2 3/8” plus 3/32 and 1/8” borders, corner to corner panel is 1 ½” wide
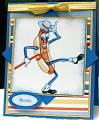
The image is colored with watercolor pencils, water and artist brush.
To give the all the flowers a raised 3D appearance embossing was done using a metal ball stylus and a folded paper towel for cushion. First score lines on the front then turn the punched shape/image over and make circular motions with the stylus staying away from the edges and score lines.
The gems are attached with AleeneÂ’s Paper Glaze (any lacquer product will work). To make the process fast and easy I squeeze a drop of lacquer onto a waxed paper (I repurpose the paper that stickers and labels are purchased on), touch the end of a large corsage pin to the lacquer then to the back of the embellishment which picks it up, position it on the card and press down with a finger, there is a little time to slide the embellishment into position if needed before it sticks tight.
Stickles was applied to the water drops, fern leaves and the daisy flower.
The stitching was done with the sewing machine.
Images from Shady Tree Studio This is a sneak peek of a set that will be released this week named Backyard Springtime.
Paper: Canson watercolor paper, white textured, K&Company blue, Over the Moon Press designer papers
Ink: StazOn – Jet Black
Accessories: Gallery watercolor pencils, Stickles, gems, Aleene’s tacky glue and Paper Glaze, K&Company daisy, tools – Fiskars border punch for the blue flower center, EK Success small flower punch, Martha Stewart Frond and Branch punch, metal ball stylus, sewing