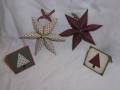
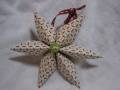
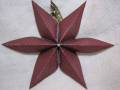
The link for the tutorial I followed to make the star ornaments is http://www.scraplovers.com/forum/showthread.php?t=6245. Basically you just take a 6" x 6" square of paper, score at 1" intervals, fold accordian style, and put a staple in the middle. Then while it's still folded up you trim both ends to a point. Put a little sticky strip near the staple on both sides, fan it out, and stick it together (my directions don't do it much justice -- visit the tutorial via the link for a much better description).
Then for one of the stars, I took a button, threaded it with raffia, and attached it with a glue dot.
For the other star, I tried to add some glimmer by taking my versamarker and highlighting the folds (both the valleys and the hills), sprinkled it with heat and stick powder, heated it, sprinkled it with glitter, and set it again with the heat gun. I don't think I like the glitter in the "valleys". But I do like the shimmer it gives on the outer folds (the "hills"). If I had to do it again, I wouldn't put any in the inner creases. I also adhered a bead in the middle with crystal effects.
For both stars I punched a hole in the back and threaded through stitched grosgrain ribbon as a hanger.
I will use these stars as package toppers for my Christmas gifts.
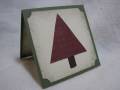
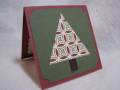
With the leftover triangle scraps from making the star ornaments, I made matching gift tags (2.75" square). The trunks of the trees are chocolate grosgrain ribbon.
To follow are links for close up views of each item (please see the specific links for the "ingredient" details):
Registered: January 27, 2006 Location: Clovis, CA Posts: 86
Wed, Dec 06, 2006 @ 9:54 AM
These are wonderful thank you for sharing I am going to have to make some for in my club this month!
thanks for all the details I love easy and beautiful!