The 1st thing I did after receiving my Clarity brushes was to view a YouTube Video by Understand Blue (Lydia) (4:32). Lydia's video was so very helpful.
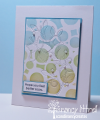
I used Arches Hot Press Watercolor paper. I then taped my ARTplorations "Bubbles" stencil over my paper using my favorite 3M masking tape. I am using the 3 smallest brushes for the 3 color families, then all you do is wipe your brush across scratch paper before you change to the next color family.
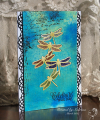
Using Lydia's technique I loaded my brush with Tim Holtz Distress Inks; Scattered Straw and Fossilized Amber using a swiping across technique until I was happy with the look. Then did the same with Mowed Lawn using the same brush and overlapping the yellow and greens to blend. Next I used the 2nd brush using Broken China again over lapping the green and blue to blend. The brush gives a much softer look than blending tools, sponges and sponge daubers with no lines or marks. Very soft and pretty I think. For darker coloring blending tools are best I think to use over stencils.
I then took my stenciled layer and die cut my Memory Box "Vignette Floral Branch" Die. It is a pretty intricate die, so I used the inlaid technique of just placing the die cut image back into the stenciled layer (just like placing a puzzle piece), turned the layer over and scotch taped the entire back to hold the die in place.
Next I used 3M foam tape to pop the piece over a layer of SU Marina Mist CS creating a very thin colored frame. My only embellishments were tiny SU pearls in the center of each flower and a stamped and popped up sentiment from the retired SU "Kind and Caring Thoughts". I was so happy with my 1st Clarity Brushes project. Hope you like it too.
We would love to have you join our April CAS (Clean and Simple) Mix Up Inlaid Die-Cutting Challenge. You have until April 24th to play along. Happy Stamping..Hugs.
Date: Saturday, April 1, 2017 GMT Views: 827
Favorited:0