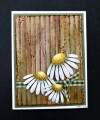
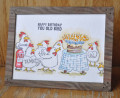
My fisrt attempt at the faux wood technique. I did it a little different though. I used Saran Wrap. I was very pleased with the outcome. I'm going to show this at my stamp camp. How do you like it?
Date: Monday, February 28, 2005 GMT Views: 1010
Favorited:27
Registered: March 18, 2004 Location: New Hampshire Posts: 7021
Mon, Feb 28, 2005 @ 4:47 PM
It looks real! Great job!
------------------------------ "Life is much too important to be taken seriously." Oscar Wilde Proud to be a member of Mo's Digital Pencil Challenge DT! My BlogMy Gallery
Registered: December 3, 2004 Location: Bourbonnais,IL Posts: 8349
Mon, Feb 28, 2005 @ 4:49 PM
Awesome job! I love the look!
------------------------------
Kim
"We must not, in trying to think about how we can make a big difference, ignore the small daily differences we can make which, over time, add up to big differences that we often cannot foresee."
Registered: June 12, 2004 Location: Lakeland, FL Posts: 302
Tue, Mar 01, 2005 @ 2:39 PM
Hi Ladies, thanks for all the wonderful comments. As I said in my description, I used saran wrap. After wadding some up and putting a rubberband around the top to make a handle/knob, I first dabbed it in creamy caramel ink. Then, I put in onto the US Vanilla cardstock and dragged it across for about three inches. Next I inked it up again and repeated until reaching the endof my cardstock. The nest color of in was close to cocoa and I did the same steps. The last ink color was baroque burgandy, but I did't use very much of this ink as I wanted just a small amount of burgandy color on my "wood". You need to practice dragging the inked up saran wrap to see just how much pressure you'll need to apply to the cardstock. After I achieved the look I wanted, I cut it into 1/2" strips and went around all the edges with the brush end of the chocolate chip marker. What looks like nails is where I used the fine tip of the chocolate chip marker and just made a dot. Hope this helps.