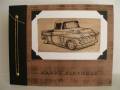
I'm not real happy about the way the top of this turned out because I had to piece in the top layer. I was working with a limited amount of paper. I just LOVE this decorative paper, both sides! That's what made it so limited. When I covered it I did remove the front latch, top and bottom but I didn't remove the hinges. I was able to work around the bottom one and the top one was not in my way. When I put the front latch back on I did use a bit of glue on the little nail before I pounded it in place. I tied some white grosgrain ribbon around the box and tied on some pink for a splash of color. I was thinking about adding a colored button to the top of the box but I don't have any of the darker pink in the larger size so for now it sits without it until my order comes! The glass comes out and I do recommend you take it out and clean it. It's pretty cloudy when you buy them. Stamp your image, color and decorate it as you like and put it in the lid of the box. It's a quick and simple project.
These boxes are at Michael's for 99 cents! (49 cents when they are on sale!).
Check out my Blog "My Creative Corner"!
It's a great place for ideas for Hostess Gifts, Make & Takes, Stamp Camps and Craft Fairs! http://starlightstamper.blogspot.com/
Date: Tuesday, March 13, 2007 GMT Views: 371
Favorited:5