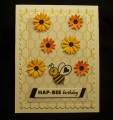
I kept her general layout with the individual elementS on the main panel. I changed the flower images to die cut flowers, changed the sentiment and changed the cardstock colors.
I want to give credit to a blogger named Carol McFarland whose card also inspired me. The cute name of her blog is sawitlovedithadtomakeit.
I sponged yellow and orange ink onto white cardstock and then die cut the flowers. I punched a black cardstock center for each flower and fussy cut a clipart bumblebee. These were mounted on vellum which was die cut slightly smaller than the stamped and die cut background panel. I glued each element to the vellum. To attach the vellum, I added adhesive only in the area directly behind each element. The sentiment was computer generated and die cut. I adjusted the die to make a longer black die cut to mount behind the sentiment.
Date: Tuesday, August 22, 2023 GMT Views: 240
Favorited:0
Registered: March 13, 2011 Location: Langley, B.C. Canada Posts: 32131
Tue, Aug 22, 2023 @ 10:24 AM
That chicken wire background stamp is just the best! Love your mix of the two flower dies and your colors. The clip art bee is so cute and that sentiment is fun! I really like how you did that sentiment with the angled strips and your two colors of white and black!
Registered: February 19, 2011 Location: Fullerton, CA Posts: 15293
Tue, Aug 22, 2023 @ 10:46 AM
Love your take on the inspiration card. Changing her circles to the individual die cut flowers and that adorable see was very creative. Love the wire mesh for the bg as well as the velum panel. This all came together so well...Such a fun, happy card. Love it.