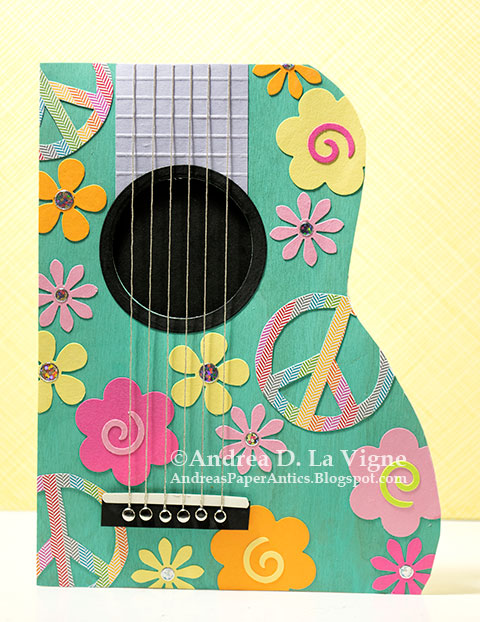
My uncle's birthday is coming up soon. He had posted a photo on Facebook of a guitar he had painted with hippie designs & colors. He loves music, and he & his wife sing at several local senior centers, veterans centers, etc. So I decided this guitar card idea would be perfect for him!
I don't have any "flower power" or peace symbol type stamps or dies, but I have a few old flower punches from The Paper Studio, EK Success, & Marvy Uchida that have a groovy vibe to them. I found a peace symbol photo file on Pixabay.com, and downloaded that to use.
Because my punches are on the medium/larger side, I had to adjust the size of my card. I printed the template from the tutorial, scanned that into my computer, & opened it in Photoshop. I resized it so it was 7" high, which made it a little more than 5" wide. I added a thin border, to give me the top & left side cut lines, & printed it out onto plain copy paper. I also sized & printed the peace symbol to use as a template.
I used cherry wood veneer paper for my card front. I adhered the template face down to the back of my paper with repositionable adhesive, & cut around it with scissors. I scored & folded a sheet of heavyweight cardstock for my card base, making it a full 5-1/2x8-1/2". Then I lined up my card front with the bottom & left sides of the card base, & traced around the shape. I used scissors to cut the excess off my card base.
I added a coat of teal acrylic craft paint to my card front, which my uncle had done with his guitar. For the peace symbols, I traced over the template with a black pen, to make the lines darker, & traced that 3 times onto the back of my patterned paper. I used my light box to help me see through the paper. I cut out the center bits with a craft knife, then cut around the perimeter of each with my scissors.
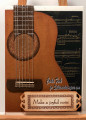
I punched several flowers & a few swirls from various bright colors of cardstock. I die cut the hole in my card front, & also a black cardstock frame to go around it. I added a piece of light purple cardstock that I had scored for the neck of the guitar, and glued on my circle frame. I used a strip of black cardstock for the bridge, just cutting it with my paper trimmer. I pierced holes in the bridge, threaded some silver embroidery floss through each, & added my brads. After I adhered that to the card front with foam tape, I wrapped the floss around the top of the card front & adhered it in place on the back side. I glued my frame around the hole, then it was time to decorate.
I glued the swirl pieces to the centers of the largest flowers. I glued my peace symbols to the card front first, in a visual triangle, since they were the largest element. Then I added my flowers, letting some hang off the edge, and avoiding the bridge, circle frame, & neck areas.
I added the saddle that I cut from ivory cardstock between the strings & the bridge. Even though the tutorial said you didn't have to glue that in place, I added a bit of glue under each end, just to be sure it stayed put. I trimmed off all the overhanging bits of my flowers & peace symbols. I added a scrap of black cardstock to the front of my card base where it would show through the hole, & then foam mounted my card front to the card base. I decided the design was too busy for a greeting--which I had frankly forgotten to leave space for--so I just didn't add one. Finally I added a Dazzler sticker to the center of each of the smaller flowers. I'm sure my uncle will get a kick out of this!
Date: Tuesday, March 2, 2021 GMT Views: 408
Favorited:3
Accessories: Flower & swirl punches; We R Memory Keepers "Nested Circles" die; Waffle Flower "Additional Circles" die; Silver mini brads; Hot off the Press Dazzlers stickers