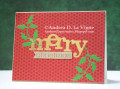
I decided to resurrect a technique I learned in an old Online Card Classes class--layered die cut inlay. This steps up die cut inlay a notch, and does require a bit of concentration & focus, kind of like masking in stamping.
I die cut the "merry" from my patterned paper panel first. I made sure to keep all the inside pieces, for when I did the inlay. Next, I laid a gold die cut "merry" into the opening in my panel, and taped it on the back. I cut the holy branch, overlapping the "m" in merry. Again, I made sure to keep every little piece. To do that, before I removed the die from the panel, I taped on the back of where it had cut with painter's tape, to hold all the pieces in place. Then I carefully removed the die, peeled off the tape with all the bits stuck to it, and set that aside. I repeated that process for the holly on the other end of the word.
I cut a piece of green cardstock the same size as my patterned paper panel. I added Stick It adhesive to one side, peeled off the release paper, and adhered my top panel to that. This left solid adhesive behind the openings for my inlay pieces. I adhered the largest part of the "merry" die cut into place, just tapping it down lightly until I'd positioned everything. I added the holly branches, the remaining pieces of the "m," and the inside pieces of the "e." Once I'd finagled all the pieces into place, I ran it through my die cutting machine with no dies, to press everything together firmly.
I stamped "Christmas" onto a strip of beige cardstock, & heat embossed with gold, to play off the gold merry. I flagged one end, and glued it to my card. I trimmed my panel down just slightly, matted it with more of the same beige cardstock, & adhered it to a white card base.
Date: Thursday, November 19, 2020 GMT Views: 1546
Favorited:3